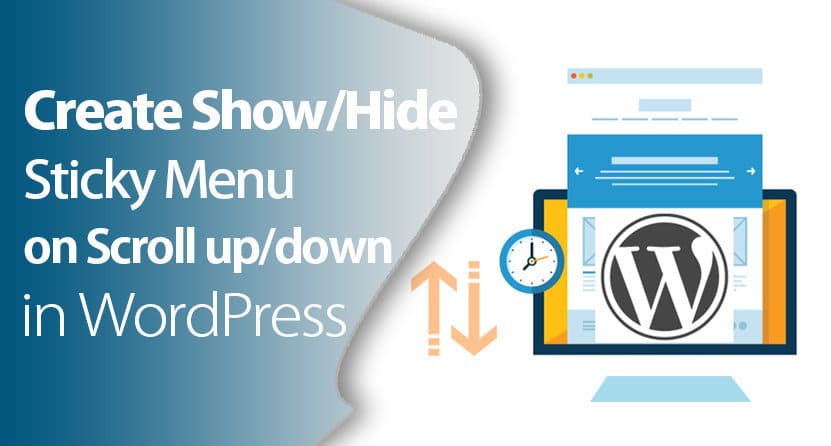
Implementing a Sticky Menu with Scroll-to-Top Functionality in WordPress Without Using a Plugin, in the realm of modern websites and premium WordPress themes, you might have come across a captivating design trend where the header remains fixed and elegantly reveals or conceals itself as you scroll upwards or downwards. This results in a visually pleasing navigation experience, placing navigation menus at the forefront. Such a feature holds immense value for websites, particularly those with extensive content such as lengthy posts or pages. It bestows users with a swift navigation avenue, thereby enhancing the overall user experience.
Within this discourse, you will uncover the methodology to incorporate this dynamic behavior into your WordPress site without resorting to a third-party plugin. I am dedicatedly delving into intricate aspects of WordPress website functionality, and this endeavor is no exception.
The implementation of a sticky navigation menu can significantly elevate the user experience of your WordPress site. It emerges as a pivotal component, facilitating seamless traversal for website visitors across various pages, devoid of any interruptions. This enhancement not only amplifies the usability and accessibility of your website but also contributes to the refinement of its overall quality.
Creating a Scroll-Activated Show/Hide Sticky Menu in WordPress: Streamlining Navigation for Swift Access
Enhancing Navigation Efficiency: Introducing scroll-triggered show/hide functionality in WordPress Without Plugin to sticky menus empowers visitors with swift and effortless navigation across your web pages. Especially for articles exceeding the 2,000-word mark, where users engage by scrolling through extensive content, this feature serves as a beacon. Once the user’s interaction transitions from reading to navigation, the menu gracefully emerges upon scrolling upward. This seamless action enables users to instantaneously access the menu, guiding them to their desired destinations on your website. Consequently, this immersive experience encourages prolonged visitor engagement, consequently bolstering both user interaction and conversions on your WordPress platform.
Curbing Bounce Rates: The implementation of a streamlined, uncluttered, and easily navigable menu inherently combats bounce rates, contributing to a more engaging website journey. The incorporation of a sticky navigation component plays a pivotal role in achieving this outcome.
Elevating Brand Recognition: Harness the prowess of sticky navigation to prominently display your logo or other visually appealing elements within the header. This strategic placement exponentially amplifies brand recognition, fortifying the identity of your business in the minds of your audience.
Comprehensive Step-by-Step Tutorial: Crafting a Scroll-Responsive Show/Hide Sticky Menu
As you’ve undoubtedly discerned, a sticky menu is a navigational element that seamlessly accompanies you while traversing both upwards and downwards on a webpage. In essence, this entails the navigation panel remaining visible during upward scrolls, while elegantly concealing itself during downward scrolls.
Within the confines of this instructional guide, we shall embark on the creation of a sticky menu that graciously reveals itself upon upward scrolling of the viewport. However, to preserve the fluidity of the content consumption experience, we shall ingeniously conceal the menu during instances of downward page scrolling. The ultimate manifestation of our efforts will result in a meticulously balanced visual presentation. Without further ado, let us commence this enlightening journey:
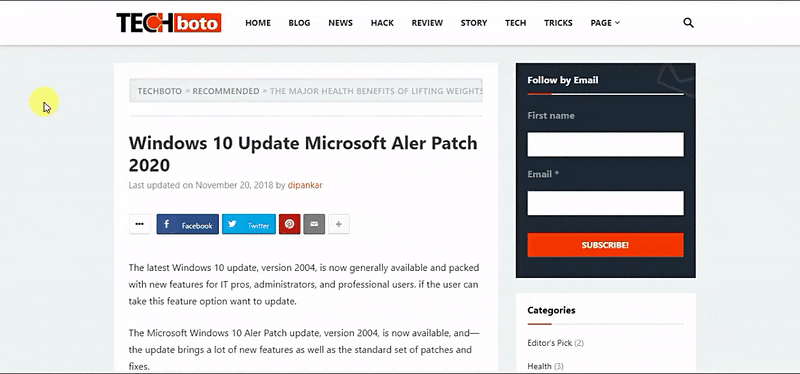
Step 1 – Analyze the Header Section
To initiate the process, right-click on any webpage of your choice and select the “Inspect” option. This will grant you access to the intricate underpinnings of the webpage, encompassing its source code, visual assets such as images, the HTML and CSS components contributing to its aesthetic, as well as the Javascript code that orchestrates dynamic animations and functionalities.
As your first task, navigate to the target website and direct your attention to the encompassing section known as the “header.” Your objective is to locate this pivotal area within the webpage’s structure. For visual guidance, refer to the image provided below:
Next, identify the ‘div’ or ‘header’ section. Within this same section, carefully inspect and determine the presence of any distinctive ‘id’ or ‘class’ attributes. It’s imperative to emphasize that these identifiers must possess uniqueness – refrain from duplicating ‘id’ or ‘class’ values anywhere on the current page. This distinctiveness is paramount.
In the event that you encounter redundant ‘id’ or ‘class’ attributes, you have the option to undertake the following step. Should uniqueness not be established, proceed to generate a new class (employ any preferred name) and integrate it into your theme’s ‘header.php’ file. To accomplish this, navigate to your Dashboard, access the ‘Appearance’ section, and opt for the ‘Theme Editor.’ Subsequently, locate the ‘header.php’ file within this interface. Within this file, you’ll encounter the section corresponding to the menu bar. At this juncture, incorporate the newly crafted, unique class name (a designation of your choice, but ensuring its uniqueness is upheld).
Please remember to exercise caution and precision during this process to maintain the integrity of your website’s structure and design.
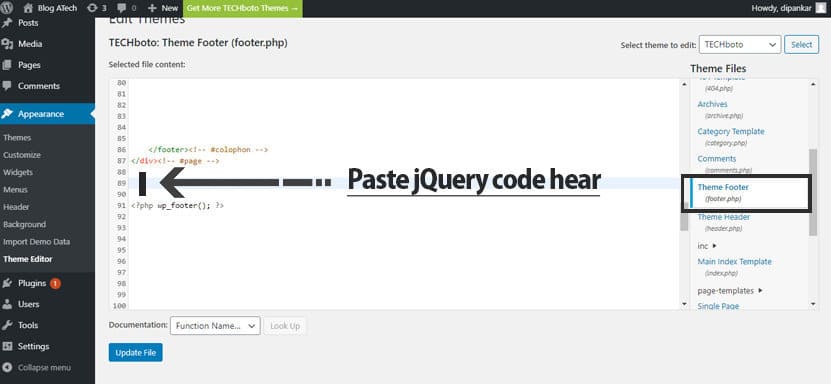
Step 2 – Integrate jQuery Code
At this juncture, we shall engage in an empirical exploration by applying the following code snippet to the selected header section. Having made your choice of ‘id’ or ‘class’ name, proceed to insert the ensuing jQuery code snippet into the ‘footer.php’ file within your theme’s directory. To embark on this endeavor, follow these steps:
- Access the Dashboard Login of your website.
- Navigate to the ‘Appearance’ section.
- Opt for the ‘Theme Editor’ feature.
- Within this interface, pinpoint and open the ‘footer.php’ file.
- Proceed to append the provided jQuery code snippet immediately before the closing </body> tag.
By diligently adhering to these directives, you shall seamlessly infuse the jQuery functionality into your web framework. This dynamic addition is poised to contribute to the envisaged show/hide sticky menu behavior.
<script>
(function($) {
jQuery(window).load(function(){

var prevScrollpos = window.pageYOffset;
window.onscroll = function() {
	if($(window).scrollTop() > 10){
		var currentScrollPos = window.pageYOffset;
	if (prevScrollpos > currentScrollPos) {

// $(".site-header").css('top','0');       // activate this if theme menu like news/ magazines (mega menu type);
$(".site-header").css('position','fixed');
$(".site-header").css('z-index','999');
// $(".site-content").css('padding','105px 0');	   // main content layout section after menu replace unique class or id
$("#masthead").addClass("nav_hi_"); //add unique id/class hear (if id start with '#' or class start with '.');
$(".site-header").addClass("menuset_");

	} else {
	// $(".site-header").css('top','50px');            // activate this if theme menu like news/ magazines (mega menu type);
	$(".site-header").css('position','');
	// $(".site-content").css('padding','');       // main content layout section after menu replace unique class or id
	$("#masthead").removeClass("nav_hi_"); //add unique id/class hear (if id start with '#' or class start with '.');
	$(".site-header").removeClass("menuset_");
	}
	prevScrollpos = currentScrollPos;
}
else{
	$(".navbar-main").css('top','');
	$(".navbar-main").css('position','');
	$("#nav-down").removeClass("nav_hi_");
	$(".navbar-main").removeClass("menuset_");
}
}
});
}(jQuery));
</script>
Step 3 – Link jQuery to the Menu
In this phase, we establish a vital linkage between jQuery and your menu. By meticulously following these instructions, you will seamlessly intertwine the two components. Here’s how you proceed:
- Locate the specific code snippet within your jQuery script.
- Within your ‘footer.php’ file, pinpoint the designated section where you initially placed the jQuery code.
- Identify the segment marked as ‘#masthead’ within the jQuery code. At this juncture, you have two options: a) Replace it with the ‘id’ or ‘class’ name you opted for in the initial step; b) If you’ve created a unique class within ‘header.php,’ utilize that unique class instead of ‘#masthead’.
By methodically executing these directives, you forge a seamless connection between your customized jQuery script and the designated menu component. Reference the accompanying image for clarity and guidance:
Step 4 – Verify the Functionality
Having conscientiously followed the preceding three steps, you are now poised to assess the efficacy of your endeavors. By undertaking this verification process, you will ascertain the successful integration of the jQuery code and confirm the synchronization between your website’s header section and the jQuery script. Here’s the sequence of actions:
- As a preliminary measure, ensure that the jQuery code has been seamlessly incorporated into your ‘footer.php’ file, alongside the replacement of the designated code segment.
- With these adjustments in place, refresh your website to initiate the assessment.
- Observe the scroll behavior: When you scroll down, the menu bar should gracefully vanish momentarily, while scrolling up should result in its swift reappearance.
This stage is pivotal in gauging the accurate functioning of the scroll-triggered show/hide menu. The harmonious synchronization between your jQuery script and the header section is a testament to your meticulous efforts.
Should you encounter any discrepancies in the intended behavior, first scrutinize the ‘id’ or ‘class’ used in your script to ensure proper connectivity. If necessary, carry out a systematic review and, if needed, revisit the preceding steps. Rest assured, this process is well-proven and effectively employed on our own website to achieve seamless scroll-based navigation.
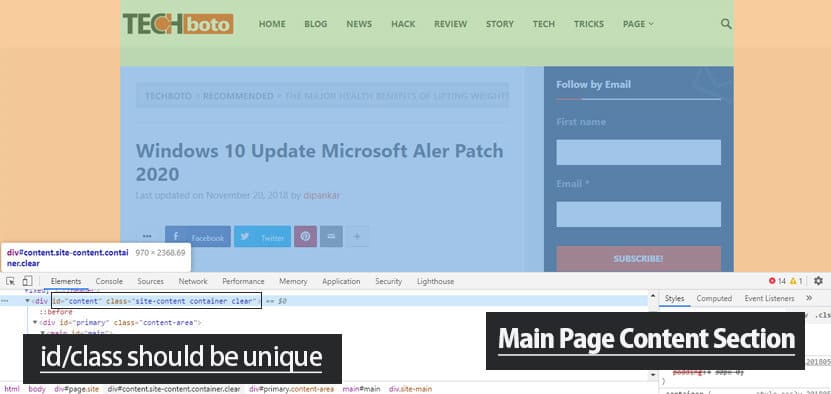
Step 5 – Locate the Main Page Content Area
Concurrently, it’s imperative to familiarize yourself with the primary webpage content section, which commences immediately subsequent to the header menu. To accomplish this, engage the “inspect” functionality within your web browser. Launch the desired website and embark on a quest to identify the entirety of the content section. Visual assistance is available in the image provided below for your reference.
Simply focus on acquiring the main content section of this page, encapsulated within a distinctive ‘id’ or ‘class.’ It is imperative that this identifier maintains its uniqueness. Should you encounter a situation where the ‘id’ or ‘class’ lacks uniqueness, you have the option to manually introduce a new class within the ‘header.php’ file, precisely within the location encompassing the main page content section.
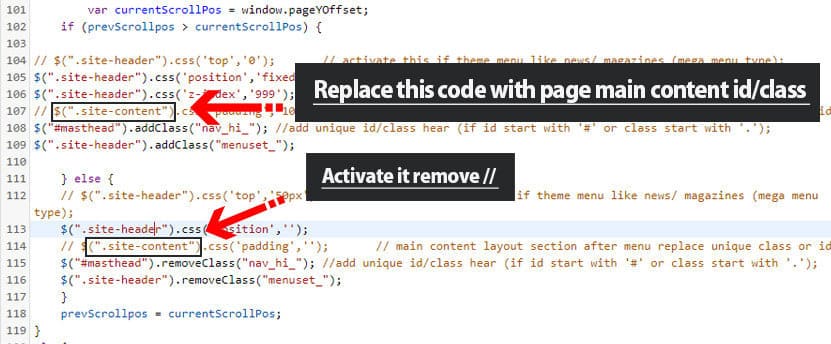
Step 6 – Substitution of ‘site-content’ with Page Main Content Identifier
Now, let’s proceed with the final step in this process. As you’ve already integrated the jQuery code into the ‘footer.php’ file, your next action involves locating the ‘site-content’ code snippet. Replace this particular code snippet with the identifier you acquired during step 4. This replacement serves as the seamless transition between the designated ‘site-content’ section and the unique identifier representative of your page’s main content.
Crafting the Scroll-Activated Show/Hide Sticky Menu in WordPress Without Plugin: A Dynamic Animated Header Menu Through jQuery Techniques
Through a symphony of jQuery attributes, we’ve engineered a scroll-responsive show/hide sticky menu that transcends mere functionality, breathing life into your website’s header navigation. This transformational guide has been curated to seamlessly usher this captivating feature into your WordPress realm.
Take heed of this important consideration: Upon successfully traversing each step outlined herein, the culmination of code and function yields a captivating show/hide sticky menu, poised to elegantly reveal itself upon scroll. However, a small yet noteworthy option exists for those who seek an even cleaner coding approach. You’re encouraged to further refine this jQuery code, seamlessly weaving it into your website’s header area and the crucial main content section. For optimal code organization and tidiness, consider housing this enhanced code within a dedicated ‘.js’ file.
Your appreciation for this guide is greatly acknowledged. Should you desire more insights, we’re readily accessible on platforms such as Twitter and Facebook. Your pursuit of dynamic website enhancements is a journey we’re thrilled to accompany you on.