Posted on Leave a comment

PHP Pinterest Downloader Script Source Code How to Develop

In this article, we will guide you through the process of creating a PHP based Pinterest Image Downloader. You’ll find comprehensive information and the accompanying source code that can be integrated into your website. Additionally, at andamantech.com, we offer an enhanced pro version of this tool for purchase. Our premium all-in-one Pinterest Downloader source code comes complete with a live demo for your convenience.

Start creating your own basic Pinterest Downloader with PHP. Follow these simple instructions to craft a PHP Pinterest Downloader that suits your requirements. The provided source code offers a minimalist, one-page solution for downloading from Pinterest. This version intentionally avoids using CSS and JavaScript, resulting in a simple page design. This approach focuses on functionality, providing an uncomplicated and effective tool for Pinterest content downloads.

Step 1: Project Setup

Begin by establishing your project environment. Create a fresh directory on your web server to serve as the home for your project files. Feel free to choose a name for the directory folder name, such as “pinterest-downloader

Step 2: Create the HTML Interface

Within the project directory, generate an PHP file named “index.php” to act as the user interface. Employ fundamental HTML components like a form for inputting the Pinterest image URL.

<title>Pinterest Image Downloader</title>
<form method="POST">
    <input type="text" name="url" placeholder=" https://in.pinterest.com/pin/658299670523298984/" value="">
    <input type="submit" name="submit">

</form>

In the preceding code, you’ll find a basic HTML form.

Step 3: Integrate PHP Functionality

Afterwards, the PHP curl_init function is utilized to fetch the image path from Pinterest. This path is then presented within an HTML tag, designated with the class name “preview.”

<?php
function search($pin_url) {
    $curl = curl_init($pin_url);
    curl_setopt($curl, CURLOPT_URL, $pin_url);
    curl_setopt($curl, CURLOPT_RETURNTRANSFER, true);
    $res = curl_exec($curl);
    curl_close($curl);
    return $res;
}
echo "Pinterest Image Downloader";
?>
<title>Pinterest Image Downloader</title>
<form method="POST">
    <input type="text" name="url" placeholder=" https://in.pinterest.com/pin/658299670523298984/" value="<?php if(isset($_POST['url'])){echo $_POST['url'];} ?>">
    <input type="submit" name="submit">
    <?php
    if (isset($_POST['submit'])) {
        if (empty($_POST['url'])) {
            echo "<br />Please input the URL";
        }
        else {
            $ser_pint = search($_POST['url']);
            $pint_im = explode('href="https://i.', $ser_pint);
            if (isset($pint_im[1])) {
                $pint_im2 = explode('" as="image"/>', $pint_im[1]);
?>
</form>
<div class="preview">
    Preview Image
    <br />
    <img width="300px" src="<?php echo "https://i.$pint_im2[0]"?>">
</div>
<div class="download">
    <a href="<?php echo "https://i.$pint_im2[0]"?>" target="_blank">Download the Original Size</a>
</div>
<?php
            } else {
                echo "<br />Please input the correct URL.";
            }
        } 
    }

?>

Usage Instructions:

  1. Enter your Pinterest URL into the input box. (For instance: https://in.pinterest.com/pin/658299670523298984/)
  2. Click the submit button.
  3. The preview image will be displayed.
  4. Download the full-size/original image by clicking the download button beneath the preview image.


Utilize this tool to effortlessly retrieve Pinterest images by providing their URLs—no need for an API. You’re welcome to utilize or adapt this source code to fashion your personal Pinterest image downloader for your ventures. Tailor it to your preferences. Should you have any inquiries, don’t hesitate to ask by dropping a comment.

Posted on Leave a comment

Best Push Notification System Desktop & Mobile WordPress Plugin

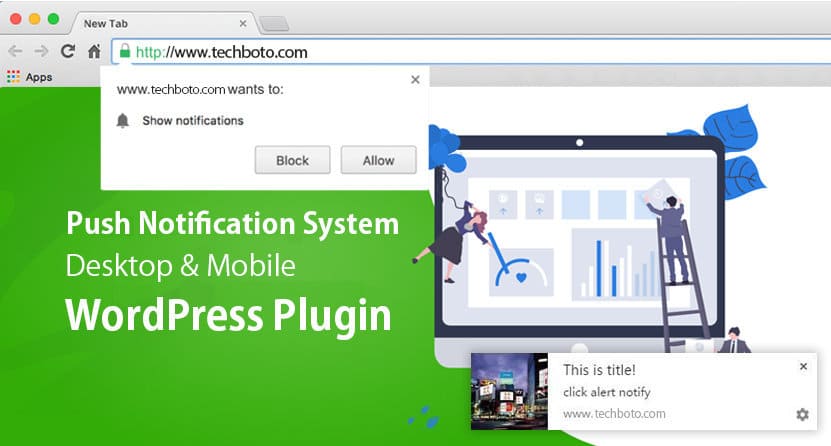
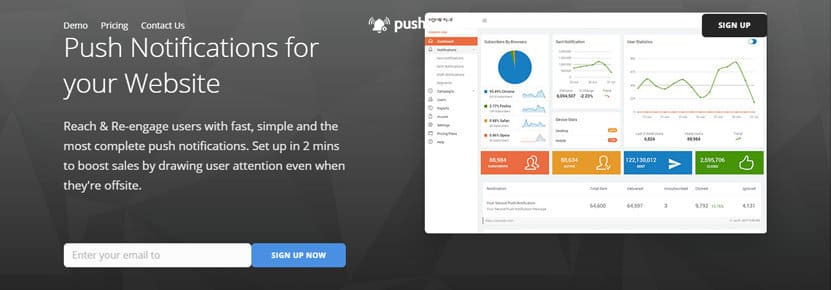
Push notifications are designed to inform subscribers who opt to receive these alert messages. By granting permission or accepting these alerts, users can promptly receive notifications regarding the latest site updates. These notifications can be received upon opening the web browser or even instantaneously on mobile devices. Browser push notifications offer the ability to send messages to your website’s visitors even when they are not actively browsing your site. As a result, this functionality has gained significant popularity among online businesses and marketers. It stands as another effective method to engage your audience, enhance the number of repeat visitors, and has consistently demonstrated substantially higher click-through rates (CTRs) in most instances.

What Are Push Notifications?

WordPress push notifications provide the means to automatically alert your audience who have granted permission or accepted these alert messages, whenever new content is published on your site. Additionally, you have the flexibility to send messages at any desired time.

You might have encountered a scenario where you were prompted to click “Allow.” This action enables the website to send notifications via your browser, typically appearing on the upper-right side. Below, you’ll find an illustrative example of a push notification.

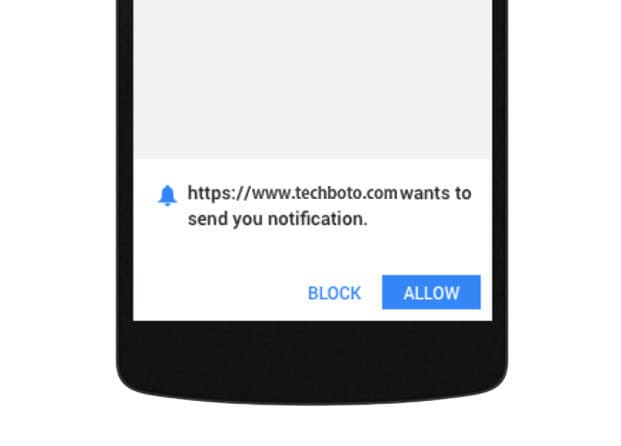
Displayed here is a screenshot taken from an Android device, showcasing a push notification request. Push notifications are supported not only on Android apps but also on iOS apps. Furthermore, major browsers like Google Chrome, Safari, Microsoft Edge, and Opera have integrated support for push notifications.

Some notable providers of push notification services include:

  • Gravitec.net
  • OneSignal
  • PushCrew
  • PushEngage
  • Free Web Push Notification Tool
  • PushAssist

These services collectively facilitate push notifications for WordPress, enhancing your ability to effectively engage with your audience.

1. Gravitec.net

Gravitec.net is a user-friendly push notification service that offers seamless account creation through a simple signup process or directly from your admin panel. This entirely free plugin empowers you to alert web browsers about your new website posts or promotions, utilizing popular browsers such as Chrome, Firefox, Safari, Opera, or Yandex.

To activate push notifications on your WordPress website, you can effortlessly install the plugin and establish a connection to your Gravitec.net account. This entire setup can be conveniently initiated from your WordPress admin panel with just a single click.

Once integrated with Gravitec.net, your website visitors will have the option to subscribe to notifications. While most push notification services allow manual sending of notifications, Gravitec.net goes a step further by offering automation features. It enables automated notifications based on your RSS feed, which can disseminate the most trending news articles or specific content segments to your subscribers.

2. OneSignal

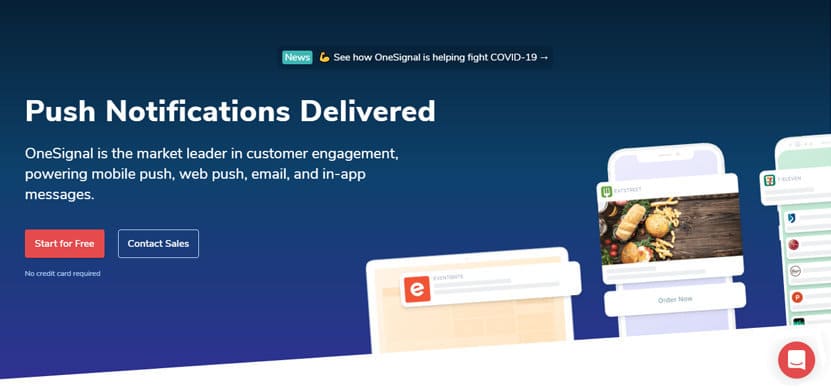
OneSignal is a no-cost WordPress plugin that introduces the concept of push notifications, allowing you to showcase your latest offers, services, or products directly to your audience. With compatibility across major browsers such as Chrome, Firefox, and Safari, OneSignal ensures widespread reach. This popular plugin provides effortless customization options, encompassing timing and display location configurations.

One of its most prominent capabilities lies in its ability to process over 2.7 billion notifications each day, underscoring its remarkable popularity. Bloggers can take advantage of its automatic notification feature, ensuring notifications are automatically sent for every new post published. Furthermore, the real-time analysis feature creates a comprehensive monitoring environment, offering valuable insights for plugin users.

Given its impressive features and functionality, OneSignal emerges as a highly recommended and top-tier web push notification plugin.

3. PushCrew

PushCrew offers a free plan, albeit with a subscriber limit of 500. However, if your subscriber count exceeds 500 and you require additional features like segmentation and RSS-to-push functionality, you have the option to upgrade. Plans catering to up to 2,000 subscribers commence at $25 per month. Within this premium plugin, an array of impressive options awaits.

One standout feature is the capability to simultaneously send messages, facilitating real-time engagement with your audience. PushCrew currently extends its push notification services to Chrome and Firefox, covering a wide range of operating systems including Mac, Windows, Linux, Chrome OS, and Android.

Remarkably, PushCrew also offers an enabling API, empowering you to craft custom scripts for your website. This proves beneficial for developers, as they can strategically personalize notifications. Leveraging your push subscriber data, combined with the power of Google Analytics, you can even segment your subscribers based on a diverse set of conditions.

4. PushEngage

PushEngage offers a free plan accommodating up to 2,500 subscribers. This platform functions seamlessly across a variety of browsers, encompassing Firefox and Chrome, catering to both desktop and mobile users. Notably, PushEngage empowers users to craft targeted notifications, utilizing customized segmentation that includes geographical location.

A recommended strategy by PushEngage involves utilizing a welcome notification, presented through a popup form, for new subscribers. This quick and informative welcome notification plays a crucial role in helping new subscribers grasp the context of their subscription. Additionally, it’s prudent to extend this approach to push subscribers by employing similar tactics used for visitor options and lead magnets, complete with a confirmation email.

Despite its advantages, the PushEngage plugin can occasionally pose a minor challenge. Specifically, visitors might find it slightly perplexing when dealing with pop-ups. In cases where a visitor opts to close the popup, clarity is needed regarding the subsequent steps and the location of the appropriate button to proceed.

5. Free Web Push Notification Tool

This straightforward WordPress push notification plugin offers a remarkably efficient solution to initiate web push notifications for your esteemed visitors. It stands as an autonomous push notification service seamlessly integrating with WordPress, facilitated by a dedicated plugin designed exclusively for WordPress compatibility.

It’s noteworthy that the range of supported devices slightly deviates from that of other plugins. Specifically, iZooto provides support for Chrome, Firefox, and Safari browsers on desktop platforms, while also catering exceptionally well to mobile devices, particularly those operating on the Android platform.

The dedicated developers at iZooto are diligently committed to furnishing users with an optimal web push notification experience. Their third-party service has gained popularity for various compelling reasons, attracting well-established brands and garnering support across multiple languages. Evidently, the iZooto web push notification service is effectively leveraged by numerous e-commerce websites to bolster sales and enhance user engagement.

6. PushAssist

Presenting another third-party web push notification service tailored for WordPress. Much like other notification plugins, PushAssist operates independently as a dedicated service, complemented by a WordPress plugin that streamlines the setup process. While self-served plugins may offer a slightly reduced feature set compared to third-party alternatives, both options effectively contribute to achieving their intended goals.

PushAssist extends its compatibility to include Chrome (for both desktop and Android), Firefox (for desktop and Android), as well as Safari (for Mac OS X). This widespread compatibility has contributed to the global popularity of PushAssist, with a substantial user base exceeding 10,000 websites. Notably, they offer a range of pricing tiers, including a noteworthy free plan catering to up to 3,000 subscribers. This capacity proves ample for new blogs or websites seeking to establish a push notification strategy.

7. All push notification for WP

“All Push Notifications for WP” is a complimentary plugin designed specifically for WordPress, enabling seamless push notifications. This pragmatic plugin empowers you to promptly disseminate real-time updates, also known as push notices, to your subscriber base. Operating as a dedicated WordPress plugin, it carries the distinct advantage of being devoid of monthly charges, as all processing occurs directly on your server rather than relying on a third-party service.

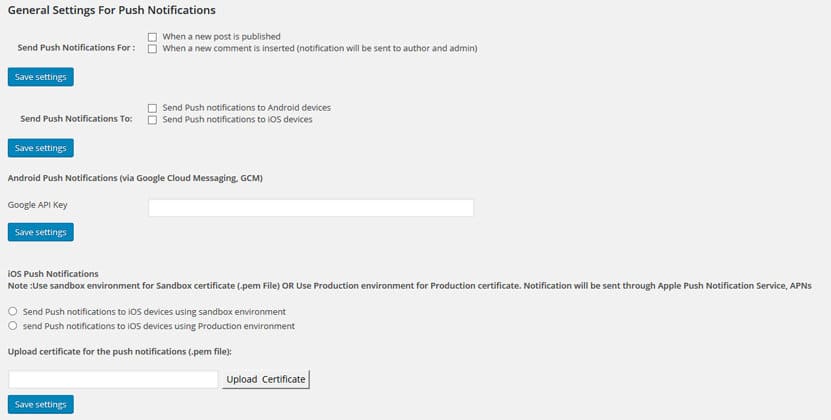
This plugin offers support for mobile push notification services, specifically Firebase Cloud Messaging (FCM) for Android devices and Apple Push Notification service (APNs) for iOS devices. However, I advise against its usage for beginners or casual bloggers, as it presents a rather intricate setup. If you fall into this category, I recommend opting for one of the more user-friendly services mentioned above, which will likely better suit your needs.

Which Push Notification Plugin Should You Use?

We understand that web push notification plugins for WordPress serve as valuable reminders for your site’s audience. As previously mentioned, push notifications can be an effective tool. Among the available free options, OneSignal stands out as a great choice. Alternatively, if you’re looking for a more advanced solution, the PushEngage plugin offers excellent features under its pro option. Below, I’ve compiled a list of the finest WordPress web push notification plugins for your consideration. Feel free to select the one that suits your needs best. If you have experience with any of the plugins mentioned, we encourage you to share your insights. If you’ve found this post to be helpful, we’d greatly appreciate it if you could spread the word.

Posted on

How to Send a Form Submit to Google Sheet Using HTML and JavaScript with Apps Script

Google Forms stands as the leading web-based survey instrument, accessible at no cost. Nonetheless, when faced with extensive data input tasks, its support may prove limited. In lieu of employing Google Forms, you have the option to create a custom data entry form utilizing Google’s HTML Service.


Within this article, I will demonstrate the process of crafting a basic data entry form using Google Apps Script and subsequently transmitting the gathered data into Google Sheets.


Step 1: Formulating the HTML Form

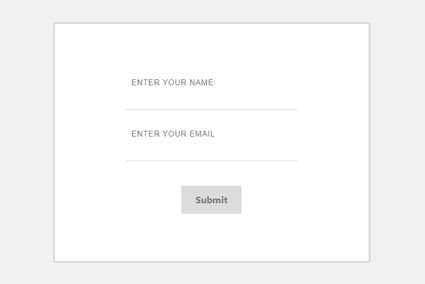
Below, you’ll find the complete code for the Contact Form along with instructions on managing the submission process.

Launch an empty file in your preferred programming text editor. Copy and paste the code provided below, then save the file using the [.html] extension. Our choice was to name it index.html (or any name you prefer), and don’t forget to include the Ajax integration script as well.

<!DOCTYPE html>
<html lang="en">
   <head>
      <title>Google Sheet Submit</title>
      <meta name="viewport" content="width=device-width, initial-scale=1">
      <link href="//maxcdn.bootstrapcdn.com/bootstrap/4.1.1/css/bootstrap.min.css" rel="stylesheet">
      <script src="//cdnjs.cloudflare.com/ajax/libs/jquery/3.2.1/jquery.min.js"></script>
      <script src="//maxcdn.bootstrapcdn.com/bootstrap/4.1.1/js/bootstrap.min.js"></script>
      <style>
         body{
            background: #f1f1f1;
         }
form {
   border: solid #d8d8d8 3px;
    border-radius: 4px;
    width: 60%;
    margin: 60px auto;
    background: #ffffff;
    padding: 60px 120px 80px 120px;
    text-align: center;
}
label {
  display: block;
  position: relative;
  margin: 40px 0px;
}
.label-txt {
  position: absolute;
  top: -1.6em;
  padding: 10px;
  font-family: sans-serif;
  font-size: .8em;
  letter-spacing: 1px;
  color: rgb(120,120,120);
  transition: ease .3s;
}
.input {
  width: 100%;
  padding: 10px;
  background: transparent;
  border: none;
  outline: none;
}

.line-box {
   position: relative;
    width: 100%;
    height: 3px;
    background: #efefef;
}
.line {
  position: absolute;
  width: 0%;
  height: 2px;
  top: 0px;
  left: 50%;
  transform: translateX(-50%);
  background: #00b9b1;
  transition: ease .6s;
}
.input:focus + .line-box .line {
  width: 100%;
}
.label-active {
  top: -3em;
}
button {
  display: inline-block;
  padding: 12px 24px;
  background: rgb(220,220,220);
  font-weight: bold;
  color: rgb(120,120,120);
  border: none;
  outline: none;
  border-radius: 3px;
  cursor: pointer;
  transition: ease .3s;
}
button:hover {
  background: #00b9b1;
  color: #ffffff;
}
#msg{
	color:red;
}
      </style>
   </head>
   <body>
<div class="container">
<div class="row">
   <div class="col-md-12">
      <div class="col-md-10 offset-1">
         <form method="post" id="formName">
            <label>
               <p class="label-txt">ENTER YOUR NAME</p>
               <input type="text" class="input" name="name" required>
               <div class="line-box">
                  <div class="line"></div>
               </div>
            </label>
            <label>
               <p class="label-txt">ENTER YOUR EMAIL</p>
               <input type="text" class="input" name="email" required>
               <div class="line-box">
                  <div class="line"></div>
               </div>
            </label>
            <button type="submit" id="btnSubmit">Submit</button>
          <div id="msg"></div>
         </form>
         </div>
   </div>
</div>
</div>
     
	  <script>
	  jQuery('#formName').on('submit',function(e){
		e.preventDefault();
		jQuery('#msg').html('Please wait...');
		jQuery('#btnSubmit').attr('disabled',true);
		jQuery.ajax({
			url:'https://script.google.com/macros/s/AKfycbzL5c0j3kpnEqKlL3OsIsIlU3uSuLx3Nb1yr6rvThPQH9EukBd9LFfNcq_MA1utbBbcjw/exec',
			type:'post',
			data:jQuery('#formName').serialize(),
			success:function(result){
				jQuery('#formName')[0].reset();
				jQuery('#msg').html('Thank You');
				jQuery('#btnSubmit').attr('disabled',false);
            setTimeout(function(){
               window.location.href='index.html';
            }, 1000);
         }
		});
	  });
	  </script>
   </body>
</html>

Step 2: Establish a Fresh Google Sheet

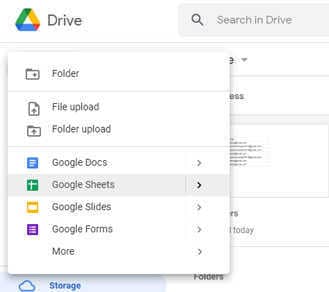
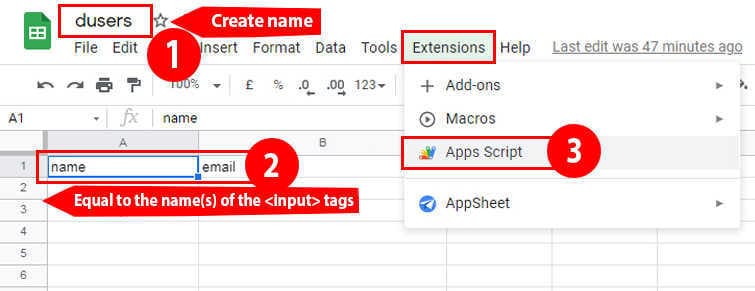
Generate a new Google Sheet and insert column headers, mirroring the arrangement depicted in the image below. Designate the sheet with a name of your preference.

Keep in mind: Write the column headers to match the name(s) of the <input> tags.

Step 3: Develop a Google Sheets Apps Script

To achieve this, we must establish a connection between our script and the form. Open the Google Apps Script editor from within the Google Form.

You can accomplish this by clicking the vertical ellipsis located at the top-right corner of the Google Form editor. Then, navigate to Script editor by following this path: Extension → Apps Script.

Step 4: Create Code.gs

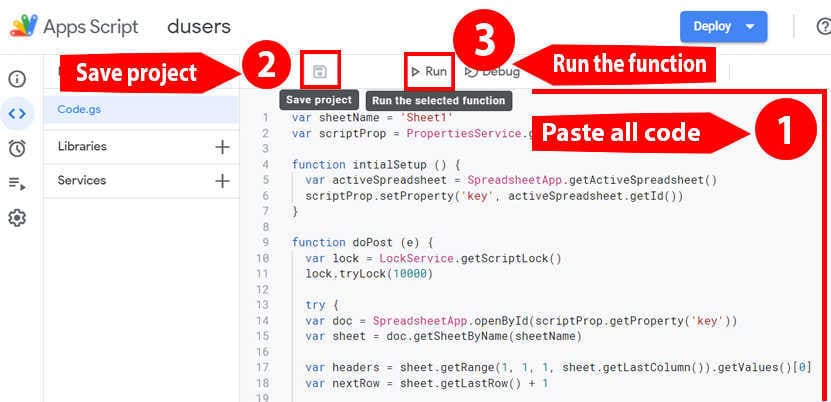
You can directly copy and paste this code into your project without making any changes or edits.

Typically, you have the flexibility to alter the project name (Untitled project) to a name of your choice. Consider naming the project similarly to your Form or Sheet if they are closely related.

Clear or remove the contents within Code.gs and then insert the provided code below.

var sheetName = 'Sheet1'
var scriptProp = PropertiesService.getScriptProperties()
function intialSetup () {
  var activeSpreadsheet = SpreadsheetApp.getActiveSpreadsheet()
  scriptProp.setProperty('key', activeSpreadsheet.getId())
}
function doPost (e) {
  var lock = LockService.getScriptLock()
  lock.tryLock(10000)
  try {
	var doc = SpreadsheetApp.openById(scriptProp.getProperty('key'))
	var sheet = doc.getSheetByName(sheetName)

	var headers = sheet.getRange(1, 1, 1, sheet.getLastColumn()).getValues()[0]
	var nextRow = sheet.getLastRow() + 1

	var newRow = headers.map(function(header) {
	  return header === 'timestamp' ? new Date() : e.parameter[header]
	})

	sheet.getRange(nextRow, 1, 1, newRow.length).setValues([newRow])

	return ContentService
	  .createTextOutput(JSON.stringify({ 'result': 'success', 'row': nextRow }))
	  .setMimeType(ContentService.MimeType.JSON)
  }
  catch (e) {
	return ContentService
	  .createTextOutput(JSON.stringify({ 'result': 'error', 'error': e }))
	  .setMimeType(ContentService.MimeType.JSON)
  }
  finally {
	lock.releaseLock()
  }
}

Next, proceed to Run → Run Function → initialSetup to execute this function.

In the “Authorization Required” dialogue box, click on “Review Permissions.”

Now, you can either Sign in or select the Google account linked to this project.

Click on “Allow.”

Step 5: Publish the project as a web app

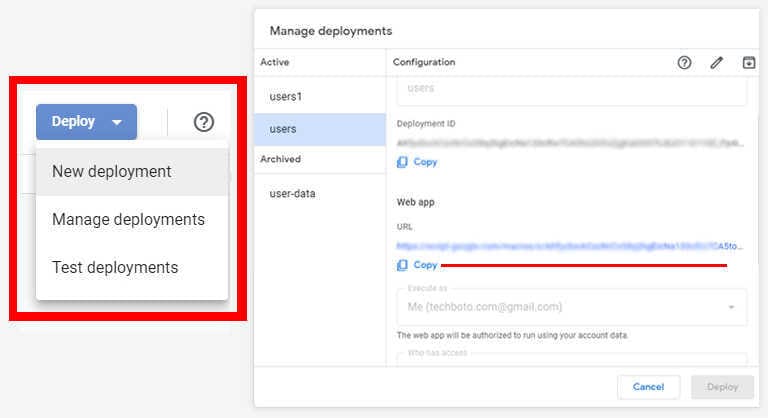
Compose a description as desired and set the Project Version to “New.” Insert the initial version into the input field provided.

Keep “Execute the app as:” configured as “Me([email protected]).”

Under “Who has access to the app:”, choose “Anyone, even anonymous.”

Click on “Deploy.”

In the popup window, copy the Current web app URL from the dialogue and then click “OK.”

Step 6: Substitute Web App URL in HTML Form (from Step 1)

Access the file named index.html. Locate the line containing “url” and replace <SCRIPT URL> with the URL of your script, which you have just created.

The provided code lacks form validations and additional functions. Collaborate with us to craft an error-free code. Remember, for your crucial fields, incorporate data validation mechanisms.

Conclusion:

Throughout this tutorial, we delved into the creation of a personalized email responder, which activates upon the submission of a Google Form. We explored the process of incorporating triggers to execute our code upon form submission. Moreover, we ensured the proper addition of permissions and scopes to facilitate seamless code execution. Additionally, we integrated the Gmail API advanced service to access our signature block. It’s worth noting that the provided code is compatible with localhost setups; I’ve personally implemented it on my local computer’s localhost.

If you found value in this tutorial and wish to stay updated on my forthcoming projects, feel free to subscribe below this post.

Posted on Leave a comment

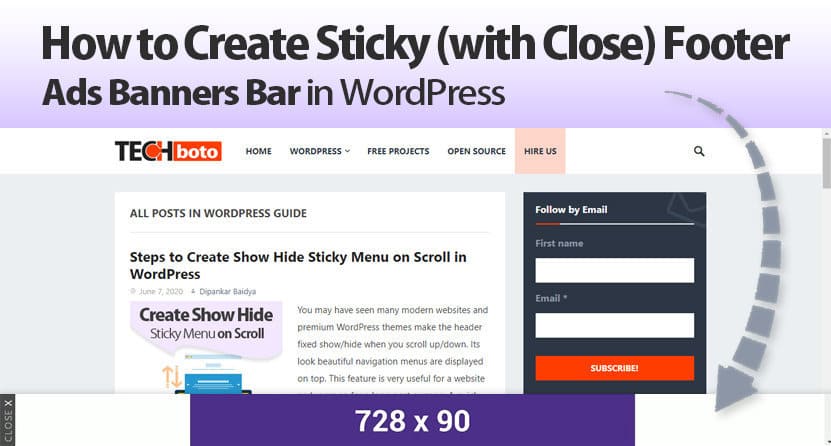
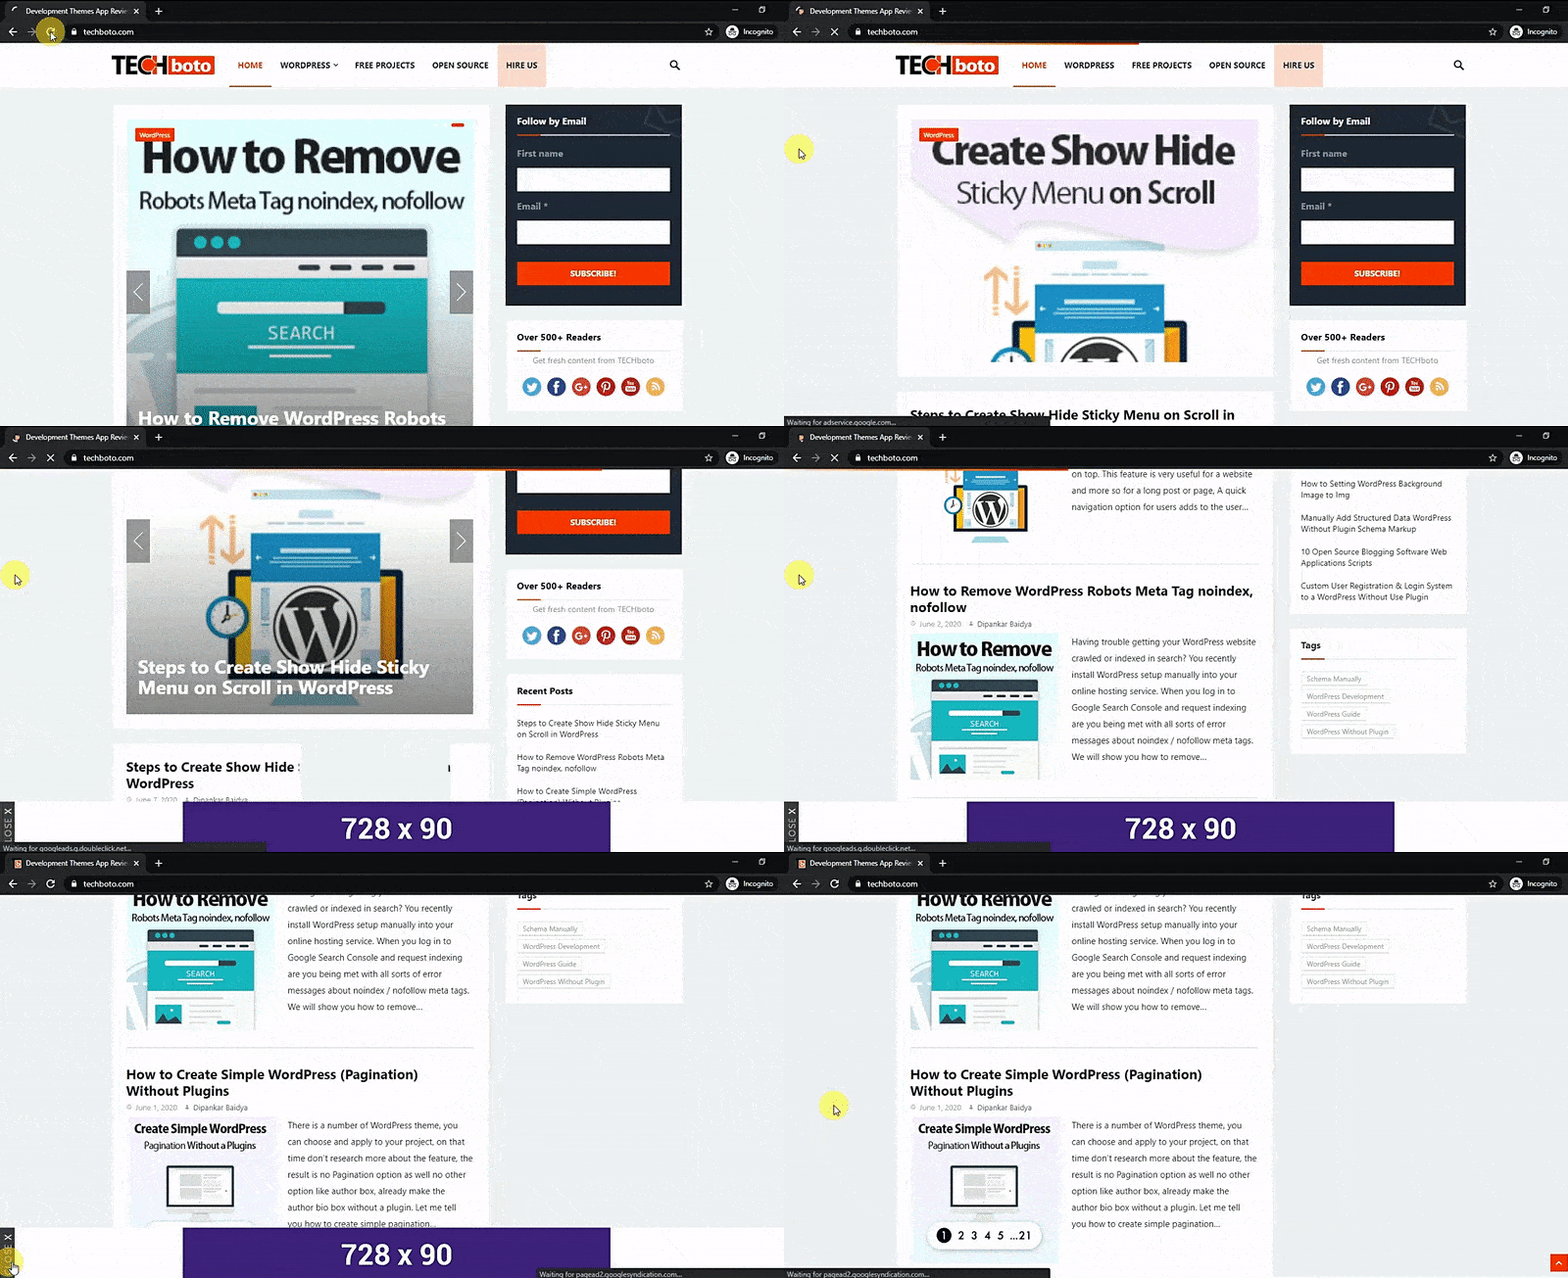
How to Create Sticky Footer Banners ads with Close Button

Are you searching for an optimal method to display Adsense banner ads (728 x 90) within a floating sticky footer bar, complete with a close button? Numerous WordPress site owners utilize advertisements as a means to monetize their websites. In this comprehensive guide, we will unveil the most effective approach to incorporating sticky advertisement banners into the footer section, all without the need for a plugin. This approach ensures faster website loading times, as it avoids resource-intensive scripts, thereby facilitating effortless advertising optimization. Our solution simplifies the process, granting you full authority over your site’s advertising space, all while providing ample room for customization according to your preferences.

Introducing Footer Sticky Ads Banners

The footer bar remains steadfastly positioned at the bottom of your page, steadfastly maintaining its presence even as users scroll both upwards and downwards. Its utility extends beyond mere advertisement display, proving valuable for navigation aids, internal promotional materials, or any form of content you wish to affix to the bottom section. As part of the Sticky Ads feature in the footer, an added advantage is the presence of a close option, lending an air of professionalism to your website. Should a user choose not to engage with these popup footer ads, they can be effortlessly dismissed with a simple button click.

Within the confines of this article, we will elucidate the process of crafting a Footer Sticky Ads Banner complete with a Close button for your WordPress site. Our approach employs a coding technique to achieve this seamlessly.

Edit your theme’s footer.php using the Theme Editor:

I opted not to develop this as a WordPress plugin due to its straightforward integration. Creating it as a plugin would involve extra scripting and processes. To incorporate it into your WordPress site, follow these steps: Navigate to Appearance → Theme Editor, then access the Theme Footer (footer.php) file. Paste the following code just before the wp_footer() function.

The provided CSS code will center-align your ads, style buttons, and set background colors.

<style>
@media (max-width: 767px){.fotads_fxmain{ display:none; } }
.fotads_fxmain{ position: fixed; bottom: 0px; width: 100%; height: auto; z-index: 9995; pointer-events: none; }
.fotbackcolor{ width: 100%; height: auto; background-color: #fff; margin: 0px auto; position: relative; }
.fotitems{ float: left; position: absolute; background-color: rgb(74, 74, 74); width: 25px; height: 100%; pointer-events: auto; cursor: pointer; z-index: 9999; display: flex; justify-content: center; align-items: center; overflow: hidden; }
.fotbuttonarea{ transform: rotate(270deg);color: #bfbfbf;letter-spacing: 2px; }
.fotbtclos{ color: white; margin-left: 5px; }
.fotads_showalign{ position: relative; height: auto; background-color: transparent; display: flex; justify-content: center; pointer-events: auto; }
</style>

HTML code just paste it bellow the CSS:

<div class="fotads_fxmain">
 <div class="fotbackcolor">
  <div class="fotitems">
    <div class="fotbuttonarea">CLOSE<span class="fotbtclos">X</span></div>
     </div>
    <div class="fotads_showalign"  id="ads_showhide">

  <!-- Paste Ads script code hear -->
<img src="https://lh3.googleusercontent.com/Sh7SH08FZ6pVcq7dxVgc3FmuW0wLFM-0cvYPRYxDFeB4vZ0GLS5qibRWO-4KXxl_tKo=w728-h90-rwa">   
  <!-- Paste Ads script code hear -->

  </div>
 </div>
</div>

jQuery script paste it bellow HTML:

<script>
(function($) {
jQuery(window).load(function(){

$(".fotitems").click(function(){
$("#ads_showhide").hide();
})

});
}(jQuery));
</script>

The provided code is intended for illustrative purposes. For instance, I have utilized an image here, but you can substitute it with an ad script. It’s important to note that this code is designed to display ads on a sticky footer bar. If the ads fail to load, this section remains hidden. The visibility of this section varies; it won’t be displayed on mobile devices, but it will appear for users on Windows and iPad Pro.

Incorporating this functionality isn’t overly complex. Just add the following code snippet to the footer.php file where you currently have an image section. Replace the image section with your desired Ads unit script, which can be conveniently modified. It’s essential to keep in mind that repurposing these Sticky Ads Banners for other purposes will necessitate adjustments to customization.

Posted on Leave a comment

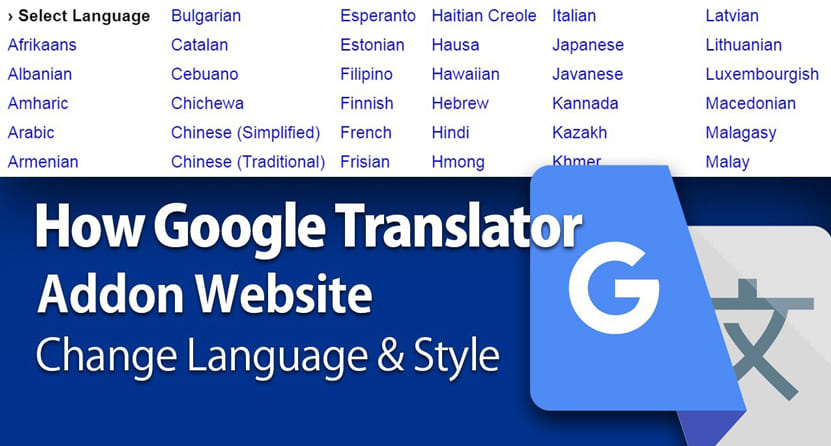
Google Translator Website Change Language API System Integrate

Enhance Your Website with Language Conversion using Google Translator: Discover the Convenience of Adding Google Translator to Your Local Language Website

Are you looking to make your website more accessible to a global audience? The Google Translator tool offers a seamless solution. By integrating Google Translator into your website, you can effortlessly enable language conversion, ensuring that your content resonates with readers worldwide.

Unlock the Power of Multilingual Communication: With Google Translator, the language barrier becomes a thing of the past. Your website will be equipped to dynamically translate its content into over 90 languages, utilizing the robust capabilities of Google Translate’s automatic conversion.

Simple Integration, Instant Impact: Our user-friendly translation button generator empowers you to seamlessly incorporate translation buttons onto your website. Once implemented, these buttons allow users to trigger translations effortlessly. By simply clicking on a designated button or flag, visitors to your website can experience instant translations powered by Google Translate.

Elevate User Experience: Imagine a visitor arriving at your website and instantly being able to consume your content in their preferred language. With Google Translator, you can enhance user experience, attract a wider audience, and foster greater engagement.

Embrace Global Reach: In today’s interconnected world, expanding your website’s reach has never been more crucial. By harnessing the power of Google Translator, you position your website to captivate a diverse array of visitors, regardless of their native language.

Seamless Translation at Your Fingertips: Integrating Google Translator into your website is not only practical but also intuitive. Say goodbye to language barriers and hello to a more inclusive online presence. Implement Google Translator today and unlock the true potential of your website’s global appeal.

How Google Translator API System Integrate Website Change Language Codes

Crafted by Google, Google Translate serves as a dynamic tool designed to seamlessly convert textual content from one language to another within a website. With an extensive selection of languages at your disposal, this platform boasts a remarkably effective, dependable, and user-friendly method for webpage translation.

First Step:

Incorporate the “div” component bearing the identifier “google_translate_element”:

<div id="google_translate_element"></div>

Please copy and paste the following code snippet into the desired location on your website where you intend to display the Google Translate dropdown or language selector. For instance, you can insert this snippet within the <head> section of your main menu.

Second Step:

Include a reference script link in the uppermost section of your website’s header, above all CSS and JavaScript scripts. This step is crucial due to the Google Translate API script’s initial loading requirement, ensuring optimal performance and results.

<script type="text/javascript">
function googleTranslateFunction(){
new google.translate.TranslateElement({pageLanguage:'en', layout:google.translate.TranslateElement.InlineLayout.SIMPLE},'google_translate_element');
} </script>

<script type="text/javascript" src="//translate.google.com/translate_a/element.js?cb=googleTranslateFunction"></script>

Third Step:

This step is optional, and if you wish to customize the style of the Google Language button, you can follow these instructions. Please copy and paste the provided code into your “style.css” file.

.goog-te-gadget-simple {
 background-color: #6f6f6ffc;
  border-left: 0pxsolid#d5d5d5;
   border-top: 0pxsolid#9b9b9b;
    border-bottom: 0pxsolid#e8e8e8;
   border-right: 0pxsolid#d5d5d5;
  font-size: 7pt;
 display: inline-block;
cursor: pointer;
  margin-top: 11px;
 zoom: 1;
display: inline;
}
.goog-te-gadget-icon {
  margin-left: 2px;
   width: 1px;
  height: 0px;
 border: none;
vertical-align: middle;
}

You can now integrate the Google Language selector dropdown with over 90 languages into your website’s API system.

Posted on Leave a comment

WordPress Contact Form Enabling Email Delivery Without Plugins

There is a wide range of plugins that can be utilized to incorporate a contact form into your WordPress site. However, it is also possible to achieve this functionality without relying on a plugin by implementing PHP and jQuery code. This approach involves creating a WordPress form builder from scratch, enabling the submission of user information via email to both the user and the website administrator.

To implement a “Start Process” feature and request the creation of a contact form, you will require an HTML form, a small jQuery script, and a PHP file to handle the email delivery process. This setup enables the form to be submitted by the user, triggering an action that sends an email to both the user and the website administrator. Follow the steps below to create a contact form in WordPress without using a plugin, while ensuring email delivery

Step 1: Creating a Page with a Custom Name (e.g., Contact or Contact Us)

To create a page with a custom name, such as “Contact” or “Contact Us,” follow these steps:

  1. Open your web browser and go to your WordPress admin dashboard.
  2. In the left sidebar, click on “Pages.”
  3. From the dropdown menu, select “Add New.”
  4. In the page editor, enter the desired title for your page, such as “Contact” or “Contact Us.”

By following these steps, you will successfully create a custom contact page with the desired name and content, enhancing the overall appearance and functionality of your WordPress website.

Step 2: Building the Form

Now that you have created the “Contact” or “Contact Us” page, let’s proceed to add a basic form with fields for name, email, dropdown, and message. Follow these steps:

  1. Open the WordPress editor for the “Contact” or “Contact Us” page.
  2. Click on the “+” icon to add a new block.
  3. Search for the “Custom HTML” block and select it.
  4. In the Custom HTML block, paste the following code:
<label>Your Name <small id="name_error"></small></label>
<input type="text" name="name" id="name">
<label>Email <small id="email_error"></small></label>
<input type="text" name="email" id="email">
<label>Subject</label>
<select style="width:100%" name="subject" id="subject">
<option>Option-1</option>
<option>Option-2</option></select>
<label>Message</label>
<textarea name="message" id="message"></textarea><br>
<input type="button" value="Submit" id="form_submit">

Save it

Step 3: Data Processing and Error Handling

Our current form appears visually appealing; however, it lacks functionality as it does not include validation or email submission. To address this issue, we need to implement the following steps: first, verify that the form has been submitted, and second, validate whether all fields have been correctly filled or not.

Please paste the following code below. To do this, navigate to “Appearance” and select “Theme File Editor” from the right sidebar. Look for “Theme Files” and locate “footer.php”. Finally, paste the script provided below on the last line of the “footer.php” file.

<script>
(function($){ 
$("#form_submit").click(function(){
if($("#name").val()==""){
$("#name_error").html(" (Please enter your name)");
return false;
}
if($("#email").val()==""){
$("#email_error").html(" (Please enter your email)");
return false;
}
if(!(/^([a-zA-Z0-9_.+-])+\@(([a-zA-Z0-9-])+\.)+([a-zA-Z0-9]{2,4})+$/.test($("#email").val()))){
$("#email_error").html(" (Invalid email)");
return false;
}
$("#form_submit").val("Please wait...").css("pointer-events","none");
$.ajax({
url: "/demo/data_form.php",
data: 'name='+$("#name").val()+
'&email='+$("#email").val()+
'&subject='+$("#subject").val()+
'&message='+$("#message").val(),
type: 'post',
success: function (response)
{
if(response=="mailsubmit"){
alert("Thank you, Request has been sent successfully - We will contact you soon...");
}			
if(response=="mailnotsend"){
alert("ERROR Message could not be sent!");
}
$("#form_submit").val("Submit").css("pointer-events","");
$("#name").val("");
$("#email").val("");
$("#message").val("");	
}
});
})
})(jQuery);</script>

Please note that modifying theme files directly can be risky, so it is recommended to create a backup of the file before making any changes.

Step 4: Creating PHP Mailer for Both User and Admin

First, navigate to your WordPress directory and locate the file upload section. This can typically be found in the server directory path where the wp-admin folder is located. Once you’ve accessed the file upload section, proceed with the following steps:

  1. Create a new folder called “demo” within the WordPress directory.
  2. Inside the “demo” folder, create a PHP file named “data_form.php”. This step is necessary because we referenced this file’s URL path (“/demo/data_form.php”) in the Ajax script mentioned earlier.
  3. Open the “data_form.php” file and insert the code provided below:
<?php
error_reporting(0);
if(isset($_POST['name'])){
$name=$_POST['name'];
$email=$_POST['email'];
$subject=$_POST['subject'];
$message=$_POST['message'];
$date=date("d-m-Y");
$subject = "New Contact $name";
$tomessage="Thank you for choosing us.. !!<br>
Our expert will contact you soon..!!<br>
keep visit our site.. !!<br>
<a href='https://www.andamantech.com/' target='_blank'>Andaman Tech</a>";
$tosubject = "Thank you $name for conatct us";
$message = '<table width="643" border="0" cellspacing="2" cellpadding="2" style="border: 4px solid #ff810099;border-radius: 34px;margin: 0 auto;">
<tbody><tr><td colspan="2" align="center" style="padding: 10px 0px;"><span style="color: #267dff;font-weight: bold;font-family: Arial, Helvetica, sans-serif;font-size: 20px;"> - Your Company Name - </span></td>
</tr><tr><td colspan="2" align="center" bgcolor="#FFFFFF"><span style="font-size: 16px;font-family: Arial, Helvetica, sans-serif;font-weight: bold;color: #EA5E00;">&nbsp;Contact Details</span></td>
</tr><tr><td colspan="2" bgcolor="#f7f7f7">&nbsp;</td>
</tr><tr><td width="156"><span style="font-family:Arial, Helvetica, sans-serif;font-size:14px;color:#000000;">Name</span></td>
<td width="469"><span style="font-family:Arial, Helvetica, sans-serif;font-size:14px;color:#000000;">';
$message .= $_POST['name'];
$message .='</span></td>
</tr><tr><td><span style="font-family:Arial, Helvetica, sans-serif;font-size:14px;color:#000000;">Email</span></td>
<td><span style="font-family:Arial, Helvetica, sans-serif;font-size:14px;color:#000000;">';
$message .= $_POST['email'];
$message .='</span></td>
</tr><tr><td><span style="font-family:Arial, Helvetica, sans-serif;font-size:14px;color:#000000;">Subject: </span></td>
<td><span style="font-family:Arial, Helvetica, sans-serif;font-size:14px;color:#000000;">';
$message .= $_POST['subject'];
$message .='</span></td>
</tr><tr><td><span style="font-family:Arial, Helvetica, sans-serif;font-size:14px;color:#000000;">Message: </span></td>
<td><span style="font-family:Arial, Helvetica, sans-serif;font-size:14px;color:#000000;">';
$message .= $_POST['message'];
$message .='</span></td>
</tr><tr><td><span style="font-family:Arial, Helvetica, sans-serif;font-size:14px;color:#000000;">Date: </span></td>
<td><span style="font-family:Arial, Helvetica, sans-serif;font-size:14px;color:#000000;">';
$message .= $date;
$message .='</span></td>
</tr><tr><td colspan="2" bgcolor="#f7f7f7">&nbsp;</td></tr><tr><td colspan="2" align="center"><span style="font-family:Arial, Helvetica, sans-serif;font-size:11px;"><a href="http://localhost/wp?ref=mail-service" target="_blank" style="color: #a5a5a5;">Developed by - Andaman Tech</a></span></td></tr></tbody>
</table>';
$headers  = 'MIME-Version: 1.0' . "\r\n";
$headers .= 'content-type: text/html; charset=iso-8859-1' . "\r\n";
$headers .= 'From: Your website name<[email protected]>'."\r\n";
if(mail("[email protected]",$subject,$message,$headers)) 
{
mail($_POST['email'],$tosubject,$tomessage,$headers);

echo "mailsubmit";
}
else
{
echo "mailnotsend";
}
}

After pasting the code into the “data_form.php” file, save it. You have now successfully created the folder and PHP file in the WordPress directory, which will handle the functionality to send emails to both users who submit the contact form and the admin.

Step 5: Make the necessary modifications to your email id

In order for the email functionality to work correctly, you need to update the email settings. Follow the steps below:

  1. Open the “data_form.php” file in a text editor.
  2. Locate the following line of code:
<[email protected]>
  1. Replace ‘[email protected]’ with the actual email address where you want to receive the contact form submissions. For example:
<[email protected]>

Save the changes to the “data_form.php” file.

With the updated code, the form submission will only proceed if all the required fields are filled and a valid email address is provided. If any errors occur, an appropriate error message will be displayed. Remember to replace ‘[email protected]’ with your actual email address to receive the contact form submissions.

Note: If you are running your website on a local server, the email functionality may not work as expected due to server limitations. However, if you are using an online hosting service, please ensure that you replace the email address with your working email address for the code to function correctly.

I hope you find this article helpful. If you do, please consider sharing it on social media. Additionally, if you notice any mistakes or have suggestions for a tutorial on creating a WordPress contact form with enabling email delivery Without Plugins, which includes sending emails to both the user and admin, please leave a comment below. Your feedback is greatly appreciated.

Posted on Leave a comment

How to Load a WordPress Page Without Refreshing Using jQuery Ajax


If you’re looking to achieve fast page loading for WordPress pages without refreshing using jQuery AJAX, and you prefer not to use plugins, you’re in luck. I will provide you with all the necessary details on how to implement this feature in WordPress. By simply copying and pasting the provided code into the correct location, your website will load quickly, whether it’s hosted on a server or running locally on your computer.

The optimal approach in this case is to create a post and publish it, as it will automatically work on all website pages and the navigation menu. Whenever you encounter a loader animation after performing an action on the page, it indicates that a jQuery AJAX request is being sent to the server, which affects the loading time.

In this comprehensive article, I will guide you through the step-by-step process of creating and managing jQuery AJAX loading for WordPress pages and post pages. By implementing a simple code snippet and file, you will enable seamless loading without the need to refresh your website. This feature will greatly enhance the user experience for your readers.

Step 1: Getting Started

To begin, navigate to the following directory: wp-content -> themes -> Your Theme Name. Inside your theme’s folder, create a new folder with any desired name (e.g., “loader_boom”). This folder will be used to store the necessary files for implementing the loader functionality.

Next, create a file named “ajax_loads.js”. This JavaScript file will be responsible for handling the AJAX loading functionality on your WordPress site.

(function(window,undefined){ var History = window.History, $ = window.jQuery, document = window.document; if ( !History.enabled ) return false; $(function(){ var	rootUrl = reload_helper['rootUrl'],	contentSelector = '#' + reload_helper['container_id'], $content = $(contentSelector),	contentNode = $content.get(0), $body = $(document.body),	scrollOptions = {	duration: 800,	easing:'swing'	};	if ( $content.length === 0 ) $content = $body; $.expr[':'].internal = function(obj, index, meta, stack){ var		$this = $(obj),	url = $this.attr('href')||'',		isInternalLink; isInternalLink = url.substring(0,rootUrl.length) === rootUrl || url.indexOf(':') === -1;	return isInternalLink; };	var documentHtml = function(html){	var result = String(html).replace(/<\!DOCTYPE[^>]*>/i, '') .replace(/<(html|head|body|title|script)([\s\>])/gi,'<div id="document-$1"$2') .replace(/<\/(html|head|body|title|script)\>/gi,'</div>');	return result;	}; $.fn.wp_reload = function(){ var $this = $(this);	$this.find('a:internal:not(.no-ajaxy,[href^="#"],[href*="wp-login"],[href*="wp-admin"])').on('click', function(event){ var	$this	= $(this),	url		= $this.attr('href'),	title 	= $this.attr('title') || null; if ( event.which == 2 || event.metaKey ) return true;		History.pushState(null,title,url); event.preventDefault();	return false;	}); return $this;	}; $body.wp_reload(); $(window).bind('statechange',function(){ var		State 		= History.getState(),	url			= State.url, relativeUrl = url.replace(rootUrl,''); $.ajax({	url: url,	success: function(data, textStatus, jqXHR){ var	$data 			= $(documentHtml(data)), $dataBody		= $data.find('#document-body:first ' + contentSelector), bodyClasses 	= $data.find('#document-body:first').attr('class'),	contentHtml, $scripts; var $menu_list = $data.find('.' + reload_helper['mcdc']);	jQuery('body').attr('class', bodyClasses); $scripts = $dataBody.find('#document-script');	if ( $scripts.length ) $scripts.detach(); contentHtml = $dataBody.html()||$data.html(); if ( !contentHtml ) {		document.location.href = url; return false;	}	$content.stop(true,true); $content.html(contentHtml) .wp_reload()	.css('text-align', '') .animate({opacity: 1, visibility: "visible"}); if ( '' != reload_helper['scrollTop'] ) { jQuery('html, body').animate({	scrollTop: jQuery(contentSelector).offset().top }, 1000);	}	$('.' + reload_helper['mcdc']).html($menu_list.html()); $body.wp_reload();	$(reload_helper['ids']).each(function(){ jQuery(this).addClass('no-ajaxy'); });		document.title = $data.find('#document-title:first').text(); try { document.getElementsByTagName('title')[0].innerHTML = document.title.replace('<','&lt;') .replace('>','&gt;') .replace(' & ',' &amp; '); } catch ( Exception ) { }	$scripts.each(function(){	var scriptText = $(this).html(); if ( '' != scriptText ) { scriptNode = document.createElement('script'); scriptNode.appendChild(document.createTextNode(scriptText)); contentNode.appendChild(scriptNode); } else {	$.getScript( $(this).attr('src') );	}	}); if ( typeof window.pageTracker !== 'undefined' ) window.pageTracker._trackPageview(relativeUrl); if ( typeof window.reinvigorate !== 'undefined' && typeof window.reinvigorate.ajax_track !== 'undefined' ) reinvigorate.ajax_track(url);	},	error: function(jqXHR, textStatus, errorThrown){ document.location.href = url; return false;	}	});	}); }); })(window);

Step 2: Creating an Additional File named “ajax_history.js”

In addition to the “ajax_loads.js” file, create another file called “ajax_history.js”. This JavaScript file will be utilized to manage the history of AJAX requests on your WordPress site.

window.JSON||(window.JSON={}),function(){function f(a){return a<10?"0"+a:a}function quote(a){return escapable.lastIndex=0,escapable.test(a)?'"'+a.replace(escapable,function(a){var b=meta[a];return typeof b=="string"?b:"\\u"+("0000"+a.charCodeAt(0).toString(16)).slice(-4)})+'"':'"'+a+'"'}function str(a,b){var c,d,e,f,g=gap,h,i=b[a];i&&typeof i=="object"&&typeof i.toJSON=="function"&&(i=i.toJSON(a)),typeof rep=="function"&&(i=rep.call(b,a,i));switch(typeof i){case"string":return quote(i);case"number":return isFinite(i)?String(i):"null";case"boolean":case"null":return String(i);case"object":if(!i)return"null";gap+=indent,h=[];if(Object.prototype.toString.apply(i)==="[object Array]"){f=i.length;for(c=0;c<f;c+=1)h[c]=str(c,i)||"null";return e=h.length===0?"[]":gap?"[\n"+gap+h.join(",\n"+gap)+"\n"+g+"]":"["+h.join(",")+"]",gap=g,e}if(rep&&typeof rep=="object"){f=rep.length;for(c=0;c<f;c+=1)d=rep[c],typeof d=="string"&&(e=str(d,i),e&&h.push(quote(d)+(gap?": ":":")+e))}else for(d in i)Object.hasOwnProperty.call(i,d)&&(e=str(d,i),e&&h.push(quote(d)+(gap?": ":":")+e));return e=h.length===0?"{}":gap?"{\n"+gap+h.join(",\n"+gap)+"\n"+g+"}":"{"+h.join(",")+"}",gap=g,e}}"use strict",typeof Date.prototype.toJSON!="function"&&(Date.prototype.toJSON=function(a){return isFinite(this.valueOf())?this.getUTCFullYear()+"-"+f(this.getUTCMonth()+1)+"-"+f(this.getUTCDate())+"T"+f(this.getUTCHours())+":"+f(this.getUTCMinutes())+":"+f(this.getUTCSeconds())+"Z":null},String.prototype.toJSON=Number.prototype.toJSON=Boolean.prototype.toJSON=function(a){return this.valueOf()});var JSON=window.JSON,cx=/[\u0000\u00ad\u0600-\u0604\u070f\u17b4\u17b5\u200c-\u200f\u2028-\u202f\u2060-\u206f\ufeff\ufff0-\uffff]/g,escapable=/[\\\"\x00-\x1f\x7f-\x9f\u00ad\u0600-\u0604\u070f\u17b4\u17b5\u200c-\u200f\u2028-\u202f\u2060-\u206f\ufeff\ufff0-\uffff]/g,gap,indent,meta={"\b":"\\b","\t":"\\t","\n":"\\n","\f":"\\f","\r":"\\r",'"':'\\"',"\\":"\\\\"},rep;typeof JSON.stringify!="function"&&(JSON.stringify=function(a,b,c){var d;gap="",indent="";if(typeof c=="number")for(d=0;d<c;d+=1)indent+=" ";else typeof c=="string"&&(indent=c);rep=b;if(!b||typeof b=="function"||typeof b=="object"&&typeof b.length=="number")return str("",{"":a});throw new Error("JSON.stringify")}),typeof JSON.parse!="function"&&(JSON.parse=function(text,reviver){function walk(a,b){var c,d,e=a[b];if(e&&typeof e=="object")for(c in e)Object.hasOwnProperty.call(e,c)&&(d=walk(e,c),d!==undefined?e[c]=d:delete e[c]);return reviver.call(a,b,e)}var j;text=String(text),cx.lastIndex=0,cx.test(text)&&(text=text.replace(cx,function(a){return"\\u"+("0000"+a.charCodeAt(0).toString(16)).slice(-4)}));if(/^[\],:{}\s]*$/.test(text.replace(/\\(?:["\\\/bfnrt]|u[0-9a-fA-F]{4})/g,"@").replace(/"[^"\\\n\r]*"|true|false|null|-?\d+(?:\.\d*)?(?:[eE][+\-]?\d+)?/g,"]").replace(/(?:^|:|,)(?:\s*\[)+/g,"")))return j=eval("("+text+")"),typeof reviver=="function"?walk({"":j},""):j;throw new SyntaxError("JSON.parse")})}(),function(a,b){"use strict";var c=a.History=a.History||{},d=a.jQuery;if(typeof c.Adapter!="undefined")throw new Error("History.js Adapter has already been loaded...");c.Adapter={bind:function(a,b,c){d(a).bind(b,c)},trigger:function(a,b,c){d(a).trigger(b,c)},extractEventData:function(a,c,d){var e=c&&c.originalEvent&&c.originalEvent[a]||d&&d[a]||b;return e},onDomLoad:function(a){d(a)}},typeof c.init!="undefined"&&c.init()}(window),function(a,b){"use strict";var c=a.document,d=a.setTimeout||d,e=a.clearTimeout||e,f=a.setInterval||f,g=a.History=a.History||{};if(typeof g.initHtml4!="undefined")throw new Error("History.js HTML4 Support has already been loaded...");g.initHtml4=function(){if(typeof g.initHtml4.initialized!="undefined")return!1;g.initHtml4.initialized=!0,g.enabled=!0,g.savedHashes=[],g.isLastHash=function(a){var b=g.getHashByIndex(),c;return c=a===b,c},g.saveHash=function(a){return g.isLastHash(a)?!1:(g.savedHashes.push(a),!0)},g.getHashByIndex=function(a){var b=null;return typeof a=="undefined"?b=g.savedHashes[g.savedHashes.length-1]:a<0?b=g.savedHashes[g.savedHashes.length+a]:b=g.savedHashes[a],b},g.discardedHashes={},g.discardedStates={},g.discardState=function(a,b,c){var d=g.getHashByState(a),e;return e={discardedState:a,backState:c,forwardState:b},g.discardedStates[d]=e,!0},g.discardHash=function(a,b,c){var d={discardedHash:a,backState:c,forwardState:b};return g.discardedHashes[a]=d,!0},g.discardedState=function(a){var b=g.getHashByState(a),c;return c=g.discardedStates[b]||!1,c},g.discardedHash=function(a){var b=g.discardedHashes[a]||!1;return b},g.recycleState=function(a){var b=g.getHashByState(a);return g.discardedState(a)&&delete g.discardedStates[b],!0},g.emulated.hashChange&&(g.hashChangeInit=function(){g.checkerFunction=null;var b="",d,e,h,i;return g.isInternetExplorer()?(d="historyjs-iframe",e=c.createElement("iframe"),e.setAttribute("id",d),e.style.display="none",c.body.appendChild(e),e.contentWindow.document.open(),e.contentWindow.document.close(),h="",i=!1,g.checkerFunction=function(){if(i)return!1;i=!0;var c=g.getHash()||"",d=g.unescapeHash(e.contentWindow.document.location.hash)||"";return c!==b?(b=c,d!==c&&(h=d=c,e.contentWindow.document.open(),e.contentWindow.document.close(),e.contentWindow.document.location.hash=g.escapeHash(c)),g.Adapter.trigger(a,"hashchange")):d!==h&&(h=d,g.setHash(d,!1)),i=!1,!0}):g.checkerFunction=function(){var c=g.getHash();return c!==b&&(b=c,g.Adapter.trigger(a,"hashchange")),!0},g.intervalList.push(f(g.checkerFunction,g.options.hashChangeInterval)),!0},g.Adapter.onDomLoad(g.hashChangeInit)),g.emulated.pushState&&(g.onHashChange=function(b){var d=b&&b.newURL||c.location.href,e=g.getHashByUrl(d),f=null,h=null,i=null,j;return g.isLastHash(e)?(g.busy(!1),!1):(g.doubleCheckComplete(),g.saveHash(e),e&&g.isTraditionalAnchor(e)?(g.Adapter.trigger(a,"anchorchange"),g.busy(!1),!1):(f=g.extractState(g.getFullUrl(e||c.location.href,!1),!0),g.isLastSavedState(f)?(g.busy(!1),!1):(h=g.getHashByState(f),j=g.discardedState(f),j?(g.getHashByIndex(-2)===g.getHashByState(j.forwardState)?g.back(!1):g.forward(!1),!1):(g.pushState(f.data,f.title,f.url,!1),!0))))},g.Adapter.bind(a,"hashchange",g.onHashChange),g.pushState=function(b,d,e,f){if(g.getHashByUrl(e))throw new Error("History.js does not support states with fragement-identifiers (hashes/anchors).");if(f!==!1&&g.busy())return g.pushQueue({scope:g,callback:g.pushState,args:arguments,queue:f}),!1;g.busy(!0);var h=g.createStateObject(b,d,e),i=g.getHashByState(h),j=g.getState(!1),k=g.getHashByState(j),l=g.getHash();return g.storeState(h),g.expectedStateId=h.id,g.recycleState(h),g.setTitle(h),i===k?(g.busy(!1),!1):i!==l&&i!==g.getShortUrl(c.location.href)?(g.setHash(i,!1),!1):(g.saveState(h),g.Adapter.trigger(a,"statechange"),g.busy(!1),!0)},g.replaceState=function(a,b,c,d){if(g.getHashByUrl(c))throw new Error("History.js does not support states with fragement-identifiers (hashes/anchors).");if(d!==!1&&g.busy())return g.pushQueue({scope:g,callback:g.replaceState,args:arguments,queue:d}),!1;g.busy(!0);var e=g.createStateObject(a,b,c),f=g.getState(!1),h=g.getStateByIndex(-2);return g.discardState(f,e,h),g.pushState(e.data,e.title,e.url,!1),!0}),g.emulated.pushState&&g.getHash()&&!g.emulated.hashChange&&g.Adapter.onDomLoad(function(){g.Adapter.trigger(a,"hashchange")})},typeof g.init!="undefined"&&g.init()}(window),function(a,b){"use strict";var c=a.console||b,d=a.document,e=a.navigator,f=a.sessionStorage||!1,g=a.setTimeout,h=a.clearTimeout,i=a.setInterval,j=a.clearInterval,k=a.JSON,l=a.alert,m=a.History=a.History||{},n=a.history;k.stringify=k.stringify||k.encode,k.parse=k.parse||k.decode;if(typeof m.init!="undefined")throw new Error("History.js Core has already been loaded...");m.init=function(){return typeof m.Adapter=="undefined"?!1:(typeof m.initCore!="undefined"&&m.initCore(),typeof m.initHtml4!="undefined"&&m.initHtml4(),!0)},m.initCore=function(){if(typeof m.initCore.initialized!="undefined")return!1;m.initCore.initialized=!0,m.options=m.options||{},m.options.hashChangeInterval=m.options.hashChangeInterval||100,m.options.safariPollInterval=m.options.safariPollInterval||500,m.options.doubleCheckInterval=m.options.doubleCheckInterval||500,m.options.storeInterval=m.options.storeInterval||1e3,m.options.busyDelay=m.options.busyDelay||250,m.options.debug=m.options.debug||!1,m.options.initialTitle=m.options.initialTitle||d.title,m.intervalList=[],m.clearAllIntervals=function(){var a,b=m.intervalList;if(typeof b!="undefined"&&b!==null){for(a=0;a<b.length;a++)j(b[a]);m.intervalList=null}},m.debug=function(){(m.options.debug||!1)&&m.log.apply(m,arguments)},m.log=function(){var a=typeof c!="undefined"&&typeof c.log!="undefined"&&typeof c.log.apply!="undefined",b=d.getElementById("log"),e,f,g,h,i;a?(h=Array.prototype.slice.call(arguments),e=h.shift(),typeof c.debug!="undefined"?c.debug.apply(c,[e,h]):c.log.apply(c,[e,h])):e="\n"+arguments[0]+"\n";for(f=1,g=arguments.length;f<g;++f){i=arguments[f];if(typeof i=="object"&&typeof k!="undefined")try{i=k.stringify(i)}catch(j){}e+="\n"+i+"\n"}return b?(b.value+=e+"\n-----\n",b.scrollTop=b.scrollHeight-b.clientHeight):a||l(e),!0},m.getInternetExplorerMajorVersion=function(){var a=m.getInternetExplorerMajorVersion.cached=typeof m.getInternetExplorerMajorVersion.cached!="undefined"?m.getInternetExplorerMajorVersion.cached:function(){var a=3,b=d.createElement("div"),c=b.getElementsByTagName("i");while((b.innerHTML="<!--[if gt IE "+ ++a+"]><i></i><![endif]-->")&&c[0]);return a>4?a:!1}();return a},m.isInternetExplorer=function(){var a=m.isInternetExplorer.cached=typeof m.isInternetExplorer.cached!="undefined"?m.isInternetExplorer.cached:Boolean(m.getInternetExplorerMajorVersion());return a},m.emulated={pushState:!Boolean(a.history&&a.history.pushState&&a.history.replaceState&&!/ Mobile\/([1-7][a-z]|(8([abcde]|f(1[0-8]))))/i.test(e.userAgent)&&!/AppleWebKit\/5([0-2]|3[0-2])/i.test(e.userAgent)),hashChange:Boolean(!("onhashchange"in a||"onhashchange"in d)||m.isInternetExplorer()&&m.getInternetExplorerMajorVersion()<8)},m.enabled=!m.emulated.pushState,m.bugs={setHash:Boolean(!m.emulated.pushState&&e.vendor==="Apple Computer, Inc."&&/AppleWebKit\/5([0-2]|3[0-3])/.test(e.userAgent)),safariPoll:Boolean(!m.emulated.pushState&&e.vendor==="Apple Computer, Inc."&&/AppleWebKit\/5([0-2]|3[0-3])/.test(e.userAgent)),ieDoubleCheck:Boolean(m.isInternetExplorer()&&m.getInternetExplorerMajorVersion()<8),hashEscape:Boolean(m.isInternetExplorer()&&m.getInternetExplorerMajorVersion()<7)},m.isEmptyObject=function(a){for(var b in a)return!1;return!0},m.cloneObject=function(a){var b,c;return a?(b=k.stringify(a),c=k.parse(b)):c={},c},m.getRootUrl=function(){var a=d.location.protocol+"//"+(d.location.hostname||d.location.host);if(d.location.port||!1)a+=":"+d.location.port;return a+="/",a},m.getBaseHref=function(){var a=d.getElementsByTagName("base"),b=null,c="";return a.length===1&&(b=a[0],c=b.href.replace(/[^\/]+$/,"")),c=c.replace(/\/+$/,""),c&&(c+="/"),c},m.getBaseUrl=function(){var a=m.getBaseHref()||m.getBasePageUrl()||m.getRootUrl();return a},m.getPageUrl=function(){var a=m.getState(!1,!1),b=(a||{}).url||d.location.href,c;return c=b.replace(/\/+$/,"").replace(/[^\/]+$/,function(a,b,c){return/\./.test(a)?a:a+"/"}),c},m.getBasePageUrl=function(){var a=d.location.href.replace(/[#\?].*/,"").replace(/[^\/]+$/,function(a,b,c){return/[^\/]$/.test(a)?"":a}).replace(/\/+$/,"")+"/";return a},m.getFullUrl=function(a,b){var c=a,d=a.substring(0,1);return b=typeof b=="undefined"?!0:b,/[a-z]+\:\/\//.test(a)||(d==="/"?c=m.getRootUrl()+a.replace(/^\/+/,""):d==="#"?c=m.getPageUrl().replace(/#.*/,"")+a:d==="?"?c=m.getPageUrl().replace(/[\?#].*/,"")+a:b?c=m.getBaseUrl()+a.replace(/^(\.\/)+/,""):c=m.getBasePageUrl()+a.replace(/^(\.\/)+/,"")),c.replace(/\#$/,"")},m.getShortUrl=function(a){var b=a,c=m.getBaseUrl(),d=m.getRootUrl();return m.emulated.pushState&&(b=b.replace(c,"")),b=b.replace(d,"/"),m.isTraditionalAnchor(b)&&(b="./"+b),b=b.replace(/^(\.\/)+/g,"./").replace(/\#$/,""),b},m.store={},m.idToState=m.idToState||{},m.stateToId=m.stateToId||{},m.urlToId=m.urlToId||{},m.storedStates=m.storedStates||[],m.savedStates=m.savedStates||[],m.normalizeStore=function(){m.store.idToState=m.store.idToState||{},m.store.urlToId=m.store.urlToId||{},m.store.stateToId=m.store.stateToId||{}},m.getState=function(a,b){typeof a=="undefined"&&(a=!0),typeof b=="undefined"&&(b=!0);var c=m.getLastSavedState();return!c&&b&&(c=m.createStateObject()),a&&(c=m.cloneObject(c),c.url=c.cleanUrl||c.url),c},m.getIdByState=function(a){var b=m.extractId(a.url),c;if(!b){c=m.getStateString(a);if(typeof m.stateToId[c]!="undefined")b=m.stateToId[c];else if(typeof m.store.stateToId[c]!="undefined")b=m.store.stateToId[c];else{for(;;){b=(new Date).getTime()+String(Math.random()).replace(/\D/g,"");if(typeof m.idToState[b]=="undefined"&&typeof m.store.idToState[b]=="undefined")break}m.stateToId[c]=b,m.idToState[b]=a}}return b},m.normalizeState=function(a){var b,c;if(!a||typeof a!="object")a={};if(typeof a.normalized!="undefined")return a;if(!a.data||typeof a.data!="object")a.data={};b={},b.normalized=!0,b.title=a.title||"",b.url=m.getFullUrl(m.unescapeString(a.url||d.location.href)),b.hash=m.getShortUrl(b.url),b.data=m.cloneObject(a.data),b.id=m.getIdByState(b),b.cleanUrl=b.url.replace(/\??\&_suid.*/,""),b.url=b.cleanUrl,c=!m.isEmptyObject(b.data);if(b.title||c)b.hash=m.getShortUrl(b.url).replace(/\??\&_suid.*/,""),/\?/.test(b.hash)||(b.hash+="?"),b.hash+="&_suid="+b.id;return b.hashedUrl=m.getFullUrl(b.hash),(m.emulated.pushState||m.bugs.safariPoll)&&m.hasUrlDuplicate(b)&&(b.url=b.hashedUrl),b},m.createStateObject=function(a,b,c){var d={data:a,title:b,url:c};return d=m.normalizeState(d),d},m.getStateById=function(a){a=String(a);var c=m.idToState[a]||m.store.idToState[a]||b;return c},m.getStateString=function(a){var b,c,d;return b=m.normalizeState(a),c={data:b.data,title:a.title,url:a.url},d=k.stringify(c),d},m.getStateId=function(a){var b,c;return b=m.normalizeState(a),c=b.id,c},m.getHashByState=function(a){var b,c;return b=m.normalizeState(a),c=b.hash,c},m.extractId=function(a){var b,c,d;return c=/(.*)\&_suid=([0-9]+)$/.exec(a),d=c?c[1]||a:a,b=c?String(c[2]||""):"",b||!1},m.isTraditionalAnchor=function(a){var b=!/[\/\?\.]/.test(a);return b},m.extractState=function(a,b){var c=null,d,e;return b=b||!1,d=m.extractId(a),d&&(c=m.getStateById(d)),c||(e=m.getFullUrl(a),d=m.getIdByUrl(e)||!1,d&&(c=m.getStateById(d)),!c&&b&&!m.isTraditionalAnchor(a)&&(c=m.createStateObject(null,null,e))),c},m.getIdByUrl=function(a){var c=m.urlToId[a]||m.store.urlToId[a]||b;return c},m.getLastSavedState=function(){return m.savedStates[m.savedStates.length-1]||b},m.getLastStoredState=function(){return m.storedStates[m.storedStates.length-1]||b},m.hasUrlDuplicate=function(a){var b=!1,c;return c=m.extractState(a.url),b=c&&c.id!==a.id,b},m.storeState=function(a){return m.urlToId[a.url]=a.id,m.storedStates.push(m.cloneObject(a)),a},m.isLastSavedState=function(a){var b=!1,c,d,e;return m.savedStates.length&&(c=a.id,d=m.getLastSavedState(),e=d.id,b=c===e),b},m.saveState=function(a){return m.isLastSavedState(a)?!1:(m.savedStates.push(m.cloneObject(a)),!0)},m.getStateByIndex=function(a){var b=null;return typeof a=="undefined"?b=m.savedStates[m.savedStates.length-1]:a<0?b=m.savedStates[m.savedStates.length+a]:b=m.savedStates[a],b},m.getHash=function(){var a=m.unescapeHash(d.location.hash);return a},m.unescapeString=function(b){var c=b,d;for(;;){d=a.unescape(c);if(d===c)break;c=d}return c},m.unescapeHash=function(a){var b=m.normalizeHash(a);return b=m.unescapeString(b),b},m.normalizeHash=function(a){var b=a.replace(/[^#]*#/,"").replace(/#.*/,"");return b},m.setHash=function(a,b){var c,e,f;return b!==!1&&m.busy()?(m.pushQueue({scope:m,callback:m.setHash,args:arguments,queue:b}),!1):(c=m.escapeHash(a),m.busy(!0),e=m.extractState(a,!0),e&&!m.emulated.pushState?m.pushState(e.data,e.title,e.url,!1):d.location.hash!==c&&(m.bugs.setHash?(f=m.getPageUrl(),m.pushState(null,null,f+"#"+c,!1)):d.location.hash=c),m)},m.escapeHash=function(b){var c=m.normalizeHash(b);return c=a.escape(c),m.bugs.hashEscape||(c=c.replace(/\%21/g,"!").replace(/\%26/g,"&").replace(/\%3D/g,"=").replace(/\%3F/g,"?")),c},m.getHashByUrl=function(a){var b=String(a).replace(/([^#]*)#?([^#]*)#?(.*)/,"$2");return b=m.unescapeHash(b),b},m.setTitle=function(a){var b=a.title,c;b||(c=m.getStateByIndex(0),c&&c.url===a.url&&(b=c.title||m.options.initialTitle));try{d.getElementsByTagName("title")[0].innerHTML=b.replace("<","&lt;").replace(">","&gt;").replace(" & "," &amp; ")}catch(e){}return d.title=b,m},m.queues=[],m.busy=function(a){typeof a!="undefined"?m.busy.flag=a:typeof m.busy.flag=="undefined"&&(m.busy.flag=!1);if(!m.busy.flag){h(m.busy.timeout);var b=function(){var a,c,d;if(m.busy.flag)return;for(a=m.queues.length-1;a>=0;--a){c=m.queues[a];if(c.length===0)continue;d=c.shift(),m.fireQueueItem(d),m.busy.timeout=g(b,m.options.busyDelay)}};m.busy.timeout=g(b,m.options.busyDelay)}return m.busy.flag},m.busy.flag=!1,m.fireQueueItem=function(a){return a.callback.apply(a.scope||m,a.args||[])},m.pushQueue=function(a){return m.queues[a.queue||0]=m.queues[a.queue||0]||[],m.queues[a.queue||0].push(a),m},m.queue=function(a,b){return typeof a=="function"&&(a={callback:a}),typeof b!="undefined"&&(a.queue=b),m.busy()?m.pushQueue(a):m.fireQueueItem(a),m},m.clearQueue=function(){return m.busy.flag=!1,m.queues=[],m},m.stateChanged=!1,m.doubleChecker=!1,m.doubleCheckComplete=function(){return m.stateChanged=!0,m.doubleCheckClear(),m},m.doubleCheckClear=function(){return m.doubleChecker&&(h(m.doubleChecker),m.doubleChecker=!1),m},m.doubleCheck=function(a){return m.stateChanged=!1,m.doubleCheckClear(),m.bugs.ieDoubleCheck&&(m.doubleChecker=g(function(){return m.doubleCheckClear(),m.stateChanged||a(),!0},m.options.doubleCheckInterval)),m},m.safariStatePoll=function(){var b=m.extractState(d.location.href),c;if(!m.isLastSavedState(b))c=b;else return;return c||(c=m.createStateObject()),m.Adapter.trigger(a,"popstate"),m},m.back=function(a){return a!==!1&&m.busy()?(m.pushQueue({scope:m,callback:m.back,args:arguments,queue:a}),!1):(m.busy(!0),m.doubleCheck(function(){m.back(!1)}),n.go(-1),!0)},m.forward=function(a){return a!==!1&&m.busy()?(m.pushQueue({scope:m,callback:m.forward,args:arguments,queue:a}),!1):(m.busy(!0),m.doubleCheck(function(){m.forward(!1)}),n.go(1),!0)},m.go=function(a,b){var c;if(a>0)for(c=1;c<=a;++c)m.forward(b);else{if(!(a<0))throw new Error("History.go: History.go requires a positive or negative integer passed.");for(c=-1;c>=a;--c)m.back(b)}return m};if(m.emulated.pushState){var o=function(){};m.pushState=m.pushState||o,m.replaceState=m.replaceState||o}else m.onPopState=function(b,c){var e=!1,f=!1,g,h;return m.doubleCheckComplete(),g=m.getHash(),g?(h=m.extractState(g||d.location.href,!0),h?m.replaceState(h.data,h.title,h.url,!1):(m.Adapter.trigger(a,"anchorchange"),m.busy(!1)),m.expectedStateId=!1,!1):(e=m.Adapter.extractEventData("state",b,c)||!1,e?f=m.getStateById(e):m.expectedStateId?f=m.getStateById(m.expectedStateId):f=m.extractState(d.location.href),f||(f=m.createStateObject(null,null,d.location.href)),m.expectedStateId=!1,m.isLastSavedState(f)?(m.busy(!1),!1):(m.storeState(f),m.saveState(f),m.setTitle(f),m.Adapter.trigger(a,"statechange"),m.busy(!1),!0))},m.Adapter.bind(a,"popstate",m.onPopState),m.pushState=function(b,c,d,e){if(m.getHashByUrl(d)&&m.emulated.pushState)throw new Error("History.js does not support states with fragement-identifiers (hashes/anchors).");if(e!==!1&&m.busy())return m.pushQueue({scope:m,callback:m.pushState,args:arguments,queue:e}),!1;m.busy(!0);var f=m.createStateObject(b,c,d);return m.isLastSavedState(f)?m.busy(!1):(m.storeState(f),m.expectedStateId=f.id,n.pushState(f.id,f.title,f.url),m.Adapter.trigger(a,"popstate")),!0},m.replaceState=function(b,c,d,e){if(m.getHashByUrl(d)&&m.emulated.pushState)throw new Error("History.js does not support states with fragement-identifiers (hashes/anchors).");if(e!==!1&&m.busy())return m.pushQueue({scope:m,callback:m.replaceState,args:arguments,queue:e}),!1;m.busy(!0);var f=m.createStateObject(b,c,d);return m.isLastSavedState(f)?m.busy(!1):(m.storeState(f),m.expectedStateId=f.id,n.replaceState(f.id,f.title,f.url),m.Adapter.trigger(a,"popstate")),!0};if(f){try{m.store=k.parse(f.getItem("History.store"))||{}}catch(p){m.store={}}m.normalizeStore()}else m.store={},m.normalizeStore();m.Adapter.bind(a,"beforeunload",m.clearAllIntervals),m.Adapter.bind(a,"unload",m.clearAllIntervals),m.saveState(m.storeState(m.extractState(d.location.href,!0))),f&&(m.onUnload=function(){var a,b;try{a=k.parse(f.getItem("History.store"))||{}}catch(c){a={}}a.idToState=a.idToState||{},a.urlToId=a.urlToId||{},a.stateToId=a.stateToId||{};for(b in m.idToState){if(!m.idToState.hasOwnProperty(b))continue;a.idToState[b]=m.idToState[b]}for(b in m.urlToId){if(!m.urlToId.hasOwnProperty(b))continue;a.urlToId[b]=m.urlToId[b]}for(b in m.stateToId){if(!m.stateToId.hasOwnProperty(b))continue;a.stateToId[b]=m.stateToId[b]}m.store=a,m.normalizeStore(),f.setItem("History.store",k.stringify(a))},m.intervalList.push(i(m.onUnload,m.options.storeInterval)),m.Adapter.bind(a,"beforeunload",m.onUnload),m.Adapter.bind(a,"unload",m.onUnload));if(!m.emulated.pushState){m.bugs.safariPoll&&m.intervalList.push(i(m.safariStatePoll,m.options.safariPollInterval));if(e.vendor==="Apple Computer, Inc."||(e.appCodeName||"")==="Mozilla")m.Adapter.bind(a,"hashchange",function(){m.Adapter.trigger(a,"popstate")}),m.getHash()&&m.Adapter.onDomLoad(function(){m.Adapter.trigger(a,"hashchange")})}},m.init()}(window)

Step 3: Modifying the “header.php” File in Your WordPress Theme

To proceed, log in to your WordPress admin panel and navigate to “Appearance” -> “Theme Editor”. In the Theme Editor, locate and select the “header.php” file. Inside this file, paste the provided code. This code snippet will be responsible for including the necessary JavaScript files and initiating the AJAX loading functionality on your website.

<script type='text/javascript' src='<?php echo get_template_directory_uri(); ?>/loader_boom/ajax__history.js?ver=5.3.2'></script>
<script type='text/javascript' src='<?php echo get_template_directory_uri(); ?>/loader_boom/ajax__loads.js?ver=5.3.2'></script>
<script> var reload_helper = {"rootUrl":"http:\/\/<?php echo $_SERVER['HTTP_HOST']; ?>\/\/","ids":"","container_id":"main","mcdc":"menu","searchID":"searchform","transition":"","scrollTop":"","loader":"","bp_status":""}; </script>

I trust that this guide has provided you with a solid foundation for creating your own “without-page-refresh” solutions. This method is applicable to any WordPress website and offers an excellent approach to optimize resource-heavy components that don’t need to be loaded immediately, such as a sizable dropdown list of products. By following these straightforward steps, you can effortlessly load these components using jQuery AJAX.

Note: Please be aware that while the provided source code is intended to function on both local and live servers, there is a chance that it may become outdated, resulting in issues. If you encounter any difficulties, it is advisable to seek updated source code or explore alternative solutions to ensure optimal performance. Stay up to date with the latest practices and consider consulting relevant documentation or online resources for the most current techniques.

Posted on Leave a comment

jQuery Cookies Bar Form Set Cookie WordPress

Incorporating jQuery into a WordPress site makes setting up a cookie bar a breeze. This article serves as a comprehensive guide on leveraging jQuery for cookie management, including setting, retrieving, and removing cookies. It presents a streamlined and effective solution specifically tailored for WordPress users.

Numerous options exist for reading, setting, and removing cookies. However, if you prefer a straightforward approach that eliminates unnecessary features, you can utilize the following jQuery functions for swift and effortless execution of these tasks. Simply add these functions to a JavaScript file for seamless integration.

To implement this solution, create three essential files: “index.html” for the webpage, “style.css” for the stylesheet, and “cookie.js” for the JavaScript file.

It’s worth highlighting that jQuery cookies seamlessly integrate with any platform or framework, including WordPress.


To enable cookie functionality on your website, you will need an index file. For WordPress users, simply copy the code provided inside the body tag.

<!doctype html>
<head>
  <meta charset="utf-8">  
  <title>How to set cookies with JavaScript Demo</title>  
  <link rel="stylesheet" type="text/css" href="style.css" />  
</head>
<body>
  <!-- For WordPress users copy start -->
  <div id="container">
    <div class="message  cookie__set_message  hid__sec">
	  <p>Displayed only the first time you visit this page. Refresh to hide it!</p>
	  
      <p>Even when you refresh the page, the browser remembers your option.</p>
    </div>

    <div class="message  cookie__onclc  hid__sec">
      <p>Set Cookies hide this message, by clicking the  &ldquo;&times;&rdquo; on the right of this box <a href="#?" class="close" title="Hide This Message">&times;</a></p>
      <p>This is a new message. Even when you refresh the page, the browser remembers your option.</p>
    </div>
  </div>

  <footer>
    <div class="reset">To reset, <a href="">remove the cookies</a>.</div>  
  </footer>
  <script type="text/javascript" src="http://code.jquery.com/jquery-1.9.1.min.js"></script>
  <script type="text/javascript" src="cookie.js"></script>  
  <script type="text/JavaScript">
    $(document).ready(function() {
      // COOKIES
      if ($.cookie('hide-after-load') == 'yes') {
        $('.cookie__set_message').removeClass('hid__sec');
        $('.cookie__set_message').addClass('hide--first');
      }
      // if the cookie is true, hide the initial message and show the other one
      if ($.cookie('hide-after-click') == 'yes') {
        $('.cookie__onclc').removeClass('hid__sec');
        $('.cookie__onclc').addClass('hide--first');
      }
      // add cookie to hide the first message after load (on refresh it will be hidden)
      $.cookie('hide-after-load', 'yes', {expires: 7 });
      $('.close').click(function() {
        if (!$('.cookie__onclc').is('hide--first')) {
          $('.cookie__onclc').removeClass('hid__sec');
          $('.cookie__onclc').addClass('hide--first');
          $.cookie('hide-after-click', 'yes', {expires: 7 });
        }
        return false;
      })
      //reset the cookies (not shown in tutorial)
      $('.reset a').click(function() {
        if (!$(this).hasClass('clicked')) {
          $(this).addClass('clicked');
          // add cookie setting that user has clicked
          $.cookie('hide-after-load', 'no', {expires: 7 });
          $.cookie('hide-after-click', 'no', {expires: 7 });
        }
        location.reload();
      });
    });
  </script>
<!-- For WordPress users copy start -->
</body>
</html>

2. Steps Create style.css (For wordPress Appearance → style.css )

body { font-family: "Helvetica Neue", 'Helvetica', sans-serif; color: #666; margin: 1em; line-height: 2; } a:link, a:visited { color: #f00; text-decoration: none; padding-bottom: 0.1875em; } a:hover{ color: #fe580f; cursor: pointer; }
  /* For WordPress Start */ 
  .hide--first > *:first-child {
    display: none;
  }
  .hid__sec > *:last-child {
    display: none;
  }
  /* For WordPress End */ 
  .message { text-align: center; width: 42%; padding: 0 2%; float: left; background: #f5deff; } .message:last-of-type { float: right; } .close { color: #f00; position: absolute; text-transform: lowercase; right: 20px; font-size: 1.5em; top: 10px; line-height: 1; border: none !important; } p.info { font-size: 19px; margin-bottom: 50px; text-align: center; } p.info span { color: #666 } footer:before{ content: ""; display: table; clear: both; } footer { padding-top: 40%; color: #888; text-align: center; }

3. Create File cookie.js

/*!
 * jQuery Cookie Plugin v1.4.0
 * https://github.com/carhartl/jquery-cookie
 *
 * Copyright 2013 Klaus Hartl
 * Released under the MIT license
 */
(function (factory) { if (typeof define === 'function' && define.amd) { define(['jquery'], factory); } else { factory(jQuery); }}(function ($) { var pluses = /\+/g; function encode(s) { return config.raw ? s : encodeURIComponent(s); } function decode(s) { return config.raw ? s : decodeURIComponent(s); } function stringifyCookieValue(value) { return encode(config.json ? JSON.stringify(value) : String(value)); } function parseCookieValue(s) { if (s.indexOf('"') === 0) { s = s.slice(1, -1).replace(/\\"/g, '"').replace(/\\\\/g, '\\'); } try { s = decodeURIComponent(s.replace(pluses, ' ')); return config.json ? JSON.parse(s) : s; } catch(e) {} } function read(s, converter) { var value = config.raw ? s : parseCookieValue(s); return $.isFunction(converter) ? converter(value) : value; } var config = $.cookie = function (key, value, options) { if (value !== undefined && !$.isFunction(value)) { options = $.extend({}, config.defaults, options); if (typeof options.expires === 'number') { var days = options.expires, t = options.expires = new Date(); t.setTime(+t + days * 864e+5); } return (document.cookie = [ encode(key), '=', stringifyCookieValue(value), options.expires ? '; expires=' + options.expires.toUTCString() : '', options.path ? '; path=' + options.path : '', options.domain ? '; domain=' + options.domain : '', options.secure ? '; secure' : '' ].join('')); } var result = key ? undefined : {}; var cookies = document.cookie ? document.cookie.split('; ') : []; for (var i = 0, l = cookies.length; i < l; i++) { var parts = cookies[i].split('='); var name = decode(parts.shift()); var cookie = parts.join('='); if (key && key === name) { result = read(cookie, value); break; } if (!key && (cookie = read(cookie)) !== undefined) { result[name] = cookie; } } return result; }; config.defaults = {}; $.removeCookie = function (key, options) { if ($.cookie(key) === undefined) { return false; } $.cookie(key, '', $.extend({}, options, { expires: -1 })); return !$.cookie(key); };}));

Please keep in mind that in order to run this code on your local computer, you will need to set up a server environment such as XAMPP or use an online hosting server.

Posted on 1 Comment

PHP YouTube video downloader script working 100% shorts or video

Are you currently seeking a professional PHP YouTube Video Downloader Script for your web-based application? If so, you’re in the right place. I am excited to share with you my extensively modified PHP script, which serves as an exceptional API system for downloading YouTube videos.

With careful attention to detail, this PHP YouTube downloader script has been developed to ensure seamless performance across all video types, including shorts videos, HD videos, and even 4K videos. Given YouTube’s status as the leading platform for video sharing, it often becomes necessary to obtain these videos for offline use.

If you happen to be a PHP developer, it’s highly likely that you’re in need of a reliable PHP script that enables the direct downloading of YouTube videos onto your local server. Therefore, I am thrilled to present to you my highly acclaimed and widely recognized PHP YouTube Video Downloader Script in this post.

Step – 1

Create index.php file and paste below code.

<?php error_reporting(0); ?>
<?php require './_faction/functions.php'; $error = "";?>
<!DOCTYPE html>
<html>
<title>Youtube to MP4 - Convert Youtube Videos to MP4 HD - Andamantech</title>
<meta http-equiv="content-type" content="text/html; charset=UTF-8">
<meta name="viewport" content="width=device-width, initial-scale=1.0">
<meta http-equiv="X-UA-Compatible" content="IE=edge">
<link rel="canonical" href="https://<?php echo $_SERVER['HTTP_HOST'].$_SERVER['PHP_SELF']; ?>">
<meta property="og:url" content="https://andamantech.com/" />
<meta property="og:type" content="website">
<link rel="stylesheet" href="css/main_cs.css">
<link rel="stylesheet" href="css/pasts__.css">
<link rel="stylesheet" href="css/current__.css">
<script
src="https://code.jquery.com/jquery-3.6.0.js"
integrity="sha256-H+K7U5CnXl1h5ywQfKtSj8PCmoN9aaq30gDh27Xc0jk="
crossorigin="anonymous"></script> 
<body class="noclass" id="mode">
<div id="page">
<header class="navbar navbar-light">
<div class="_container _bar">
  <h1 class="brand">
    <a href=".">
      <img src="img/logo.png" width="110" height="32" alt="Tabler" class="navbar-img">
    </a>
  </h1>
  <div class="_right">
    <div class="nightic">
    <div class="nav-item">
      <a href="#">
        <svg xmlns="http://www.w3.org/2000/svg" class="icon" width="24" height="24" viewBox="0 0 24 24" stroke-width="2" stroke="currentColor" fill="none" stroke-linecap="round" stroke-linejoin="round"><path stroke="none" d="M0 0h24v24H0z" fill="none"/><circle cx="12" cy="12" r="4" /><path d="M3 12h1m8 -9v1m8 8h1m-9 8v1m-6.4 -15.4l.7 .7m12.1 -.7l-.7 .7m0 11.4l.7 .7m-12.1 -.7l-.7 .7" /></svg>
      </a>
    </div>
    <div class="nav-item _m-left">
      <a href="#?">
        <svg xmlns="http://www.w3.org/2000/svg" width="24" height="24" viewBox="0 0 24 18" stroke-width="2" stroke="currentColor" fill="none" stroke-linecap="round" stroke-linejoin="round"><path stroke="none" d="M0 0h24v24H0z" fill="none"/><path d="M14 8v-2a2 2 0 0 0 -2 -2h-7a2 2 0 0 0 -2 2v12a2 2 0 0 0 2 2h7a2 2 0 0 0 2 -2v-2" /><path d="M20 12h-13l3 -3m0 6l-3 -3" /></svg>
      </a>
    </div>
    <div class="nav-item _hid-sm _m-left">
      <a href="#">
        <span class="avatar avatar-sm" style="background-image: url(img/islands.jpg)"></span>
          <div class="">Acount</div>
          <div class="_tiny text-muted font4">user ID</div>
      </a>
    </div>
  </div>
  </div>
</div>
</header>
<div class="navbar navbar-light _top">
<div class="_container _bar" id="myNavbar">
<div class="_hid-sm">
<ul class="navbar menu">
<li class="nav-item active"><a href="." class="_bar-item nav-link">
<span class="nav-link-icon"><svg xmlns="http://www.w3.org/2000/svg" class="icon" width="24" height="24" viewBox="0 0 24 24" stroke-width="2" stroke="currentColor" fill="none" stroke-linecap="round" stroke-linejoin="round"><path stroke="none" d="M0 0h24v24H0z" fill="none"></path><polyline points="5 12 3 12 12 3 21 12 19 12"></polyline><path d="M5 12v7a2 2 0 0 0 2 2h10a2 2 0 0 0 2 -2v-7"></path><path d="M9 21v-6a2 2 0 0 1 2 -2h2a2 2 0 0 1 2 2v6"></path></svg>
  </span>
  <span class="nav-link-title">
    Home
  </span>
</a>
</li>
<li class="nav-item _dropdown-hover">
<div class="_bar-item nav-link">
  <span class="nav-link-icon"><svg xmlns="http://www.w3.org/2000/svg" class="icon" width="24" height="24" viewBox="0 0 24 24" stroke-width="2" stroke="currentColor" fill="none" stroke-linecap="round" stroke-linejoin="round"><path stroke="none" d="M0 0h24v24H0z" fill="none"></path><polyline points="12 3 20 7.5 20 16.5 12 21 4 16.5 4 7.5 12 3"></polyline><line x1="12" y1="12" x2="20" y2="7.5"></line><line x1="12" y1="12" x2="12" y2="21"></line><line x1="12" y1="12" x2="4" y2="7.5"></line><line x1="16" y1="5.25" x2="8" y2="9.75"></line></svg>
  </span>
  <span class="_show-inline-block">About Us</span> 
</div>
</li>
<li class="nav-item _dropdown-hover">
<div class="_bar-item nav-link">
<span class="nav-link-icon"><svg xmlns="http://www.w3.org/2000/svg" class="icon" width="24" height="24" viewBox="0 0 24 24" stroke-width="2" stroke="currentColor" fill="none" stroke-linecap="round" stroke-linejoin="round"><path stroke="none" d="M0 0h24v24H0z" fill="none"></path><circle cx="12" cy="10" r="4"></circle><path d="M6.75 16a8.015 8.015 0 1 0 9.25 -13"></path><line x1="12" y1="18" x2="12" y2="22"></line><line x1="8" y1="22" x2="16" y2="22"></line></svg>
</span>
<span class="_show-inline-block">Contact</span> 
</div>
</li>
<li class="nav-item _dropdown-hover">
<div class="_bar-item nav-link">
<span class="nav-link-icon"><svg xmlns="http://www.w3.org/2000/svg" class="icon" width="24" height="24" viewBox="0 0 24 24" stroke-width="2" stroke="currentColor" fill="none" stroke-linecap="round" stroke-linejoin="round"><path stroke="none" d="M0 0h24v24H0z" fill="none"></path><circle cx="5" cy="12" r="1"></circle><circle cx="12" cy="12" r="1"></circle><circle cx="19" cy="12" r="1"></circle></svg>
</span>
<span class="_show-inline-block">More</span> 
</div>
</li>
</ul>
</div>
<a href="javascript:void(0)" class="_bar-item _button _right _hid-lar" onclick="_a_open()">
  ≡
</a>
</div>
</div>
<nav class="_sidebar _bar-block _black _card _animate-left _hid-lar" style="display:none" id="mySidebar">
<a href="javascript:void(0)" onclick="_a_close()" class="_bar-item _button _large p_tb-16">Close &times;</a>
<a href="javascript:void(0);" onclick="_a_close()" class="_bar-item _button">Home</a>
<a href="javascript:void(0);" onclick="_a_close()" class="_bar-item _button">About Us</a>
<a href="javascript:void(0);" onclick="_a_close()" class="_bar-item _button">Contact</a>
</nav>
<div class="_container p_tb-48">
<div class="_row-padding">
<?php if(isset($_POST['submit'])){ ?>
    <?php 
    error_reporting(0);
        $video_link = $_POST['video_link']; // main link
        parse_str( parse_url( $video_link, PHP_URL_QUERY ), $parse_url );
        $checkurl_= explode("=",parse_url($video_link, PHP_URL_QUERY))[0];
        if($checkurl_=="v"){
        $video_id =  $parse_url['v']; 
        }
        else if($checkurl_=="feature"){
                $link_array = explode('/',$video_link);
$clrurl = substr(end($link_array), 0, strpos(end($link_array), "?"));
$video_id=$clrurl;
        }
        else{
        $link_array = explode('/',$video_link);
        $video_id=end($link_array);
        }
if(strlen($video_id)!="11"){
echo "<h2 class='font8 _center '>php syntax error, unexpected</h2>";
}$video = json_decode(getVideoInfo("$video_id"));
$formats = $video->streamingData->formats;
$adaptiveFormats = $video->streamingData->adaptiveFormats;
$thumbnails = $video->videoDetails->thumbnail->thumbnails;
$title = $video->videoDetails->title;
$short_description = $video->videoDetails->shortDescription;
$thumbnail = end($thumbnails)->url;
}
?>
<div class="_col m4 stickybar">
  <div class="_card ctour pricefix_">
  <?php if(isset($_POST['submit'])){ ?>
    <div class="price">
      <div class="d-flex">
      <img src="<?php echo $thumbnail; ?>" style="width:100%">
    </div>
    <div class="card-body">
    <h1><?php echo $title; ?></h1>
    <p><?php echo str_split($short_description, 100)[0]; ?></p>
    </div>
    </div>
    <?php  } else{ ?><img src="img/sidebar.jpg" style="width:100%"><?php } ?>
  </div>
</div>
<div class="_col m8">
<div class="_card mark_ ctour">
<div class="">
<div class="p-large">
<form  method="post" action="">
  <div class="input-group">
  <input class="form-control" type="text" name="video_link" placeholder="Paste Youtube link" <?php if(isset($_POST['video_link'])) echo "value='".$_POST['video_link']."'"; ?> required>
</div>
  <input type="submit" class="_btn submitbt" value="Convert MP4" name="submit">
    <div class="_center text-muted">By using our service you are accepting our terms of service</div>
</form>
<?php if($error) :?>
        <div style="color:red;font-weight: bold;text-align: center"><?php print $error?></div>
    <?php endif;?>
</div>
<hr>
<div class="p-large">
<div class="p_tb-16"><?php if(!empty($formats)): ?>
            <?php if(@$formats[0]->url == ""): ?>
            <div class="card formSmall">
                <div class="card-header">
                    <strong>This video is currently not supported by our downloader!</strong>
                    <small><?php 
                    $signature = "https://example.com?".$formats[0]->signatureCipher;
                                parse_str( parse_url( $signature, PHP_URL_QUERY ), $parse_signature );
                                $url = $parse_signature['url']."&sig=".$parse_signature['s'];
                            ?>
                    </small>
                </div>
            </div>
            <?php 
            die();
            endif;
            ?>
            <div class="card formSmall">
                <div class="card-header">
                    <strong>With Video & Sound</strong>
                </div>
                <div class="card-body">
                    <table class="table ">
                        <tr>
                            <td>Type</td>
                            <td>Quality</td>
                            <td>Download</td>
                        </tr>
                        <?php foreach($formats as $format): ?>
                            <?php
                            if(@$format->url == ""){
                                $signature = "https://example.com?".$format->signatureCipher;
                                parse_str( parse_url( $signature, PHP_URL_QUERY ), $parse_signature );
                                $url = $parse_signature['url']."&sig=".$parse_signature['s'];
                            }else{
                                $url = $format->url;
                            }
                            ?>
                            <tr>
                                <td>
                                    <?php if($format->mimeType) echo explode(";",explode("/",$format->mimeType)[1])[0]; else echo "Unknown";?>
                                </td>
                                <td>
                                    <?php if($format->qualityLabel) echo $format->qualityLabel; else echo "Unknown"; ?>
                                </td>
                                <td>
                                    <a class="_btn btn-primary"
                                        href="_faction/downloader.php?link=<?php echo urlencode($url)?>&title=<?php echo urlencode($title)?>&type=<?php if($format->mimeType) echo explode(";",explode("/",$format->mimeType)[1])[0]; else echo "mp4";?>"
                                    >Download</a> 
                                </td>
                            </tr>
                            </div>
                        <?php endforeach; ?>
                    </table>
                </div>
            </div>
        <?php endif; ?>
        </div>
</div>
</div>
</div>
</div>
</div>
</div>
<section class="p_tb-64 swclr">
<div class="_container">
<div class="_card calsec">
<div class="_row-padding">
<div class="_col m5">
<p class="_opacity">Contact Us</p>
<h2 class="font8">Let's Connect to<br>Discuss your Project</h2>
</div>
<div class="_col m7">
<div class="_row-padding">
  <div class="_col m6">
    <img src="img/icon16.png"><br>
    <span class="font5">Call us-</span>
    <p>+91-9933266338</p>
  </div>
  <div class="_col m6">
    <img src="img/email.png"><br>
    <span class="font5">Drop us a Mail-</span>
      <p>[email protected]</p>
  </div>
</div>
</div>
</div>
</div>
</div>
</section>
<div id="backdrop" class="backdrop mobile-only" style="display: none"></div>
<footer class="footer">
<div class="waves">
<div class="wave" id="wave1"></div>
<div class="wave" id="wave2"></div>
<div class="wave" id="wave3"></div>
<div class="wave" id="wave4"></div>
</div>
<div class="_xlarge _section">
<a href="javascript:0;" class="_text-white"><svg xmlns="http://www.w3.org/2000/svg" class="icon" width="24" height="24" viewBox="0 0 24 24" stroke-width="2" stroke="currentColor" fill="none" stroke-linecap="round" stroke-linejoin="round"><path stroke="none" d="M0 0h24v24H0z" fill="none"/><path d="M7 10v4h3v7h4v-7h3l1 -4h-4v-2a1 1 0 0 1 1 -1h3v-4h-3a5 5 0 0 0 -5 5v2h-3" /></svg></a>
</div>
<p>Powered by <a href="https://andamantech.com/" title="Andamantech" target="_blank" class="_hover-text-green">Andamantech</a></p>
</footer>
</div>
</body>
</html>

Step – 2

Create folder and file (name functions.php) _faction → functions.php

<?php 
error_reporting(E_ALL);
ini_set('display_errors', '1');
function getVideoInfo($video_id){
$ch = curl_init();
curl_setopt($ch, CURLOPT_URL, 'https://www.youtube.com/youtubei/v1/player?key=YOUR_API_KEY');
curl_setopt($ch, CURLOPT_RETURNTRANSFER, 1);
curl_setopt($ch, CURLOPT_POST, 1);
curl_setopt($ch, CURLOPT_POSTFIELDS, '{  "context": {    "client": {      "hl": "en",      "clientName": "WEB",      "clientVersion": "2.20210721.00.00",      "clientFormFactor": "UNKNOWN_FORM_FACTOR",   "clientScreen": "WATCH",      "mainAppWebInfo": {        "graftUrl": "/watch?v='.$video_id.'",           }    },    "user": {      "lockedSafetyMode": false    },    "request": {      "useSsl": true,      "internalExperimentFlags": [],      "consistencyTokenJars": []    }  },  "videoId": "'.$video_id.'",  "playbackContext": {    "contentPlaybackContext": {        "vis": 0,      "splay": false,      "autoCaptionsDefaultOn": false,      "autonavState": "STATE_NONE",      "html5Preference": "HTML5_PREF_WANTS",      "lactMilliseconds": "-1"    }  },  "racyCheckOk": false,  "contentCheckOk": false}');
curl_setopt($ch, CURLOPT_ENCODING, 'gzip, deflate');
$headers = array();
$headers[] = 'Content-Type: application/json';
curl_setopt($ch, CURLOPT_HTTPHEADER, $headers);
$result = curl_exec($ch);
if (curl_errno($ch)) {
echo 'Error:' . curl_error($ch);
}
curl_close($ch);
return $result;
}

Step – 3

Create file inside folder you created name (downloader.php) inside _faction → downloader.php

<?php
$downloadURL = urldecode($_GET['link']);
$type = urldecode($_GET['type']);
$title = urldecode($_GET['title']);
$fileName = $title.'.'.$type;
header("Location: $downloadURL&utm_ref=andamantech.com");

This file download force from YouTube video.

I hope you have found the PHP YouTube Video Downloader Script that I have modified to be helpful. Please feel free to download and use it according to your requirements. Additionally, I encourage you to subscribe to my YouTube Channel, TECHboto, where you can find more engaging tutorials and gain inspiration for your future projects.

Posted on 1 Comment

PHP Moj App Video Downloader Script create your own for free

Introducing an efficient and reliable Moj app video downloader script that can be seamlessly integrated into your website with just a few simple steps!

This script, developed by Dipankar Baidya (Facebook: https://www.facebook.com/dipankarbaidya7919), guarantees fast and secure video downloads from the Moj app. Whether you’re using a computer or a mobile phone, this script supports various video formats and resolutions.

Once downloaded, you can conveniently play the videos using the built-in video player. Additionally, the script offers features like adjusting video playback speed, enabling repeat video mode, and even converting videos to audio files effortlessly.

Experience the convenience of this PHP-based Moj video downloader script, which ensures a user-friendly and versatile video downloading solution for your website.

Step 1 Download

Download PHP Simple HTML DOM Parser

Step 2 Include

Include PHP Simple HTML DOM Parser to your page

include('dm_html_.php');

Step 3 Create Form

Create html form, this form work on get moj app share video link and convert it into mp4.

<form  method="post" action="">
  <div class="input-group">
  <input class="form-control" type="url" name="moj_link" placeholder="Paste Youtube link" <?php if(isset($_POST['submit'])){ echo "value='$moj_link'";} ?>required onclick="this.select();">
</div>
  <input type="submit" class="_btn submitbt" value="Download Video" name="submit">
</form>

This is important steps to get or convert link into video mp4 from simple add this php script to your page

if(isset($_POST['submit']))
{
  $html = file_get_html($moj_link);
  foreach($html->find('video') as $video_){
    echo "<video controls src='".$video_->src."' height=450></video>";
  }
}

I Hope you liked PHP Moj Video Downloader Script which I create feel Free to Download and use it, Don’t forget to Subscribe my YouTube Channel TECHboto.
I hope you enjoyed this tutorial, and maybe got some inspiration for your next project.

Discover our latest Threads Downloader PHP script. You’ll find all the essential information, as well as a demo showcase the appearance and performance of the Threads Downloader PHP script web application.