Discover the world of WordPress with our comprehensive tutorial covering both fundamental and advanced concepts. Tailored for both novices and experts, our tutorial delves into all aspects of WordPress.
WordPress, built on PHP and MySQL, stands as an open-source CMS (Content Management System).
Our tutorial encompasses a wide array of topics, including installation procedures, site creation, navigation through the dashboard, content creation and editing encompassing posts, pages, and comments. Dive into the realm of themes and plugins, master WordPress security, grasp the art of backups, and learn optimization techniques to enhance performance.
Are you facing issues with your WordPress site where search engines aren’t indexing your pages due to the presence of <meta name=”robots” content=”noindex nofollow”? This can be a frustrating roadblock for website owners who want their content to be discoverable through search engines. Fortunately, there’s a simple solution to this problem, and AndamanTech is here to guide you through it.
I have previously mentioned in another blog post about how to remove the WordPress Robots Meta Tag noindex. You can refer to that blog post for updated information.
However, although the function described in that blog post works, there may still be instances where the noindex tag appears or does not change, particularly on search pages. Therefore, to ensure complete removal, you may need to remove the <meta name=”robots” content=”noindex nofollow”> tag from all pages, posts, categories, author pages, etc.
Here’s How to Remove Meta Name=”Robots” Content=”Noindex Nofollow” in WordPress:
Log in to your WordPress Admin Panel: Access your WordPress dashboard by entering your credentials.
Navigate to Appearance: Once logged in, go to the “Appearance” section. You’ll find it on the left-hand side of your dashboard menu.
Access Theme File Editor: Under “Appearance,” locate and click on “Theme File Editor.” This will open the editor where you can make changes to your theme’s files.
Acknowledge Understanding: Before proceeding, ensure that you understand the potential implications of modifying theme files directly. Click on any prompts that ask for confirmation.
Open Theme Functions (functions.php) file: In the Theme File Editor, search for and select the “Theme Functions (functions.php)” file. This file contains the functions that define your theme’s behavior.
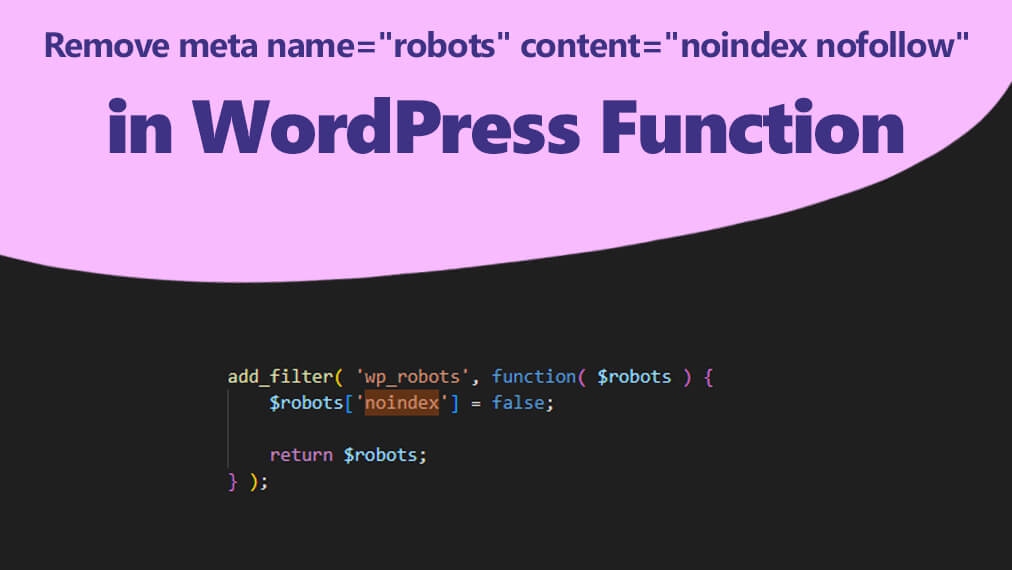
Add Code to Remove Noindex Nofollow Directive: Now, you can add the following code snippet to the bottom of your functions.php file:
This code snippet effectively removes the noindex nofollow directive and replaces it with index, follow, allowing search engines to crawl and index your pages as intended ?s={search_term_string}.
Important Note: Always make sure to back up your functions.php file before making any modifications. This ensures that you can revert to a previous version if needed.
By following these steps and implementing the provided code snippet, you can effectively remove the <meta name=”robots” content=”noindex nofollow” directive from your WordPress site, allowing search engines to properly index your content and improve your site’s visibility in search results.
With AndamanTech simple solution, you can ensure that your valuable content reaches a wider audience and achieves its intended impact. Say goodbye to indexing issues and hello to enhanced discoverability for your WordPress website!
Many of my friends are avid users of the free version of the GeneratePress theme, and they are keen on incorporating some basic customizations into their themes. In this blog post, I’m excited to provide you with a comprehensive guide on this very subject. The time for this exciting transformation is just around the corner!
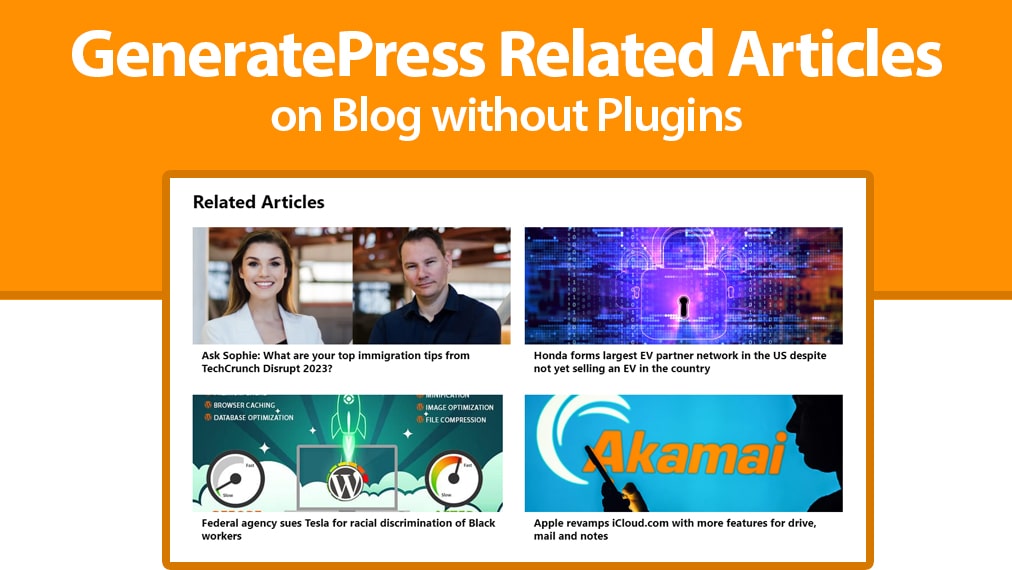
Similar to our own experience with the free version of GeneratePress, there’s a common desire to display related articles on our blog pages. The good news is, you can achieve this without the need for any plugins or third-party tools. I’ll walk you through the process of seamlessly integrating related articles directly into your theme. The necessary code can be found in this post, making implementation a breeze.
The significance of having related articles for SEO cannot be overstated. When users click on a single blog post and discover related articles on the same page, it greatly enriches their browsing experience. Sure, you can display the latest articles in the sidebar, but our goal is to have the blog page automatically identify related articles based on keywords. In this post, I’ll provide you with the script and a clear explanation of where to integrate it. So, stay tuned for more, my friends.
The accompanying image illustrates how our related articles look with a customized CSS style. I’ve detailed the process of creating and displaying related articles in this visually appealing manner. If you’re eager to add this feature to your GeneratePress free theme, then this blog is tailored just for you. You can access the full source code on our website.
Before we dive into the technical steps, I’ve gone ahead and crafted a child theme for GeneratePress. If you’d like to explore it further, you can take a peek at the live preview and even make a purchase if it piques your interest. Here’s the link to check it out.
Now, let’s get to work. First, you’ll want to copy the code enclosed within the “inside-article relate_post” div class in your blog post. Then, navigate to the theme folder of your GeneratePress theme. Inside this folder, you’ll locate a file named “content-single.php.” Scroll down to the very bottom of that file and paste the aforementioned code snippet.
This step essentially involves the copying and pasting of source code into your “content-single.php” file. Once you’ve accomplished that, save the file and refresh the page to ensure the source code harmonizes with the GeneratePress theme.
After confirming that it works, the next step is to append some additional code to your style sheet, “style.css.” Open the file and insert the following CSS code at the bottom or your preferred location:
With these actions completed, refresh the page once more. You’ll now witness the Related Articles section appearing right after your blog content, showcasing all the related articles beautifully.
I assure you that the source code provided in this blog will function as intended. My aim is to share personal projects and valuable source code with you, assisting you on your journey.
Also, I have a YouTube channel, and I’ll include the link within this blog. If you find my content helpful, please consider subscribing and supporting me there.
As a freelancer, I specialize in crafting websites, be it for blogging or e-commerce. If you’re in need of a well-designed, fast-loading website, please don’t hesitate to reach out. The contact information is conveniently located on the top right corner of this page. Simply click there, fill out the form, and I’ll get back to you within 1 to 2 hours to address any inquiries or concerns you may have. I’m here to assist, my friends.
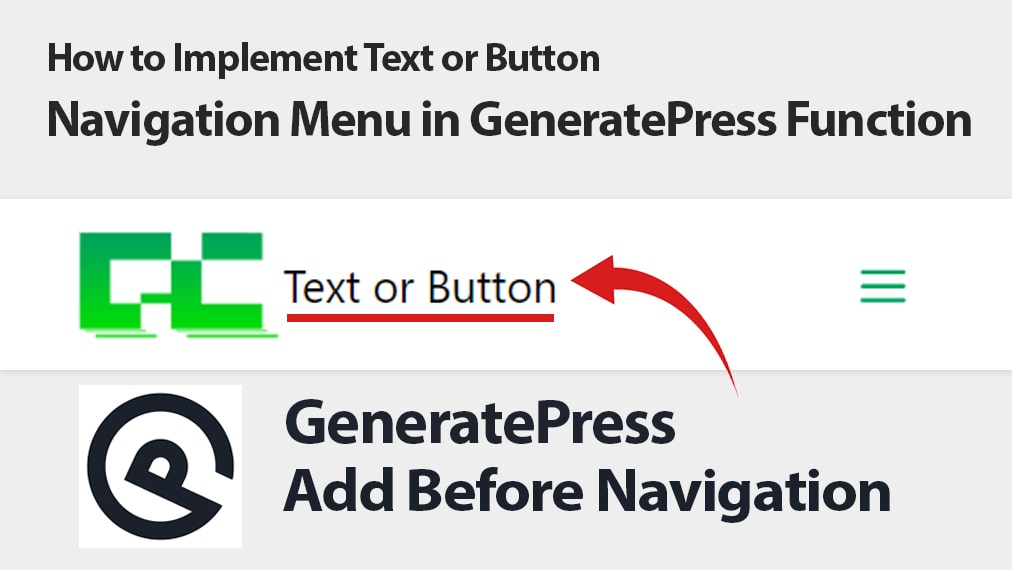
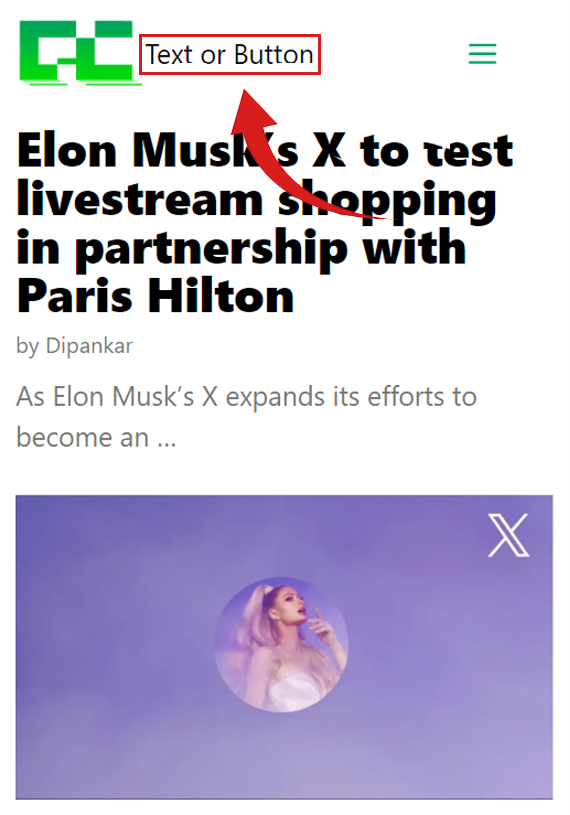
Through this blog post, I aim to guide you on how to add custom text or buttons to your GeneratePress theme’s navigation menu bar. When you click, a menu appears, and you can incorporate your custom elements. I’ll show you how to accomplish this, so stay tuned to this blog for the details.
In a straightforward manner, I’ll explain how to insert custom buttons or text in front of the navigation menu of your GeneratePress theme. I’ll also provide visual representations of the code’s appearance. You can easily achieve this by modifying your function.php file, which I’ll describe in this blog post.
I’ve managed and maintained numerous blogs in the past, and I want to assure you that all the code I provide here is thoroughly tested and functional. I create it through my own practice and share it with you through this blog.
So, let’s explore how to add custom text in front of the navigation bar. If you wish to include custom elements like buttons, links, or text, you can do so effortlessly. Below, I’ve provided the necessary code. All you have to do is copy the source code as instructed.
function add_custom_text() {
?>
<span>Text or Button</span>
<?php
}
add_action('generate_before_navigation', 'add_custom_text', 1, 0);
Open the theme folder of your GeneratePress.
Locate the file named function.php and open it.
Scroll to the end of the function.php file and paste the provided code.
Customize the text as per your preferences.
I’ll illustrate this process with an image in the blog.
After pasting all the provided code, save the file. Then, run it on your server or local host. Refresh the page to ensure that the custom text you added is functioning correctly.
I guarantee that it will work because I thoroughly test everything I share, and there are no coding errors on my end.
Additionally, I have a YouTube channel. You can support me on YouTube by following this link.
That’s all for this blog post. If you found this guide on adding custom text or buttons to GeneratePress helpful, please leave a comment. I’d greatly appreciate it. If you have any questions or need assistance with any project, feel free to contact me. You can find the contact information on the top right side of this page, and I’ll respond within 1-2 hours. Thank you, friends.
In the preceding guide titled “Generating PDFs for WordPress Posts Without Using Plugins: A domPDF Tutorial,” you can find a link to the article on https://andamantech.com/generate-pdf-wordpress-post-without-plugin-dompdf-tutorial/ if you’re inclined to explore it. Subsequently, upon our observation, it became apparent that although the PDF for this WordPress content was being generated, it was not displaying the images linked within the post. Fortunately, addressing this issue is now a straightforward task.
It is possible to generate a PDF file that does not display images when utilizing domPDF for a particular view. To facilitate PDF exportation, the activation of a function called ‘isRemoteEnabled’ is necessary. Data retrieval from a database, inclusive of images, can be accomplished. However, after PDF generation, images might not appear, resulting in a “not found” or “unknown type” warning message. This predicament can be addressed by dynamically loading data from the database as required, thus rectifying the issue and enabling successful PDF exportation.
To initiate the resolution process, access the domPDF Library located on your server. Within this library, a file can be edited to generate PDFs. For improved comprehension, an image illustrating this process is provided.
In practice, direct link images are employed using code such as: (<img src=’https://your_image_link’). This approach offers the advantage of generating PDF images from various website links, seamlessly incorporating images within the text. The domPDF library features an option to enable this functionality. When activated, images on your webpage will be displayed in the PDF file, with images being converted to text during the process.
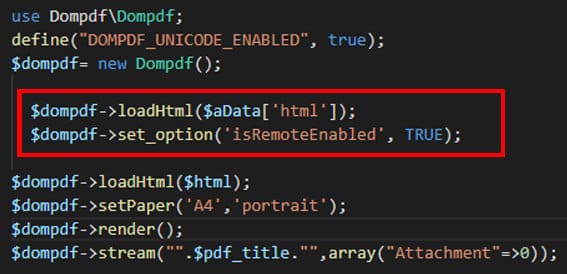
use Dompdf\Dompdf;
 define("DOMPDF_UNICODE_ENABLED", true);
  $dompdf= new Dompdf();

   $dompdf->loadHtml($aData['html']);
    $dompdf->set_option('isRemoteEnabled', TRUE);

   $dompdf->loadHtml($html);
  $dompdf->setPaper('A4','portrait');
 $dompdf->render();
$dompdf->stream("".$pdf_title."",array("Attachment"=>0));
Presently, proceed to edit this file by incorporating the provided code snippet and subsequently save your changes.
The aforementioned code snippet is designed to function exclusively on an online server. It is important to note that attempting to implement this code on a local computer environment will result in non-functionality or the display of an error message. Therefore, it is crucial to execute this code within an online server setting to achieve the desired outcome successfully.
WordPress CRM Project: Dynamic PDF Generation for Posts Without Plugins. In this WordPress CRM project, we are implementing a dynamic PDF generation feature directly within WordPress Posts, eliminating the need for additional plugins. Our goal is to provide readers with a convenient option to download and save posts as PDFs for later viewing. This tutorial holds significant importance, and I am currently in the process of creating a similar solution. Once you have a comprehensive understanding of how this tutorial functions, you can explore the practical benefits it offers.
To gain a better grasp of the process, please refer to our instructional YouTube video provided below. We invite you to subscribe to our channel to stay updated on similar content in the future. Your support is greatly appreciated!
Original Content: “WordPress based CRM project, generate PDF on WordPress Post without plugin, you always needed the dynamic PDF generation feature for the readers for creating PDF downloading option that can help readers to download your post direct and read it later. This tutorial is very important I am also creating one of you can check in after you know full details about this tutorial how it works, is this helpful. You can check our YouTube video check bellow and please Subscribe to our channel for this type of video.”
Step 1: Download the domPDF Library
You can acquire the domPDF library from its GitHub repository directly or through Composer installation. For this guide, I am opting to download the domPDF library from GitHub at the following link: https://github.com/dompdf/dompdf/releases. Hence, I suggest utilizing the GitHub platform for obtaining the Dompdf library.
Step 2: Develop the WordPress Function
In this phase, we will construct a function designed to facilitate the utilization of our PDF generation link. The primary purpose of this function is to extract pertinent information from the database and transmit it to the domPDF library, which is responsible for generating PDFs for your WordPress Posts or Pages. This step encompasses the creation of two distinctive functions:
Retrieve the database ID for a specific post.
Acquire the post title.
[code lang="js"]// function that runs when ShortCode
function pdf_download_generate() {
// Things that you want to do for get post id.
$pdf_post_id = get_the_ID();
return $pdf_post_id;
}
// post id shortcode
add_shortcode('pdfDoload', 'pdf_download_generate');

function pdf_post_title() {
// Things that you want to do for get post title and replace.
$pdf_posttitle = str_replace(" ","-",strtolower(wp_get_document_title()));
return $pdf_posttitle;
}
// post title shortcode
add_shortcode('pdfTitle', 'pdf_post_title');[/code]
Both of these functions are executed via a shortcode mechanism. This shortcode feature holds considerable significance as it empowers us to generate a PDF link precisely where it is desired. A highly effective location for showcasing this download link is the sidebar; we can readily employ it as a widget to present a prominent “Download” button.
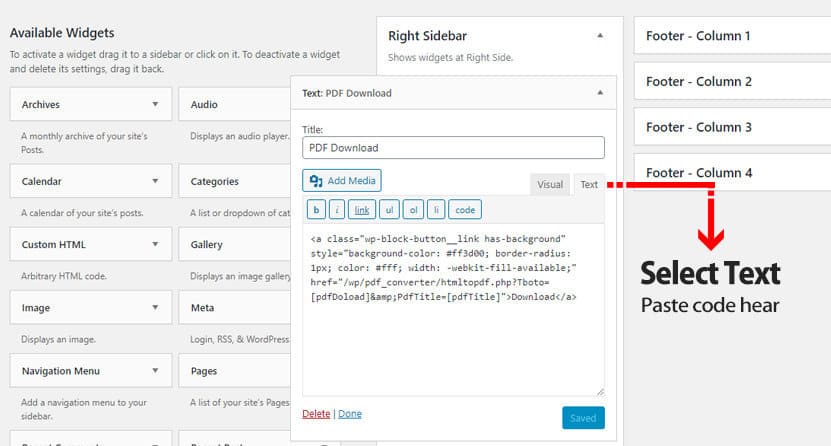
Step 3: Establish a PDF Download Button
In this stage, we will proceed to create a download button that will be embedded within a sidebar widget. Let’s delve into the process:
Begin by logging into your WordPress dashboard.
Navigate to “Appearance” and select “Customize”. Please note that the location of the sidebar option might vary depending on your theme; it could also be nested within another option.
Alternatively: If you prefer a more direct approach, access “Appearance” and click on “Widgets”. Here, you’ll locate the sidebar option.
Inside the sidebar segment, you’ll want to add a “Text” (Arbitrary text) section to the sidebar widget. Assign the title of the widget as ‘PDF Download’. In the provided text area below, you’ll encounter two options: “Visual” and “Text”. Opt for the “Text” option and insert the provided code snippet.
Feel free to make any necessary modifications, including the addition of CSS styling to enhance the visual appeal.
Step 4: Configure and Link domPDF
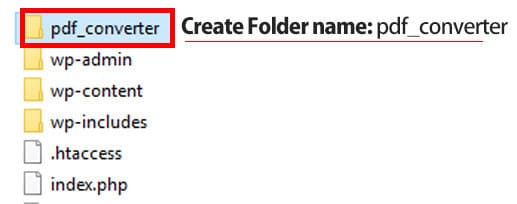
We already download domPDF file from GitHub, now this file uploads your WordPress hosting server (also you can try this in your local computer), location of the uploading file is in root directory domPDF, main files mention image bellow, create a folder and name it ‘pdf_converter‘ inside this folder you can upload this files (domPFD).
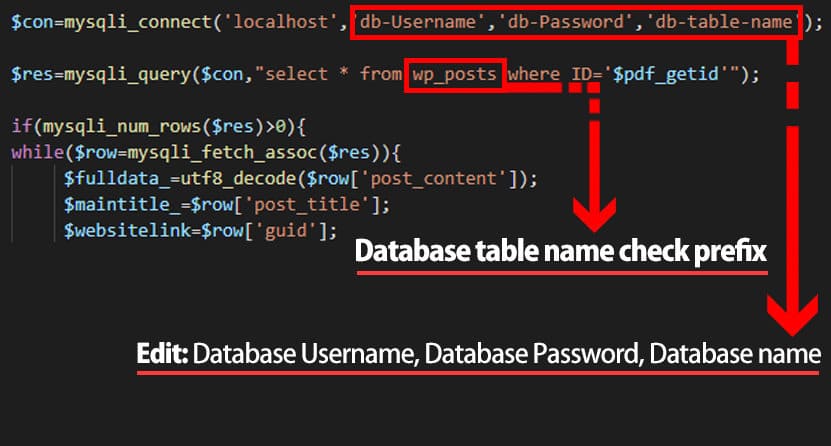
Step – 5 domPDF Configuration Database
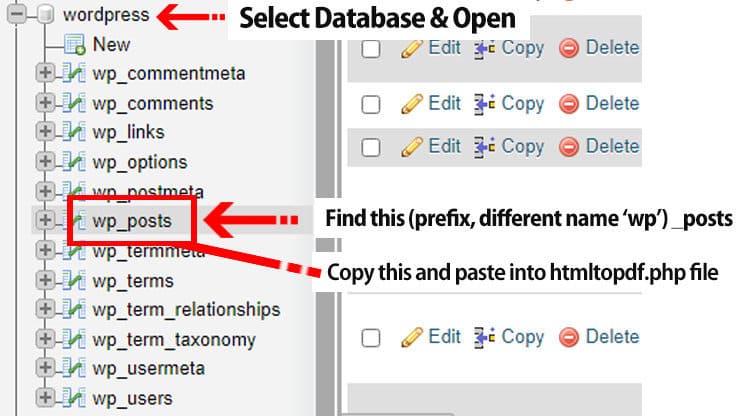
Inside this pdf_converter folder, there is a file name is ‘htmltopdf.php‘, you can edit and open this file. Now want to know your Database Username, Database Password, Database name, you can find this on your own, Now, simple open directory folder wp-config.php.
You can open your database where your db table, simply open it and find Ctr+f ‘_posts’, now you can copy this name, get a reference from image. Now this paste into wp_posts to your PREFIX_posts.
This bellow code replace inside file name ‘htmltopdf.php‘, also check this image for more details.
In this article, we have explored the seamless process of converting a WordPress Post into a PDF format through the utilization of the domPDF library. Despite its excellence, it’s important to note that while most CSS attributes function effectively, comprehensive support for CSS3 is limited. Nevertheless, domPDF provides robust support for a wide array of CSS features, making it a suitable choice for fulfilling the majority of PDF export requirements.
By harnessing the power of PHP and the MySQL database, we have successfully generated PDF files from WordPress Posts. However, if you encounter an issue such as WordPress-generated PDF images not displaying correctly within the domPDF framework, rest assured that there are solutions available. Additionally, it’s worth highlighting that the scope of domPDF’s capabilities extends beyond MySQL alone. Should you wish to generate PDFs from alternative database systems, all that’s required is establishing a connection with the specific database type in question. This adaptability underscores the versatility of the approach.
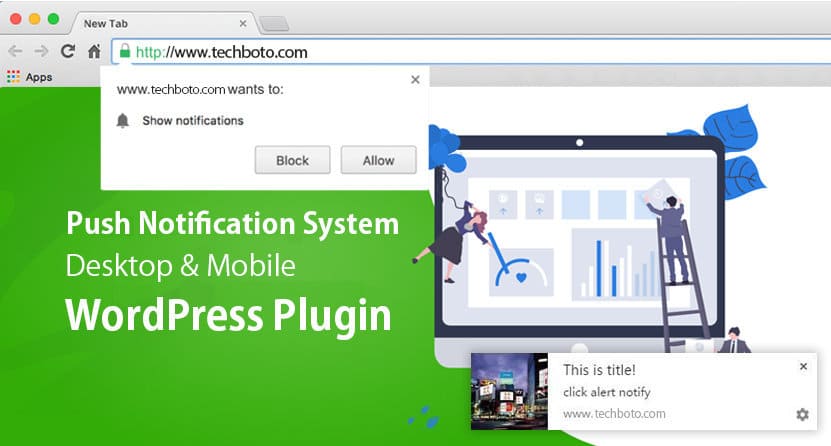
Push notifications are designed to inform subscribers who opt to receive these alert messages. By granting permission or accepting these alerts, users can promptly receive notifications regarding the latest site updates. These notifications can be received upon opening the web browser or even instantaneously on mobile devices. Browser push notifications offer the ability to send messages to your website’s visitors even when they are not actively browsing your site. As a result, this functionality has gained significant popularity among online businesses and marketers. It stands as another effective method to engage your audience, enhance the number of repeat visitors, and has consistently demonstrated substantially higher click-through rates (CTRs) in most instances.
What Are Push Notifications?
WordPress push notifications provide the means to automatically alert your audience who have granted permission or accepted these alert messages, whenever new content is published on your site. Additionally, you have the flexibility to send messages at any desired time.
You might have encountered a scenario where you were prompted to click “Allow.” This action enables the website to send notifications via your browser, typically appearing on the upper-right side. Below, you’ll find an illustrative example of a push notification.
Displayed here is a screenshot taken from an Android device, showcasing a push notification request. Push notifications are supported not only on Android apps but also on iOS apps. Furthermore, major browsers like Google Chrome, Safari, Microsoft Edge, and Opera have integrated support for push notifications.
Some notable providers of push notification services include:
Gravitec.net
OneSignal
PushCrew
PushEngage
Free Web Push Notification Tool
PushAssist
These services collectively facilitate push notifications for WordPress, enhancing your ability to effectively engage with your audience.
1. Gravitec.net
Gravitec.net is a user-friendly push notification service that offers seamless account creation through a simple signup process or directly from your admin panel. This entirely free plugin empowers you to alert web browsers about your new website posts or promotions, utilizing popular browsers such as Chrome, Firefox, Safari, Opera, or Yandex.
To activate push notifications on your WordPress website, you can effortlessly install the plugin and establish a connection to your Gravitec.net account. This entire setup can be conveniently initiated from your WordPress admin panel with just a single click.
Once integrated with Gravitec.net, your website visitors will have the option to subscribe to notifications. While most push notification services allow manual sending of notifications, Gravitec.net goes a step further by offering automation features. It enables automated notifications based on your RSS feed, which can disseminate the most trending news articles or specific content segments to your subscribers.
2. OneSignal
OneSignal is a no-cost WordPress plugin that introduces the concept of push notifications, allowing you to showcase your latest offers, services, or products directly to your audience. With compatibility across major browsers such as Chrome, Firefox, and Safari, OneSignal ensures widespread reach. This popular plugin provides effortless customization options, encompassing timing and display location configurations.
One of its most prominent capabilities lies in its ability to process over 2.7 billion notifications each day, underscoring its remarkable popularity. Bloggers can take advantage of its automatic notification feature, ensuring notifications are automatically sent for every new post published. Furthermore, the real-time analysis feature creates a comprehensive monitoring environment, offering valuable insights for plugin users.
Given its impressive features and functionality, OneSignal emerges as a highly recommended and top-tier web push notification plugin.
3. PushCrew
PushCrew offers a free plan, albeit with a subscriber limit of 500. However, if your subscriber count exceeds 500 and you require additional features like segmentation and RSS-to-push functionality, you have the option to upgrade. Plans catering to up to 2,000 subscribers commence at $25 per month. Within this premium plugin, an array of impressive options awaits.
One standout feature is the capability to simultaneously send messages, facilitating real-time engagement with your audience. PushCrew currently extends its push notification services to Chrome and Firefox, covering a wide range of operating systems including Mac, Windows, Linux, Chrome OS, and Android.
Remarkably, PushCrew also offers an enabling API, empowering you to craft custom scripts for your website. This proves beneficial for developers, as they can strategically personalize notifications. Leveraging your push subscriber data, combined with the power of Google Analytics, you can even segment your subscribers based on a diverse set of conditions.
4. PushEngage
PushEngage offers a free plan accommodating up to 2,500 subscribers. This platform functions seamlessly across a variety of browsers, encompassing Firefox and Chrome, catering to both desktop and mobile users. Notably, PushEngage empowers users to craft targeted notifications, utilizing customized segmentation that includes geographical location.
A recommended strategy by PushEngage involves utilizing a welcome notification, presented through a popup form, for new subscribers. This quick and informative welcome notification plays a crucial role in helping new subscribers grasp the context of their subscription. Additionally, it’s prudent to extend this approach to push subscribers by employing similar tactics used for visitor options and lead magnets, complete with a confirmation email.
Despite its advantages, the PushEngage plugin can occasionally pose a minor challenge. Specifically, visitors might find it slightly perplexing when dealing with pop-ups. In cases where a visitor opts to close the popup, clarity is needed regarding the subsequent steps and the location of the appropriate button to proceed.
5. Free Web Push Notification Tool
This straightforward WordPress push notification plugin offers a remarkably efficient solution to initiate web push notifications for your esteemed visitors. It stands as an autonomous push notification service seamlessly integrating with WordPress, facilitated by a dedicated plugin designed exclusively for WordPress compatibility.
It’s noteworthy that the range of supported devices slightly deviates from that of other plugins. Specifically, iZooto provides support for Chrome, Firefox, and Safari browsers on desktop platforms, while also catering exceptionally well to mobile devices, particularly those operating on the Android platform.
The dedicated developers at iZooto are diligently committed to furnishing users with an optimal web push notification experience. Their third-party service has gained popularity for various compelling reasons, attracting well-established brands and garnering support across multiple languages. Evidently, the iZooto web push notification service is effectively leveraged by numerous e-commerce websites to bolster sales and enhance user engagement.
6. PushAssist
Presenting another third-party web push notification service tailored for WordPress. Much like other notification plugins, PushAssist operates independently as a dedicated service, complemented by a WordPress plugin that streamlines the setup process. While self-served plugins may offer a slightly reduced feature set compared to third-party alternatives, both options effectively contribute to achieving their intended goals.
PushAssist extends its compatibility to include Chrome (for both desktop and Android), Firefox (for desktop and Android), as well as Safari (for Mac OS X). This widespread compatibility has contributed to the global popularity of PushAssist, with a substantial user base exceeding 10,000 websites. Notably, they offer a range of pricing tiers, including a noteworthy free plan catering to up to 3,000 subscribers. This capacity proves ample for new blogs or websites seeking to establish a push notification strategy.
7. All push notification for WP
“All Push Notifications for WP” is a complimentary plugin designed specifically for WordPress, enabling seamless push notifications. This pragmatic plugin empowers you to promptly disseminate real-time updates, also known as push notices, to your subscriber base. Operating as a dedicated WordPress plugin, it carries the distinct advantage of being devoid of monthly charges, as all processing occurs directly on your server rather than relying on a third-party service.
This plugin offers support for mobile push notification services, specifically Firebase Cloud Messaging (FCM) for Android devices and Apple Push Notification service (APNs) for iOS devices. However, I advise against its usage for beginners or casual bloggers, as it presents a rather intricate setup. If you fall into this category, I recommend opting for one of the more user-friendly services mentioned above, which will likely better suit your needs.
Which Push Notification Plugin Should You Use?
We understand that web push notification plugins for WordPress serve as valuable reminders for your site’s audience. As previously mentioned, push notifications can be an effective tool. Among the available free options, OneSignal stands out as a great choice. Alternatively, if you’re looking for a more advanced solution, the PushEngage plugin offers excellent features under its pro option. Below, I’ve compiled a list of the finest WordPress web push notification plugins for your consideration. Feel free to select the one that suits your needs best. If you have experience with any of the plugins mentioned, we encourage you to share your insights. If you’ve found this post to be helpful, we’d greatly appreciate it if you could spread the word.
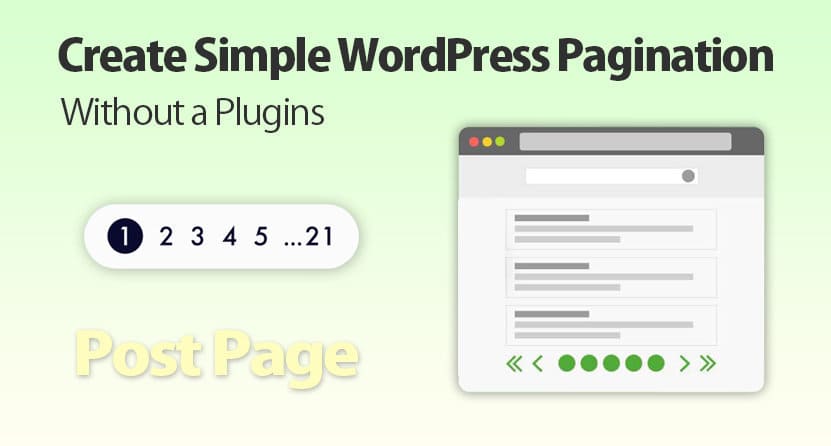
There are various WordPress themes available for you to select and implement into your project. However, it’s important not to delve too deeply into researching their features during this phase. Unfortunately, some themes may lack essential features such as Pagination and an author bio box. In fact, I’ve already managed to create an author bio box without the need for a plugin.
Allow me to guide you through the process of establishing a straightforward pagination system with numbered pages for your WordPress posts, all without relying on any additional plugins. Many developers find themselves unaware of the correct way to incorporate pagination into WordPress posts, often resorting to plugins for this purpose. Yet, it’s worth noting that such plugins can contribute to website bloat. So, let’s begin by examining the relevant code.
There is a number of WordPress theme, you can choose and apply to your project, tell you how to create simple pagination in WordPress post without having any plugin. There are lots of developers who actually didn’t know how to use pagination in WordPress posts
Step 1: Incorporate the Custom Code
To seamlessly integrate the desired functionality, simply insert the following code snippet into your theme’s “functions.php” file. To achieve this, you can conveniently copy and paste the provided code.
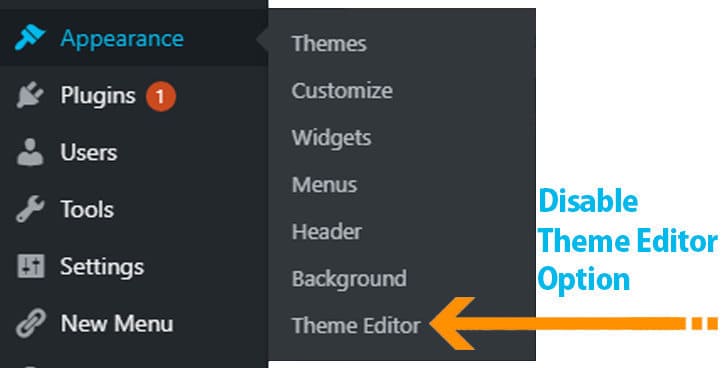
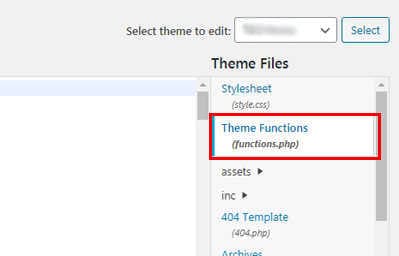
If you’re unsure about the location of the “functions.php” file within your WordPress Dashboard, here’s how you can navigate to it: Log in to your Dashboard, proceed to “Appearance” → “Theme Editor.” Once in the Theme Editor, you’ll notice a list of Theme Files on the right-hand side. Look for “functions.php” and click to open it. Append the code mentioned below to the last line of this file:
Once you’ve executed the previous step, proceed to invoke the pagination function at the location where you intend to showcase the pagination interface. This can be accomplished on your post page by utilizing the pagination() function.
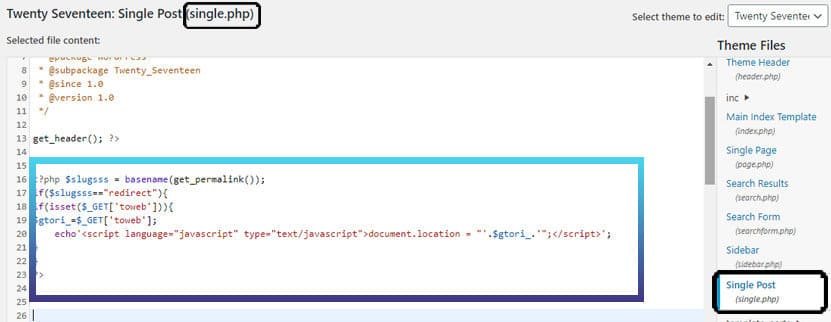
For optimal placement, consider situating this function outside of the loop. It should, however, remain within the confines of the if(have_posts()) statement within your designated template file. To effect this, navigate through your Dashboard to “Appearance” → “Theme Editor,” and then access the “single.php” file, which corresponds to individual post pages. Here, you can seamlessly integrate the pagination() function to yield the desired outcome.
You’re currently working within the “single.php” file. To incorporate the code, simply paste it immediately above the closing </main> tag.
<?php if ( have_posts() ) : ?>
    <?php while ( have_posts() ) : the_post(); ?>
        // post goes here
    <?php endwhile; ?>

    <div class="pagination"><?php pagination('»', '«'); ?></div>

<?php endif; ?>
Step 3: Crafting CSS Design for Pagination Styling
In WordPress, you have the flexibility to include personalized CSS classes to oversee the visual presentation of your freshly implemented navigation. To gain insight into styling options, consider referring to the provided CSS illustration:
Navigate to your Dashboard, then proceed to “Appearance” → “Theme Editor.” Locate and access the “style.css” file, which resides on the same page. Append the subsequent code snippet to the final line of this file to effectuate the desired styling enhancements.
By following the aforementioned trio of steps, you can seamlessly integrate pagination for your WordPress posts sans the need for any plugins, resulting in a more streamlined website loading experience. It is my aspiration that this tutorial proves to be of immense assistance. If you found this code snippet beneficial, and if you’re interested in enhancing the SEO-friendliness of your website, kindly explore our array of other articles on the site. Noteworthy examples include “Activate Image Title Tags in One Simple Step” and “Manual Addition of Schema Markup in WordPress for Structured Data Without Plugins.” Your exploration of these resources may prove enlightening.
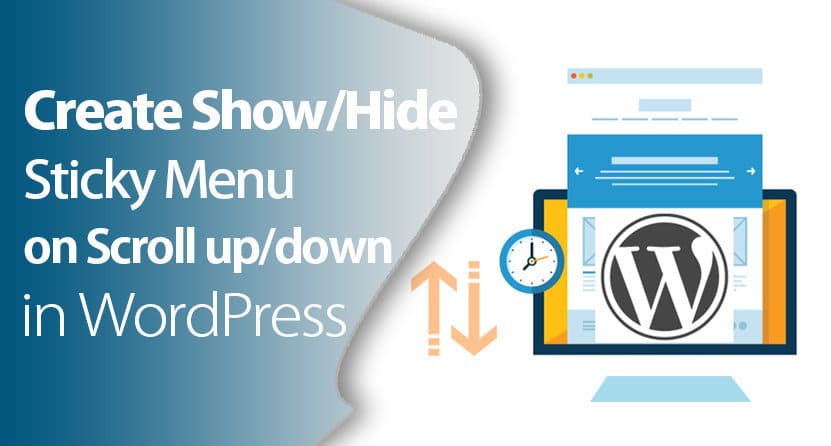
Implementing a Sticky Menu with Scroll-to-Top Functionality in WordPress Without Using a Plugin, in the realm of modern websites and premium WordPress themes, you might have come across a captivating design trend where the header remains fixed and elegantly reveals or conceals itself as you scroll upwards or downwards. This results in a visually pleasing navigation experience, placing navigation menus at the forefront. Such a feature holds immense value for websites, particularly those with extensive content such as lengthy posts or pages. It bestows users with a swift navigation avenue, thereby enhancing the overall user experience.
Within this discourse, you will uncover the methodology to incorporate this dynamic behavior into your WordPress site without resorting to a third-party plugin. I am dedicatedly delving into intricate aspects of WordPress website functionality, and this endeavor is no exception.
The implementation of a sticky navigation menu can significantly elevate the user experience of your WordPress site. It emerges as a pivotal component, facilitating seamless traversal for website visitors across various pages, devoid of any interruptions. This enhancement not only amplifies the usability and accessibility of your website but also contributes to the refinement of its overall quality.
You may have seen many modern websites and premium WordPress theme make the header fixed show/hide when you scroll up/down. Its look beautiful navigation menus are displayed on top
Creating a Scroll-Activated Show/Hide Sticky Menu in WordPress: Streamlining Navigation for Swift Access
Enhancing Navigation Efficiency: Introducing scroll-triggered show/hide functionality in WordPress Without Plugin to sticky menus empowers visitors with swift and effortless navigation across your web pages. Especially for articles exceeding the 2,000-word mark, where users engage by scrolling through extensive content, this feature serves as a beacon. Once the user’s interaction transitions from reading to navigation, the menu gracefully emerges upon scrolling upward. This seamless action enables users to instantaneously access the menu, guiding them to their desired destinations on your website. Consequently, this immersive experience encourages prolonged visitor engagement, consequently bolstering both user interaction and conversions on your WordPress platform.
Curbing Bounce Rates: The implementation of a streamlined, uncluttered, and easily navigable menu inherently combats bounce rates, contributing to a more engaging website journey. The incorporation of a sticky navigation component plays a pivotal role in achieving this outcome.
Elevating Brand Recognition: Harness the prowess of sticky navigation to prominently display your logo or other visually appealing elements within the header. This strategic placement exponentially amplifies brand recognition, fortifying the identity of your business in the minds of your audience.
Comprehensive Step-by-Step Tutorial: Crafting a Scroll-Responsive Show/Hide Sticky Menu
As you’ve undoubtedly discerned, a sticky menu is a navigational element that seamlessly accompanies you while traversing both upwards and downwards on a webpage. In essence, this entails the navigation panel remaining visible during upward scrolls, while elegantly concealing itself during downward scrolls.
Within the confines of this instructional guide, we shall embark on the creation of a sticky menu that graciously reveals itself upon upward scrolling of the viewport. However, to preserve the fluidity of the content consumption experience, we shall ingeniously conceal the menu during instances of downward page scrolling. The ultimate manifestation of our efforts will result in a meticulously balanced visual presentation. Without further ado, let us commence this enlightening journey:
Step 1 – Analyze the Header Section
To initiate the process, right-click on any webpage of your choice and select the “Inspect” option. This will grant you access to the intricate underpinnings of the webpage, encompassing its source code, visual assets such as images, the HTML and CSS components contributing to its aesthetic, as well as the Javascript code that orchestrates dynamic animations and functionalities.
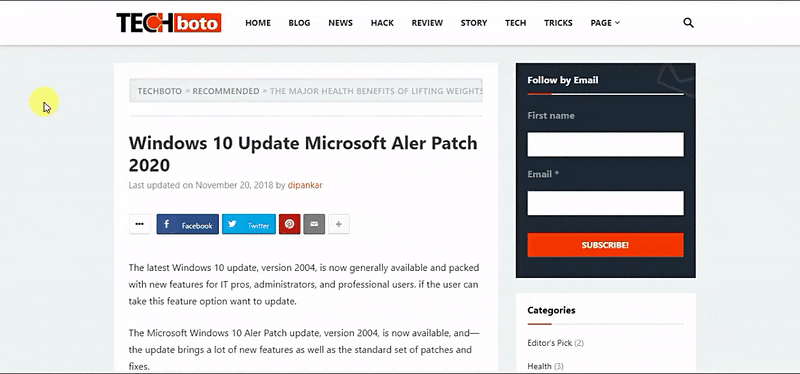
As your first task, navigate to the target website and direct your attention to the encompassing section known as the “header.” Your objective is to locate this pivotal area within the webpage’s structure. For visual guidance, refer to the image provided below:
You may have seen many modern websites and premium WordPress theme make the header fixed show/hide when you scroll up/down. Its look beautiful navigation menus are displayed on top
Next, identify the ‘div’ or ‘header’ section. Within this same section, carefully inspect and determine the presence of any distinctive ‘id’ or ‘class’ attributes. It’s imperative to emphasize that these identifiers must possess uniqueness – refrain from duplicating ‘id’ or ‘class’ values anywhere on the current page. This distinctiveness is paramount.
In the event that you encounter redundant ‘id’ or ‘class’ attributes, you have the option to undertake the following step. Should uniqueness not be established, proceed to generate a new class (employ any preferred name) and integrate it into your theme’s ‘header.php’ file. To accomplish this, navigate to your Dashboard, access the ‘Appearance’ section, and opt for the ‘Theme Editor.’ Subsequently, locate the ‘header.php’ file within this interface. Within this file, you’ll encounter the section corresponding to the menu bar. At this juncture, incorporate the newly crafted, unique class name (a designation of your choice, but ensuring its uniqueness is upheld).
Please remember to exercise caution and precision during this process to maintain the integrity of your website’s structure and design.
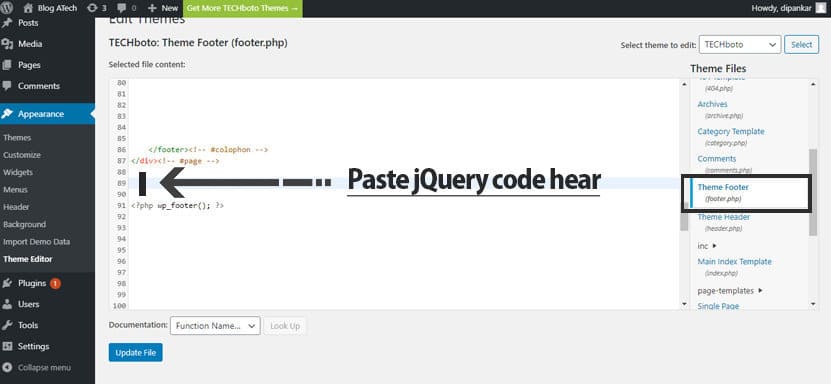
Step 2 – Integrate jQuery Code
At this juncture, we shall engage in an empirical exploration by applying the following code snippet to the selected header section. Having made your choice of ‘id’ or ‘class’ name, proceed to insert the ensuing jQuery code snippet into the ‘footer.php’ file within your theme’s directory. To embark on this endeavor, follow these steps:
Access the Dashboard Login of your website.
Navigate to the ‘Appearance’ section.
Opt for the ‘Theme Editor’ feature.
Within this interface, pinpoint and open the ‘footer.php’ file.
Proceed to append the provided jQuery code snippet immediately before the closing </body> tag.
By diligently adhering to these directives, you shall seamlessly infuse the jQuery functionality into your web framework. This dynamic addition is poised to contribute to the envisaged show/hide sticky menu behavior.
You may have seen many modern websites and premium WordPress theme make the header fixed show/hide when you scroll up/down. Its look beautiful navigation menus are displayed on top
<script>
(function($) {
jQuery(window).load(function(){
var prevScrollpos = window.pageYOffset;
window.onscroll = function() {
if($(window).scrollTop() > 10){
var currentScrollPos = window.pageYOffset;
if (prevScrollpos > currentScrollPos) {
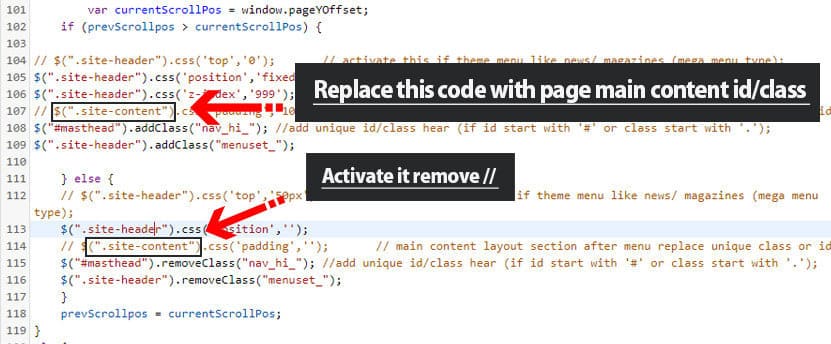
// $(".site-header").css('top','0'); // activate this if theme menu like news/ magazines (mega menu type);
$(".site-header").css('position','fixed');
$(".site-header").css('z-index','999');
// $(".site-content").css('padding','105px 0'); // main content layout section after menu replace unique class or id
$("#masthead").addClass("nav_hi_"); //add unique id/class hear (if id start with '#' or class start with '.');
$(".site-header").addClass("menuset_");
} else {
// $(".site-header").css('top','50px'); // activate this if theme menu like news/ magazines (mega menu type);
$(".site-header").css('position','');
// $(".site-content").css('padding',''); // main content layout section after menu replace unique class or id
$("#masthead").removeClass("nav_hi_"); //add unique id/class hear (if id start with '#' or class start with '.');
$(".site-header").removeClass("menuset_");
}
prevScrollpos = currentScrollPos;
}
else{
$(".navbar-main").css('top','');
$(".navbar-main").css('position','');
$("#nav-down").removeClass("nav_hi_");
$(".navbar-main").removeClass("menuset_");
}
}
});
}(jQuery));
</script>
Step 3 – Link jQuery to the Menu
In this phase, we establish a vital linkage between jQuery and your menu. By meticulously following these instructions, you will seamlessly intertwine the two components. Here’s how you proceed:
Locate the specific code snippet within your jQuery script.
Within your ‘footer.php’ file, pinpoint the designated section where you initially placed the jQuery code.
Identify the segment marked as ‘#masthead’ within the jQuery code. At this juncture, you have two options: a) Replace it with the ‘id’ or ‘class’ name you opted for in the initial step; b) If you’ve created a unique class within ‘header.php,’ utilize that unique class instead of ‘#masthead’.
By methodically executing these directives, you forge a seamless connection between your customized jQuery script and the designated menu component. Reference the accompanying image for clarity and guidance:
You may have seen many modern websites and premium WordPress theme make the header fixed show/hide when you scroll up/down. Its look beautiful navigation menus are displayed on top.
Step 4 – Verify the Functionality
Having conscientiously followed the preceding three steps, you are now poised to assess the efficacy of your endeavors. By undertaking this verification process, you will ascertain the successful integration of the jQuery code and confirm the synchronization between your website’s header section and the jQuery script. Here’s the sequence of actions:
As a preliminary measure, ensure that the jQuery code has been seamlessly incorporated into your ‘footer.php’ file, alongside the replacement of the designated code segment.
With these adjustments in place, refresh your website to initiate the assessment.
Observe the scroll behavior: When you scroll down, the menu bar should gracefully vanish momentarily, while scrolling up should result in its swift reappearance.
This stage is pivotal in gauging the accurate functioning of the scroll-triggered show/hide menu. The harmonious synchronization between your jQuery script and the header section is a testament to your meticulous efforts.
Should you encounter any discrepancies in the intended behavior, first scrutinize the ‘id’ or ‘class’ used in your script to ensure proper connectivity. If necessary, carry out a systematic review and, if needed, revisit the preceding steps. Rest assured, this process is well-proven and effectively employed on our own website to achieve seamless scroll-based navigation.
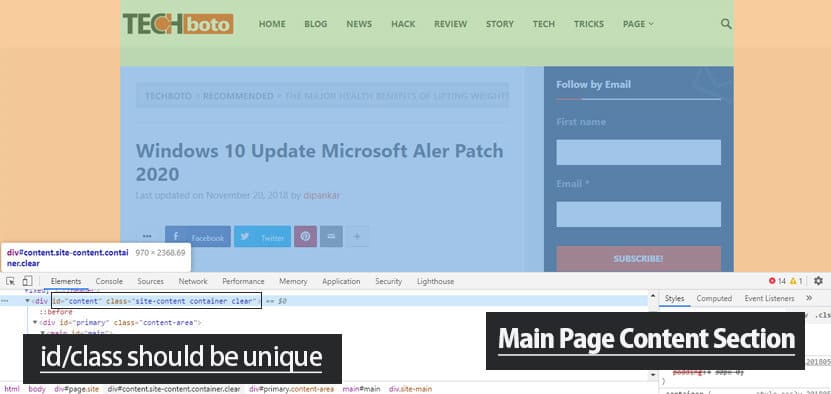
Step 5 – Locate the Main Page Content Area
Concurrently, it’s imperative to familiarize yourself with the primary webpage content section, which commences immediately subsequent to the header menu. To accomplish this, engage the “inspect” functionality within your web browser. Launch the desired website and embark on a quest to identify the entirety of the content section. Visual assistance is available in the image provided below for your reference.
Simply focus on acquiring the main content section of this page, encapsulated within a distinctive ‘id’ or ‘class.’ It is imperative that this identifier maintains its uniqueness. Should you encounter a situation where the ‘id’ or ‘class’ lacks uniqueness, you have the option to manually introduce a new class within the ‘header.php’ file, precisely within the location encompassing the main page content section.
Step 6 – Substitution of ‘site-content’ with Page Main Content Identifier
Now, let’s proceed with the final step in this process. As you’ve already integrated the jQuery code into the ‘footer.php’ file, your next action involves locating the ‘site-content’ code snippet. Replace this particular code snippet with the identifier you acquired during step 4. This replacement serves as the seamless transition between the designated ‘site-content’ section and the unique identifier representative of your page’s main content.
Crafting the Scroll-Activated Show/Hide Sticky Menu in WordPress Without Plugin: A Dynamic Animated Header Menu Through jQuery Techniques
Through a symphony of jQuery attributes, we’ve engineered a scroll-responsive show/hide sticky menu that transcends mere functionality, breathing life into your website’s header navigation. This transformational guide has been curated to seamlessly usher this captivating feature into your WordPress realm.
Take heed of this important consideration: Upon successfully traversing each step outlined herein, the culmination of code and function yields a captivating show/hide sticky menu, poised to elegantly reveal itself upon scroll. However, a small yet noteworthy option exists for those who seek an even cleaner coding approach. You’re encouraged to further refine this jQuery code, seamlessly weaving it into your website’s header area and the crucial main content section. For optimal code organization and tidiness, consider housing this enhanced code within a dedicated ‘.js’ file.
Your appreciation for this guide is greatly acknowledged. Should you desire more insights, we’re readily accessible on platforms such as Twitter and Facebook. Your pursuit of dynamic website enhancements is a journey we’re thrilled to accompany you on.
WooCommerce offers a streamlined shipping address system, enabling customers to complete a shipping address form, which is then automatically stored in the database. This process includes capturing essential details like the postcode (zip code), city, and additional relevant information.
In this post, we provide concise codes for WooCommerce, featuring built-in validation that aids in the identification of suitable shipping methods during the checkout process. Furthermore, we delve into the functionality of WooCommerce, specifically highlighting how it can echo the address details, such as the current address pin-code and city zip code, from the login user’s profile.
This code specifically retrieves the shipping address, postal code (ZIP code), and city of the logged-in user, then promptly echoes the details in a direct format, resembling something like (110001 and Delhi). The information acquired comprises the entire range of shipping zone data, which encompasses both the postcode and city.
This accomplishment is facilitated by utilizing the ‘customer_id’ as the object identifier and the ‘billing address’ as a basis for comparison within the ‘my account’ context. The rationale behind this approach lies in the fact that the SQL query yields an array of objects, each possessing these particular attributes.
Are you experiencing difficulties with getting your WordPress website crawled or indexed in search results? If you’ve recently manually installed the WordPress setup on your online hosting service, and when you attempt to request indexing through Google Search Console, are you encountering various error messages related to “noindex” or “nofollow” meta tags?
We will guide you through the process of eliminating the “noindex nofollow” meta tag from your WordPress website. This can be achieved by making specific code adjustments within the admin panel, without the need for a plugin. If you possess the technical proficiency to manipulate codes or scripts, the procedure becomes quite straightforward. However, if coding is not your forte, worry not. In this blog post, I have simplified the steps significantly, and you can effortlessly follow the instructions provided below. Accompanying reference images have also been included to assist you in effectively resolving this issue.
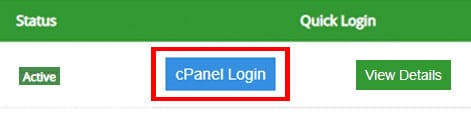
Step 1 – Accessing Your cPanel
To initiate the process, you’ll need to log in to your cPanel account. If you’d rather opt for a web-based solution to manage your files, cPanel offers a built-in File Manager.
To reach the File Manager, start by logging in to your hosting cPanel. Simply click the “cPanel Login” button, and you’ll be directed to your cPanel dashboard.
We will show you how to remove meta name=’robots’ content=’noindex nofollow’ in WordPress using replace some code inside the admin panel Step 1 Log into your cPanel
We will guide you through the process of removing the “meta name=’robots’ content=’noindex nofollow'” tag in WordPress by replacing a certain piece of code within the admin panel. Here’s the first step: Log in to your cPanel.
Step 2 – Navigating the cPanel File Manager
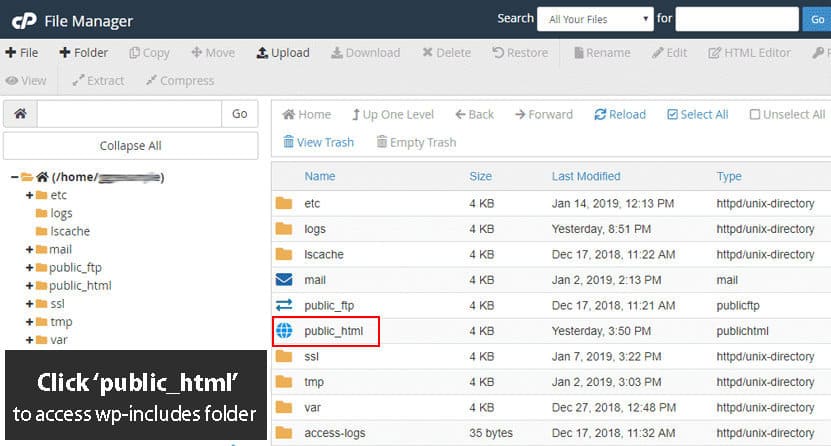
Upon accessing the File Manager, you’ll find yourself in the primary directory of your account. Typically, your focus will be on website files, which are situated within the “public_html” directory in most cases.
We will show you how to remove meta name=’robots’ content=’noindex nofollow’ in WordPress using replace some code inside the admin panel Step 1 Log into your cPanel
Step 3 – Locating the wp-includes File
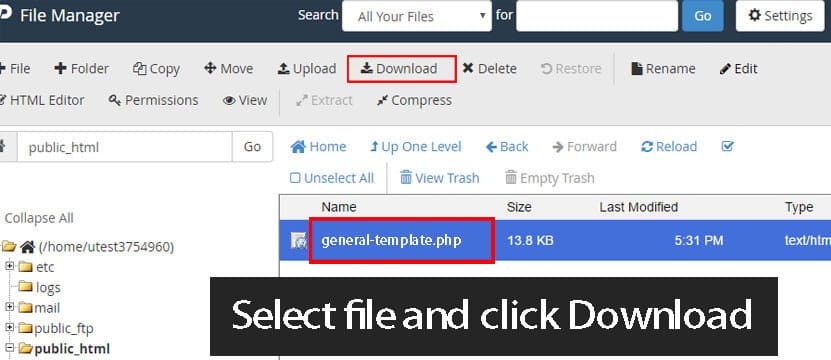
Once you’ve accessed the public_html directory, your next step is to locate the folder named “wp-includes.” Simply double-click on this folder. Amidst the multitude of folders and files, don’t fret. Take a moment to steady yourself, then effortlessly employ the keyboard shortcut Ctrl+f. Type in “general-template.php.”
Voila, you’ll now spot the file named “general-template.php.” Proceed to download this file to your system. For further clarity, refer to the image provided below.
We will show you how to remove meta name=’robots’ content=’noindex nofollow’ in WordPress using replace some code inside the admin panel Step 1 Log into your cPanel
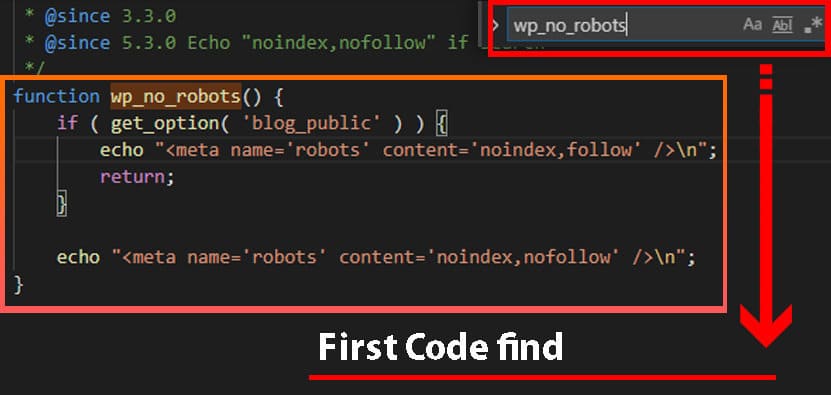
Step 4 – Modifying the general-template.php File
Within this file, you’ll encounter two distinct functions. To pinpoint these functions, open the file using a text editor on your desktop computer. Once the file is open, utilize the Ctrl+f shortcut to facilitate your search. Look for the line mentioned below:
1 – Find this first code and replace with just bellow this:
We will show you how to remove meta name=’robots’ content=’noindex nofollow’ in WordPress using replace some code inside the admin panel Step 1 Log into your cPanel
We will show you how to remove meta name=’robots’ content=’noindex nofollow’ in WordPress using replace some code inside the admin panel Step 1 Log into your cPanel
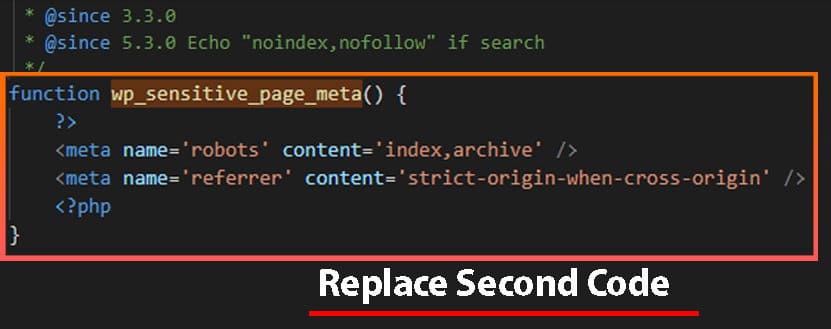
Now, substitute this code with our provided reference code. This adjustment will enhance your website’s SEO, aligning with Google’s recommendations for improved focus and webpage indexing.
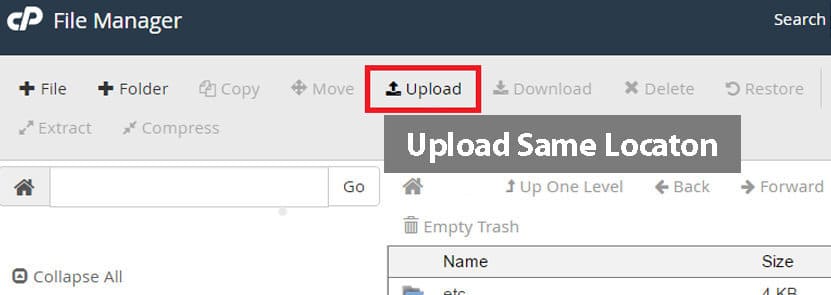
Step 5 – Uploading the Modified general-template.php File via File Manager
Navigate to the top toolbar and select the “Upload” option. This action will open a new tab, prompting you to click the “Select” button. This button allows you to locate the modified file on your local computer. Once you’ve successfully located the desired file, proceed by clicking the “Open” button to initiate the upload process.
We will show you how to remove meta name=’robots’ content=’noindex nofollow’ in WordPress using replace some code inside the admin panel Step 1 Log into your cPanel
Once this process is successfully completed, return to your website for a comprehensive check. Access the Search Console and proceed to resubmit the URL you previously attempted. If you’ve diligently replaced all codes as instructed, you should notice a remarkable shift. The URL submission will now resonate with a distinctly different tune. Upon submitting the URL, the inspection report should be devoid of any warnings or error messages, particularly those related to indexing and crawlability. This newfound status will empower you to confidently “Request Indexing.”
I trust this guidance proves valuable. Google strongly emphasizes the importance of directing your focus towards optimizing web page indexing for the Googlebot search engine crawler. This necessitates the presence of an intuitive navigation system and lucid URLs on your website.
Please be mindful: Whenever you undertake a WordPress Dashboard upgrade or update, remember that this code can be replaced with the “noindex, nofollow” variant (as provided by wordpress.org for dashboard codes). Simply follow the same procedure to effectuate the code replacement.