Posted on Leave a comment

How to Remove meta name=”robots” content=”noindex nofollow” in WordPress Function

Are you facing issues with your WordPress site where search engines aren’t indexing your pages due to the presence of <meta name=”robots” content=”noindex nofollow”? This can be a frustrating roadblock for website owners who want their content to be discoverable through search engines. Fortunately, there’s a simple solution to this problem, and AndamanTech is here to guide you through it.

How to Remove meta name robots noindex nofollow WordPress Function

While the internet may offer various solutions, some of which might be complex or unreliable, we provide you with a straightforward method to remove the noindex nofollow directive from all your pages in just a few lines of code added to your WordPress theme’s functions.php file.

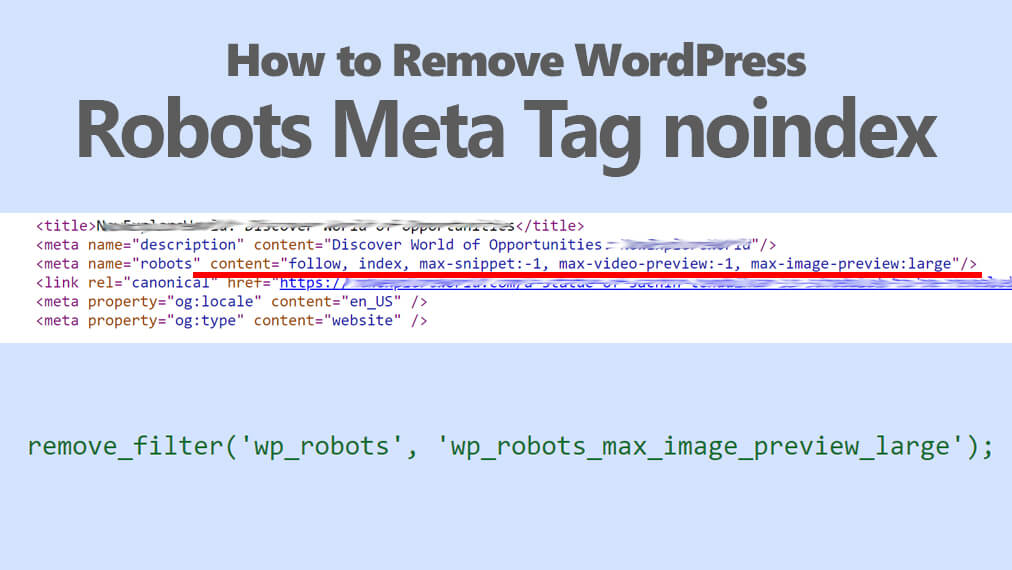
I have previously mentioned in another blog post about how to remove the WordPress Robots Meta Tag noindex. You can refer to that blog post for updated information.

However, although the function described in that blog post works, there may still be instances where the noindex tag appears or does not change, particularly on search pages. Therefore, to ensure complete removal, you may need to remove the <meta name=”robots” content=”noindex nofollow”> tag from all pages, posts, categories, author pages, etc.

Here’s How to Remove Meta Name=”Robots” Content=”Noindex Nofollow” in WordPress:

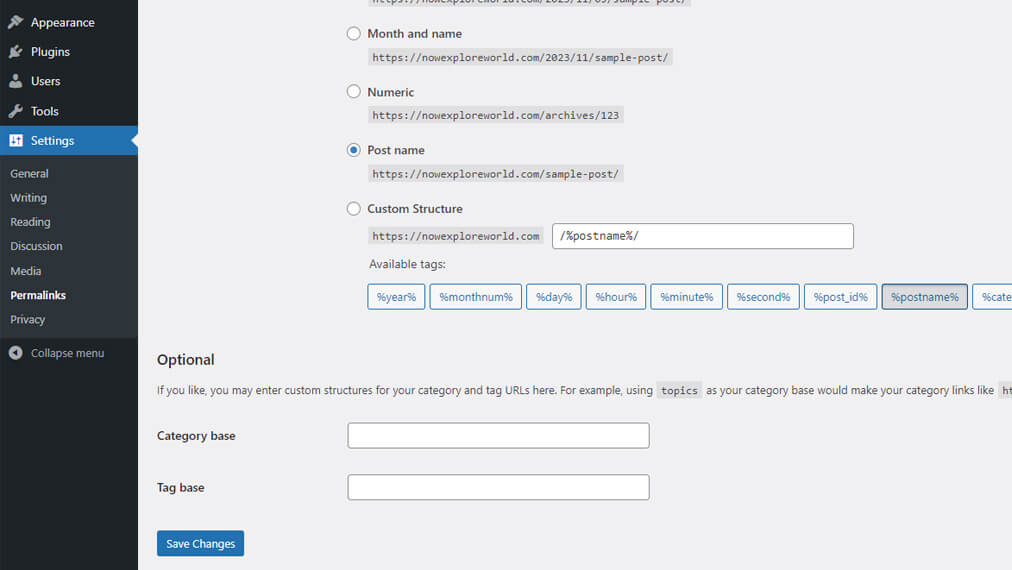
  1. Log in to your WordPress Admin Panel: Access your WordPress dashboard by entering your credentials.
  2. Navigate to Appearance: Once logged in, go to the “Appearance” section. You’ll find it on the left-hand side of your dashboard menu.
  3. Access Theme File Editor: Under “Appearance,” locate and click on “Theme File Editor.” This will open the editor where you can make changes to your theme’s files.
  4. Acknowledge Understanding: Before proceeding, ensure that you understand the potential implications of modifying theme files directly. Click on any prompts that ask for confirmation.
  5. Open Theme Functions (functions.php) file: In the Theme File Editor, search for and select the “Theme Functions (functions.php)” file. This file contains the functions that define your theme’s behavior.
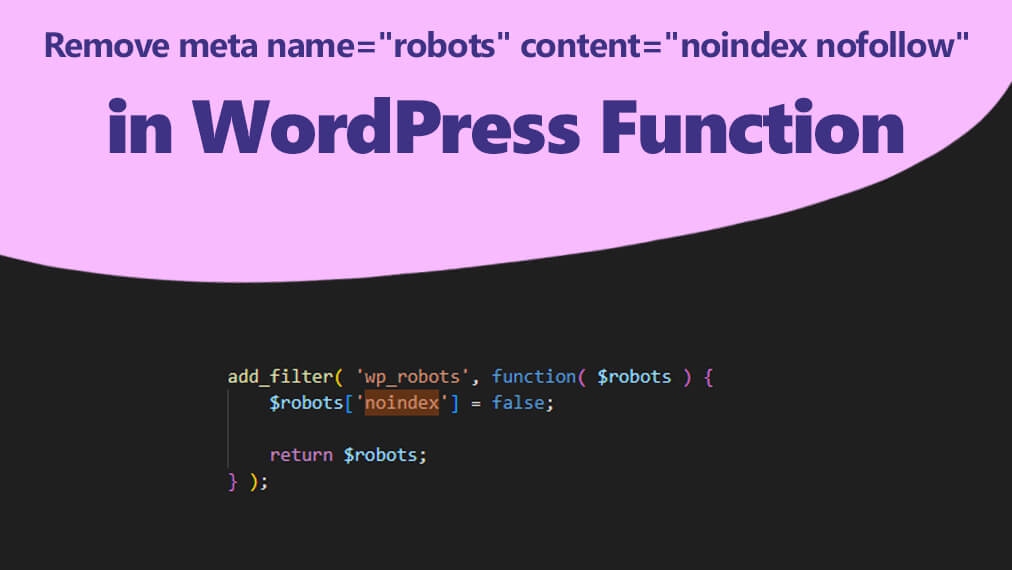
  6. Add Code to Remove Noindex Nofollow Directive: Now, you can add the following code snippet to the bottom of your functions.php file:
add_filter( 'wp_robots', function( $robots ) {
	$robots['noindex'] = false;

	return $robots;
} );

This code snippet effectively removes the noindex nofollow directive and replaces it with index, follow, allowing search engines to crawl and index your pages as intended ?s={search_term_string}.

Important Note: Always make sure to back up your functions.php file before making any modifications. This ensures that you can revert to a previous version if needed.

By following these steps and implementing the provided code snippet, you can effectively remove the <meta name=”robots” content=”noindex nofollow” directive from your WordPress site, allowing search engines to properly index your content and improve your site’s visibility in search results.

With AndamanTech simple solution, you can ensure that your valuable content reaches a wider audience and achieves its intended impact. Say goodbye to indexing issues and hello to enhanced discoverability for your WordPress website!

Posted on Leave a comment

How to Remove /category/ from WordPress URLs

How to Remove category from WordPress URLs 2023

As a WordPress developer, you may have encountered the challenge of removing the “/category/” base from your website’s URLs. While this might seem like a daunting task, it can be accomplished with a few simple steps. In this article, we’ll guide you through the process, ensuring that your WordPress website’s URLs appear just the way you want them.

Why Remove /category/ from URLs?

WordPress categorizes posts into different categories, which is a useful feature for organizing content. However, the default URL structure includes “/category/” before the category name, making URLs longer and less user-friendly. By removing “/category/” from your URLs, you can create cleaner, more aesthetically pleasing links.

Prerequisites

Before you start, there are a couple of prerequisites to keep in mind:

  1. Ensure that your web hosting server supports PHP version 8.0 or above. If not, you may need to upgrade your hosting plan or server to meet this requirement. This is essential because the method we’ll use to remove “/category/” relies on PHP functions introduced in newer versions.
  2. Make sure you have access to your WordPress admin dashboard, as you’ll need it to modify the Permalinks settings and theme files.

Step 1: Adjust Permalinks Settings

The first step in removing “/category/” from your WordPress URLs involves tweaking the Permalinks settings. Follow these steps:

  • Log in to your WordPress admin dashboard.
  • On the right-hand side menu, navigate to “Settings” and click on “Permalinks.”
  • In the Permalinks page, find the “Category base” field. By default, it’s set to “/category/.”
  • Replace “/category/” with your preferred base, or simply leave it blank for the best results. A common choice is to use a single character like a hyphen or a period (e.g., “-“). This will create cleaner, more user-friendly URLs.

Step 2: Edit Your Theme’s functions.php

The second step involves editing your theme’s functions.php file to ensure that the changes you made to the Permalinks settings take effect. Here’s what you need to do:

  • In your WordPress admin dashboard, go to “Appearance” and click on “Theme Editor.”
  • In the Theme Editor, select the “functions.php” file on the right-hand side.
  • Add the following code to the end of the functions.php file:
function remove_remane_category( $string, $type )  {
if ( $type != 'single' && $type == 'category' && ( strpos( $string, 'category' ) !== false ) )          {
$url_without_category = str_replace( "/category/", "/", $string ); 
return trailingslashit( $url_without_category );          
}  
return $string; 
}     
add_filter( 'user_trailingslashit', 'remove_remane_category', 100, 2);

Save the changes.

Final Thoughts

By following these two simple steps, you can successfully remove “/category/” from your WordPress website’s URLs. This not only makes your links look cleaner but also enhances the user experience. Remember that changing your category base also allows you to customize your URLs further.

Keep in mind that altering your website’s core settings and theme files may carry some risks. Always make a backup of your website and its files before making any changes. This way, you can restore your website if something goes wrong.

With the right PHP version and these easy steps, you can improve your WordPress website’s URL structure and create a more polished user experience for your visitors. Happy customizing also read WordPress get author Biographical Info or author description! and GeneratePress Show Related Articles without Plugin

Posted on Leave a comment

How to Remove WordPress Robots Meta Tag noindex Updated

How to Remove WordPress Robots Meta Tag noindex Updated

WordPress is a dynamic platform that evolves with each update, making it essential for website owners and developers to stay current with best practices. One important aspect of optimizing your WordPress website for search engines is managing the Robots Meta Tag. This tag instructs search engine crawlers on how to index your site’s pages. To ensure your website is always up-to-date and functioning correctly, it’s important to use the latest techniques. In this article, we’ll guide you through the process of removing the noindex directive from your WordPress site’s Robots Meta Tag and show you the most current methods.

Step 1: Removing the Robots Meta Tag from WordPress

The first step is to remove the noindex directive from the Robots Meta Tag. This tag is often used to prevent search engines from indexing specific pages or entire websites. Here’s how you can do it:

  1. Log in to your WordPress admin dashboard.
  2. Navigate to your theme’s functions.php file. You can find it under “Appearance” -> “Theme Editor” in the WordPress dashboard.
  3. In the functions.php file, scroll to the bottom to ensure that your code does not interfere with existing functions or features. It’s best practice to create a child theme if you’re not already using one.
  4. Add the following code to remove the noindex directive from the Robots Meta Tag:
remove_filter('wp_robots', 'wp_robots_max_image_preview_large');

This code will override the default noindex directive and instruct search engines to follow and index your pages. Make sure to save the changes.

Step 2: Adding the Robots Meta Tag Manually

Once you’ve removed the noindex directive using the code mentioned earlier, you might also consider including a customized Robots Meta Tag on particular pages or posts. This will grant you more precise control over how search engines handle the indexing of your content.

To implement this, access the WordPress theme folder and locate the header.php file. Open this file and place the following code snippet right after the <meta charset="<?php bloginfo( 'charset' ); ?>"> line:

Find the <head> section within the HTML code.

Within the <head> section, insert the following code snippet:

<meta name="robots" content="follow, index, max-snippet:-1, max-video-preview:-1, max-image-preview:large"/>

This code imparts the same directives as described in the preceding step, ensuring that search engines appropriately follow and index the content specific to this page.

Conclusion

Optimizing your WordPress website for search engines is an ongoing process, and managing the Robots Meta Tag is an essential part of it. By using the latest techniques and WordPress hooks, you can effectively remove the noindex directive and control how search engines index your site. Remember to regularly check for updates in WordPress and keep your theme and plugins up to date to ensure that your code works seamlessly. With these steps, you’ll have greater control over how your WordPress website appears in search engine results pages, ultimately improving its visibility and discoverability.

Posted on Leave a comment

How to Get the Current URL in WordPress Category Author Pages

How to Get the Current URL in WordPress Category Author Pages

WordPress is a powerful content management system that allows you to create and manage various types of content on your website. Sometimes, you may need to retrieve the current URL of your WordPress site when you’re on specific pages like Category or Author Pages. In this article, we’ll explore how to get the current URL in WordPress when you’re on Category or Author Pages.

Understanding Category and Author Pages

Before diving into the code, let’s briefly understand what Category and Author Pages are in WordPress:

  • Category Pages: These are pages that display a list of posts categorized under a specific topic or category. For example, you might have a Category Page for “Technology” that displays all posts related to technology.
  • Author Pages: These pages showcase posts authored by a specific writer on your website. Each author typically has their own page with a list of their published articles.

Getting the Current URL Using PHP

To obtain the current URL on Category or Author Pages, you can use WordPress functions and variables. You can place this code in your theme’s template files or in a custom plugin.

<?php echo home_url(add_query_arg(array(), $wp->request)); ?>

Get Current WordPress Slug Using PHP

You can utilize the following PHP function to obtain the current page/post’s slug. This code is versatile and functions correctly, whether it’s an archive page or a single post, for any page type within WordPress.

<?php
global $wp;
$current_slug = add_query_arg( array(), $wp->request );
echo $current_slug;
?>

The WordPress slug is the text that comes after your domain name. For example, in the URL “yoursite.com/about/”, the slug is “about.” It provides a valuable method to uniquely identify content in a user-friendly way.

In conclusion, grasping the method for obtaining the current URL in WordPress through a PHP code snippet opens up a realm of opportunities for tailoring and refining your website. Equipped with the comprehensive guidance provided in this article, you can now apply this technique with confidence, propelling your WordPress development expertise to new heights.

Posted on Leave a comment

WordPress get author Biographical Info or author description

WordPress get author Biographical Info or author description

The practice of displaying an author’s biographical information or author description is a common consideration for WordPress developers. Their primary motivation is to improve the user experience and offer a better understanding of the author. Sometimes, users might face issues related to this when a theme fails to update for various reasons, resulting in the absence of author bio information or the author’s name not being visible. In such situations, developers can readily integrate the display of author bio information through a simple WordPress function.

In WordPress, showcasing an author’s biographical information or a detailed author description is a task that developers can accomplish through various methods, adding depth and personalization to the user experience. To achieve this, developers often rely on specialized functions like get_bloginfo() or leverage the vast capabilities of the WordPress API to access and manipulate author-related data. These methods offer a high degree of flexibility, allowing developers to tailor the presentation of this information to suit the website’s unique design and content needs.

<?php echo get_bloginfo(); ?>

For instance, developers can integrate the author’s biography into the author’s profile, providing readers with a richer understanding of the author’s background, expertise, and interests. Furthermore, they can include this information at the conclusion of each post, establishing a deeper connection between the author and the content. Additionally, the information can be showcased on a dedicated author archive page, offering a comprehensive view of an author’s contributions to the website.

The act of displaying author information in such a manner is not merely a technical task; it is a user-focused feature that significantly enhances the overall user experience. By introducing the human element of the author, readers can relate on a more personal level, fostering engagement and loyalty. This added layer of transparency and authenticity not only enhances the aesthetics of the website but also strengthens the sense of community and trust, ultimately leading to a more immersive and gratifying WordPress website or blog experience.