Posted on Leave a comment

How to Remove WordPress Robots Meta Tag noindex Updated

How to Remove WordPress Robots Meta Tag noindex Updated

WordPress is a dynamic platform that evolves with each update, making it essential for website owners and developers to stay current with best practices. One important aspect of optimizing your WordPress website for search engines is managing the Robots Meta Tag. This tag instructs search engine crawlers on how to index your site’s pages. To ensure your website is always up-to-date and functioning correctly, it’s important to use the latest techniques. In this article, we’ll guide you through the process of removing the noindex directive from your WordPress site’s Robots Meta Tag and show you the most current methods.

Step 1: Removing the Robots Meta Tag from WordPress

The first step is to remove the noindex directive from the Robots Meta Tag. This tag is often used to prevent search engines from indexing specific pages or entire websites. Here’s how you can do it:

  1. Log in to your WordPress admin dashboard.
  2. Navigate to your theme’s functions.php file. You can find it under “Appearance” -> “Theme Editor” in the WordPress dashboard.
  3. In the functions.php file, scroll to the bottom to ensure that your code does not interfere with existing functions or features. It’s best practice to create a child theme if you’re not already using one.
  4. Add the following code to remove the noindex directive from the Robots Meta Tag:
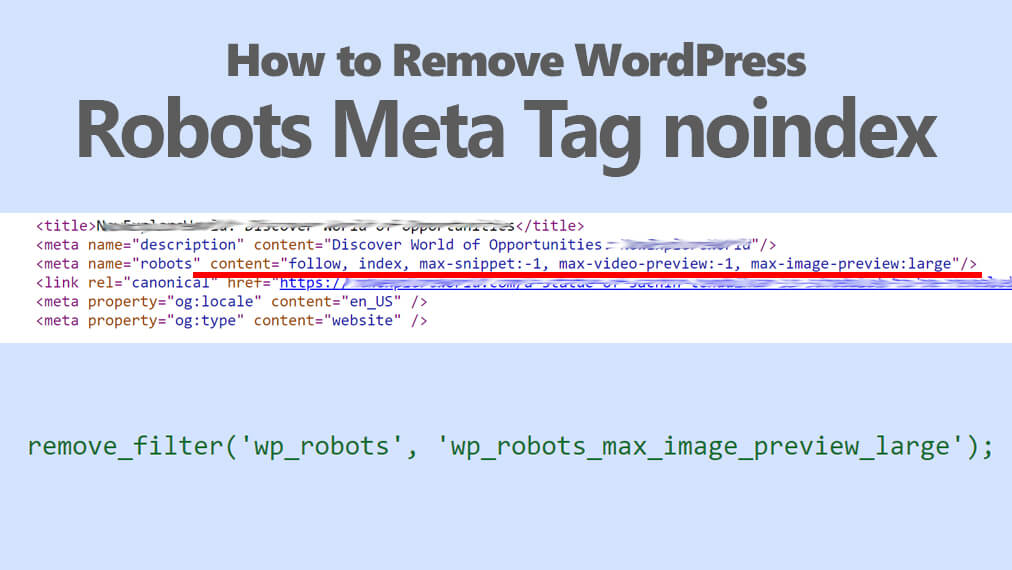
remove_filter('wp_robots', 'wp_robots_max_image_preview_large');

This code will override the default noindex directive and instruct search engines to follow and index your pages. Make sure to save the changes.

Step 2: Adding the Robots Meta Tag Manually

Once you’ve removed the noindex directive using the code mentioned earlier, you might also consider including a customized Robots Meta Tag on particular pages or posts. This will grant you more precise control over how search engines handle the indexing of your content.

To implement this, access the WordPress theme folder and locate the header.php file. Open this file and place the following code snippet right after the <meta charset="<?php bloginfo( 'charset' ); ?>"> line:

Find the <head> section within the HTML code.

Within the <head> section, insert the following code snippet:

<meta name="robots" content="follow, index, max-snippet:-1, max-video-preview:-1, max-image-preview:large"/>

This code imparts the same directives as described in the preceding step, ensuring that search engines appropriately follow and index the content specific to this page.

Conclusion

Optimizing your WordPress website for search engines is an ongoing process, and managing the Robots Meta Tag is an essential part of it. By using the latest techniques and WordPress hooks, you can effectively remove the noindex directive and control how search engines index your site. Remember to regularly check for updates in WordPress and keep your theme and plugins up to date to ensure that your code works seamlessly. With these steps, you’ll have greater control over how your WordPress website appears in search engine results pages, ultimately improving its visibility and discoverability.

Posted on Leave a comment

Adding Next and Prev Meta Tags to WordPress Without a Plugin

Search engines play a crucial role in driving traffic to your WordPress website. To improve your site’s search engine optimization (SEO) and help search engines understand the structure of your content, it’s essential to include meta tags that indicate the relationships between different pages. One such pair of meta tags are “next” and “prev,” which indicate the order of paginated content. In this article, we’ll guide you through the process of adding next and prev meta tags to your WordPress site without using a plugin.

Why are Next and Prev Meta Tags Important?

Next and prev meta tags are essential for websites that have paginated content, such as blog posts, product listings, or article archives. These tags help search engines understand the logical sequence of pages in a series, ensuring that they’re properly indexed and presented in search results. They also enhance the user experience by providing clear navigation options for readers to move through paginated content.

Adding Next and Prev Meta Tags in WordPress

Here’s a step-by-step guide to adding next and prev meta tags to your WordPress website:

  • Access Your Theme’s Header File: You’ll need to access your WordPress theme’s header.php file. This file is located in your theme’s directory and is used to define the structure of your website’s header section.
  • Backup Your Website: Before making any changes to your theme files, it’s a good practice to back up your website. This ensures you can easily restore your site in case anything goes wrong during the editing process.
  • Edit the header.php File: Open the header.php file in your preferred code editor. You can access this file through your WordPress dashboard by navigating to “Appearance” > “Theme Editor” and selecting the header.php file.
  • Add Next and Prev Meta Tags: In the <head> section of your header.php file, add the following code:
<link rel="prev" href="<?php echo get_previous_posts_page_link(); ?>" />
<link rel="next" href="<?php echo get_next_posts_page_link(); ?>" />

These lines of code use WordPress functions to generate the appropriate URLs for the “prev” and “next” tags. They will automatically point to the previous and next pages of paginated content.

  • Save Your Changes: After adding the code, save the changes to your header.php file.
  • Test Your Website: Visit your website and navigate to paginated content, such as the second page of a blog post series. View the page source (usually by right-clicking and selecting “View Page Source” in your browser) and ensure that the next and prev meta tags are correctly included in the HTML head section.
  • Check Your SEO: You can use various SEO tools and services to check the SEO status of your website and verify that the next and prev meta tags are being recognized by search engines.

Adding Condition Next and Prev Meta Tags

Integrate a PHP conditional statement to control the display of Next and Prev Meta Tags based on the availability of the next or previous page. This practice of selectively showing or hiding these tags is beneficial for optimizing user experience, as it minimizes unnecessary clutter and simplifies the navigation process. For example, it’s best to only present “Next Page” or “Previous Page” links when additional pages are accessible for navigation.

Let’s dive into a simple example of how to implement conditional Next and Prev Meta Tags using PHP.

<?php
if(get_query_var('paged')>=1){
?><link rel="prev" href="<?= previous_posts($wp_query->max_num_pages, false) ?>"/>
<?php
}
if(get_query_var('paged')<$wp_query->max_num_pages){
?><link rel="next" href="<?= next_posts($wp_query->max_num_pages, false) ?>"/><?php
}
?>

Conclusion:

Adding next and prev meta tags to your WordPress website without using a plugin is a straightforward process that can enhance your site’s SEO and user experience. By allowing search engines to understand the structure of your paginated content, you improve your chances of ranking higher in search results and provide a better navigation experience for your readers. This simple customization ensures that your WordPress site is better equipped for SEO, and it’s something you can easily do yourself with just a little knowledge of HTML and WordPress theme files.

Posted on Leave a comment

WordPress echo or get Current Page Number

WordPress echo or get Current Page Number

If you’re using a custom theme in WordPress and you want to get the current page number or modify your meta tags, you can achieve this through custom development. Here’s how you can approach both tasks

Get the Current Page Number

To get the current page number in WordPress, you can use the get_query_var('paged') variable. This is often used in combination with the main query or a custom query on your page template. For example:

<?php
$paged = (get_query_var('paged')) ? get_query_var('paged') : 1;
echo $paged;
?>

This code sets the get_query_var('paged')variable to the current page number. You can use this variable to control the content you display on different pages of your site.

Modify Meta Tags

To modify meta tags in your custom theme, you would typically want to customize the header of your theme. You can do this by creating a child theme online free or modifying your custom theme directly.

Here are the steps to modify meta tags:

  • Locate the header.php file in your theme directory.
  • Inside the <head> section of the header.php file, you can add or modify meta tags. For example, to add a custom description meta tag:
<title>Dipankar Baidya Author at - <?php if(get_query_var('paged')=='0'){}else{echo ' - Page '.get_query_var('paged');} ?><title>

To dynamically modify meta tags based on the currently displayed page, conditional statements and WordPress can be employed. It’s worth noting that the code provided previously does not differentiate page numbers; it displays the same content for all page numbers.

In the provided code snippet, we’re examining whether the current page is a single post or a loop page, such as a category page, author page, or tag page. We then dynamically adjust the page title to suit the context.

Please bear in mind that when making alterations to your theme’s code, it’s essential to exercise caution. It is highly advisable to implement changes using a child theme to prevent your modifications from being overwritten during theme updates. Additionally, always maintain a backup of your website before embarking on substantial theme modifications.