Many of my friends are avid users of the free version of the GeneratePress theme, and they are keen on incorporating some basic customizations into their themes. In this blog post, I’m excited to provide you with a comprehensive guide on this very subject. The time for this exciting transformation is just around the corner!
Similar to our own experience with the free version of GeneratePress, there’s a common desire to display related articles on our blog pages. The good news is, you can achieve this without the need for any plugins or third-party tools. I’ll walk you through the process of seamlessly integrating related articles directly into your theme. The necessary code can be found in this post, making implementation a breeze.
The significance of having related articles for SEO cannot be overstated. When users click on a single blog post and discover related articles on the same page, it greatly enriches their browsing experience. Sure, you can display the latest articles in the sidebar, but our goal is to have the blog page automatically identify related articles based on keywords. In this post, I’ll provide you with the script and a clear explanation of where to integrate it. So, stay tuned for more, my friends.

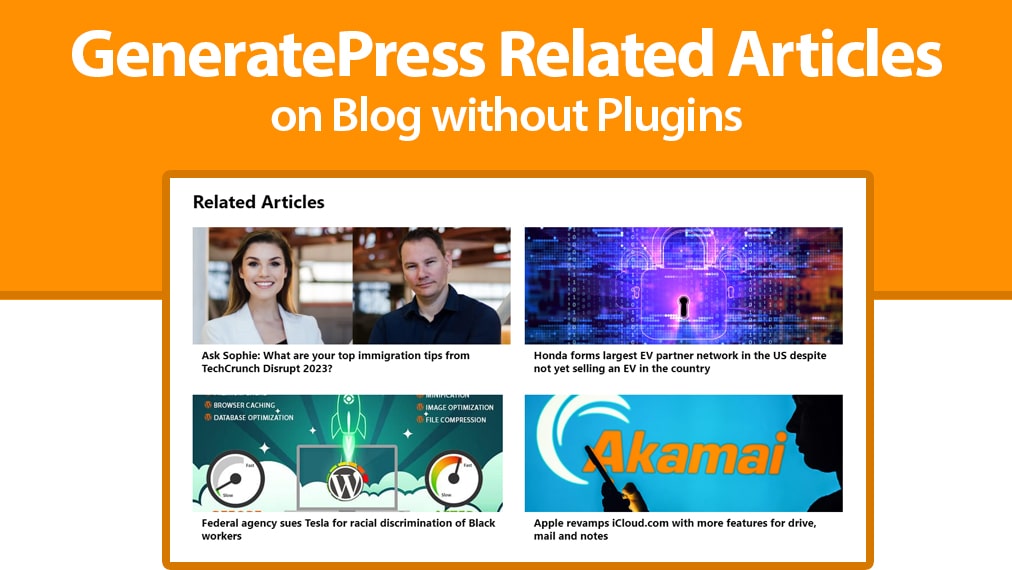
The accompanying image illustrates how our related articles look with a customized CSS style. I’ve detailed the process of creating and displaying related articles in this visually appealing manner. If you’re eager to add this feature to your GeneratePress free theme, then this blog is tailored just for you. You can access the full source code on our website.
Before we dive into the technical steps, I’ve gone ahead and crafted a child theme for GeneratePress. If you’d like to explore it further, you can take a peek at the live preview and even make a purchase if it piques your interest. Here’s the link to check it out.
Now, let’s get to work. First, you’ll want to copy the code enclosed within the “inside-article relate_post” div class in your blog post. Then, navigate to the theme folder of your GeneratePress theme. Inside this folder, you’ll locate a file named “content-single.php.” Scroll down to the very bottom of that file and paste the aforementioned code snippet.
<div class="inside-article relate_post">
 <h2>Related Articles</h2>
   <div class="entry-content" itemprop="text">
    <ul class="wp-block-latest-posts__list is-grid columns-2 wp-block-latest-posts">
     <?php
       $related = get_posts( array( 'category__in' => wp_get_post_categories($post->ID), 'numberposts' => 4, 'post__not_in' => array($post->ID) ) );
     if( $related ) foreach( $related as $post ) {
         setup_postdata($post); ?>
            <li>
             <a href="<?php the_permalink() ?>" rel="bookmark" title="<?php the_title(); ?>">
               <?php echo get_the_post_thumbnail(); ?>
            <h3><?php the_title(); ?></h3></a>
          </li>
         <?php }
        wp_reset_postdata();
       ?>
   </ul>
 </div>
</div>
This step essentially involves the copying and pasting of source code into your “content-single.php” file. Once you’ve accomplished that, save the file and refresh the page to ensure the source code harmonizes with the GeneratePress theme.
After confirming that it works, the next step is to append some additional code to your style sheet, “style.css.” Open the file and insert the following CSS code at the bottom or your preferred location:
.relate_post h2{
font-weight: 700;
font-size: 2rem;
color: var(--genPro-black);
}
.relate_post li{

}

.relate_post ul li{
border-bottom: 2px solid #f1f1f1;
height: 19rem;
padding: 0rem;
overflow: hidden;
}
.relate_post img{
height: 13rem;
object-fit: cover;
}
.relate_post h3{
font-size: 1.2rem;
color: var(--genPro-black);
font-weight: 700;
padding: 0px 1rem;
}
.relate_post ul li:hover{
background: var(--genPro-white);
box-shadow: 0px 8px 20px rgba(94, 86, 70, 0.1);
}
With these actions completed, refresh the page once more. You’ll now witness the Related Articles section appearing right after your blog content, showcasing all the related articles beautifully.
I assure you that the source code provided in this blog will function as intended. My aim is to share personal projects and valuable source code with you, assisting you on your journey.
Also, I have a YouTube channel, and I’ll include the link within this blog. If you find my content helpful, please consider subscribing and supporting me there.
As a freelancer, I specialize in crafting websites, be it for blogging or e-commerce. If you’re in need of a well-designed, fast-loading website, please don’t hesitate to reach out. The contact information is conveniently located on the top right corner of this page. Simply click there, fill out the form, and I’ll get back to you within 1 to 2 hours to address any inquiries or concerns you may have. I’m here to assist, my friends.