Google Forms stands as the leading web-based survey instrument, accessible at no cost. Nonetheless, when faced with extensive data input tasks, its support may prove limited. In lieu of employing Google Forms, you have the option to create a custom data entry form utilizing Google’s HTML Service.
Within this article, I will demonstrate the process of crafting a basic data entry form using Google Apps Script and subsequently transmitting the gathered data into Google Sheets.
Step 1: Formulating the HTML Form
Below, you’ll find the complete code for the Contact Form along with instructions on managing the submission process.
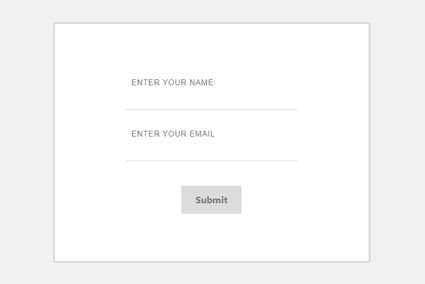
Launch an empty file in your preferred programming text editor. Copy and paste the code provided below, then save the file using the [.html] extension. Our choice was to name it index.html (or any name you prefer), and don’t forget to include the Ajax integration script as well.
<!DOCTYPE html>
<html lang="en">
   <head>
      <title>Google Sheet Submit</title>
      <meta name="viewport" content="width=device-width, initial-scale=1">
      <link href="//maxcdn.bootstrapcdn.com/bootstrap/4.1.1/css/bootstrap.min.css" rel="stylesheet">
      <script src="//cdnjs.cloudflare.com/ajax/libs/jquery/3.2.1/jquery.min.js"></script>
      <script src="//maxcdn.bootstrapcdn.com/bootstrap/4.1.1/js/bootstrap.min.js"></script>
      <style>
         body{
            background: #f1f1f1;
         }
form {
   border: solid #d8d8d8 3px;
    border-radius: 4px;
    width: 60%;
    margin: 60px auto;
    background: #ffffff;
    padding: 60px 120px 80px 120px;
    text-align: center;
}
label {
  display: block;
  position: relative;
  margin: 40px 0px;
}
.label-txt {
  position: absolute;
  top: -1.6em;
  padding: 10px;
  font-family: sans-serif;
  font-size: .8em;
  letter-spacing: 1px;
  color: rgb(120,120,120);
  transition: ease .3s;
}
.input {
  width: 100%;
  padding: 10px;
  background: transparent;
  border: none;
  outline: none;
}

.line-box {
   position: relative;
    width: 100%;
    height: 3px;
    background: #efefef;
}
.line {
  position: absolute;
  width: 0%;
  height: 2px;
  top: 0px;
  left: 50%;
  transform: translateX(-50%);
  background: #00b9b1;
  transition: ease .6s;
}
.input:focus + .line-box .line {
  width: 100%;
}
.label-active {
  top: -3em;
}
button {
  display: inline-block;
  padding: 12px 24px;
  background: rgb(220,220,220);
  font-weight: bold;
  color: rgb(120,120,120);
  border: none;
  outline: none;
  border-radius: 3px;
  cursor: pointer;
  transition: ease .3s;
}
button:hover {
  background: #00b9b1;
  color: #ffffff;
}
#msg{
	color:red;
}
      </style>
   </head>
   <body>
<div class="container">
<div class="row">
   <div class="col-md-12">
      <div class="col-md-10 offset-1">
         <form method="post" id="formName">
            <label>
               <p class="label-txt">ENTER YOUR NAME</p>
               <input type="text" class="input" name="name" required>
               <div class="line-box">
                  <div class="line"></div>
               </div>
            </label>
            <label>
               <p class="label-txt">ENTER YOUR EMAIL</p>
               <input type="text" class="input" name="email" required>
               <div class="line-box">
                  <div class="line"></div>
               </div>
            </label>
            <button type="submit" id="btnSubmit">Submit</button>
          <div id="msg"></div>
         </form>
         </div>
   </div>
</div>
</div>

	  <script>
	  jQuery('#formName').on('submit',function(e){
		e.preventDefault();
		jQuery('#msg').html('Please wait...');
		jQuery('#btnSubmit').attr('disabled',true);
		jQuery.ajax({
			url:'https://script.google.com/macros/s/AKfycbzL5c0j3kpnEqKlL3OsIsIlU3uSuLx3Nb1yr6rvThPQH9EukBd9LFfNcq_MA1utbBbcjw/exec',
			type:'post',
			data:jQuery('#formName').serialize(),
			success:function(result){
				jQuery('#formName')[0].reset();
				jQuery('#msg').html('Thank You');
				jQuery('#btnSubmit').attr('disabled',false);
            setTimeout(function(){
               window.location.href='index.html';
            }, 1000);
         }
		});
	  });
	  </script>
   </body>
</html>
Step 2: Establish a Fresh Google Sheet
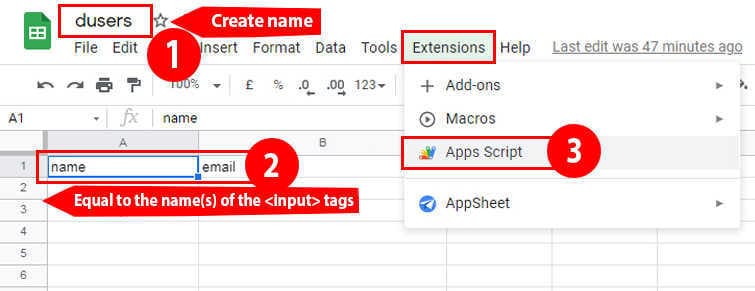
Generate a new Google Sheet and insert column headers, mirroring the arrangement depicted in the image below. Designate the sheet with a name of your preference.
Keep in mind: Write the column headers to match the name(s) of the <input> tags.
Step 3: Develop a Google Sheets Apps Script
To achieve this, we must establish a connection between our script and the form. Open the Google Apps Script editor from within the Google Form.
You can accomplish this by clicking the vertical ellipsis located at the top-right corner of the Google Form editor. Then, navigate to Script editor by following this path: Extension → Apps Script.
Step 4: Create Code.gs
You can directly copy and paste this code into your project without making any changes or edits.
Typically, you have the flexibility to alter the project name (Untitled project) to a name of your choice. Consider naming the project similarly to your Form or Sheet if they are closely related.
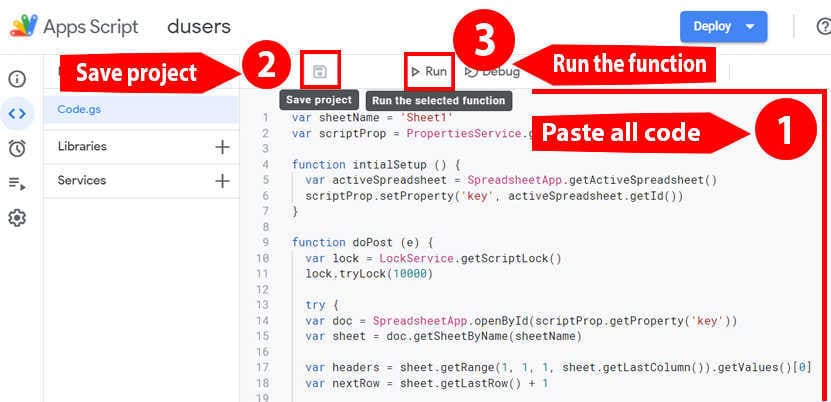
Clear or remove the contents within Code.gs and then insert the provided code below.
var sheetName = 'Sheet1'
var scriptProp = PropertiesService.getScriptProperties()
function intialSetup () {
  var activeSpreadsheet = SpreadsheetApp.getActiveSpreadsheet()
  scriptProp.setProperty('key', activeSpreadsheet.getId())
}
function doPost (e) {
  var lock = LockService.getScriptLock()
  lock.tryLock(10000)
  try {
	var doc = SpreadsheetApp.openById(scriptProp.getProperty('key'))
	var sheet = doc.getSheetByName(sheetName)

	var headers = sheet.getRange(1, 1, 1, sheet.getLastColumn()).getValues()[0]
	var nextRow = sheet.getLastRow() + 1

	var newRow = headers.map(function(header) {
	  return header === 'timestamp' ? new Date() : e.parameter[header]
	})

	sheet.getRange(nextRow, 1, 1, newRow.length).setValues([newRow])

	return ContentService
	  .createTextOutput(JSON.stringify({ 'result': 'success', 'row': nextRow }))
	  .setMimeType(ContentService.MimeType.JSON)
  }
  catch (e) {
	return ContentService
	  .createTextOutput(JSON.stringify({ 'result': 'error', 'error': e }))
	  .setMimeType(ContentService.MimeType.JSON)
  }
  finally {
	lock.releaseLock()
  }
}
Next, proceed to Run → Run Function → initialSetup to execute this function.
In the “Authorization Required” dialogue box, click on “Review Permissions.”
Now, you can either Sign in or select the Google account linked to this project.
Click on “Allow.”
Step 5: Publish the project as a web app

Compose a description as desired and set the Project Version to “New.” Insert the initial version into the input field provided.
Keep “Execute the app as:” configured as “Me([email protected]).”
Under “Who has access to the app:”, choose “Anyone, even anonymous.”
Click on “Deploy.”
In the popup window, copy the Current web app URL from the dialogue and then click “OK.”
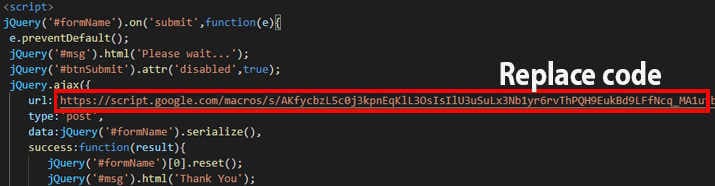
Step 6: Substitute Web App URL in HTML Form (from Step 1)
Access the file named index.html. Locate the line containing “url” and replace <SCRIPT URL> with the URL of your script, which you have just created.
The provided code lacks form validations and additional functions. Collaborate with us to craft an error-free code. Remember, for your crucial fields, incorporate data validation mechanisms.
Conclusion:
Throughout this tutorial, we delved into the creation of a personalized email responder, which activates upon the submission of a Google Form. We explored the process of incorporating triggers to execute our code upon form submission. Moreover, we ensured the proper addition of permissions and scopes to facilitate seamless code execution. Additionally, we integrated the Gmail API advanced service to access our signature block. It’s worth noting that the provided code is compatible with localhost setups; I’ve personally implemented it on my local computer’s localhost.
If you found value in this tutorial and wish to stay updated on my forthcoming projects, feel free to subscribe below this post.